This year (2017), we are working on expanding our flocks and taking on new breeds. Our goal is to create three “families” (or clans) per breed of chickens that we raise. This enables us to preserve genetic diversity without needing to import “new blood” every couple of years. We have a large garden (1800 square feet) and are cross fencing it into interior pens with hoop coops ringing the exterior while reducing the area we’ll use to raise food. This past week, we spent a few days building the prototype coop. We are thrilled with the results, as are the lucky Light Sussex birds who giving it its shakedown cruise. Come, take a peek!
General Parameters
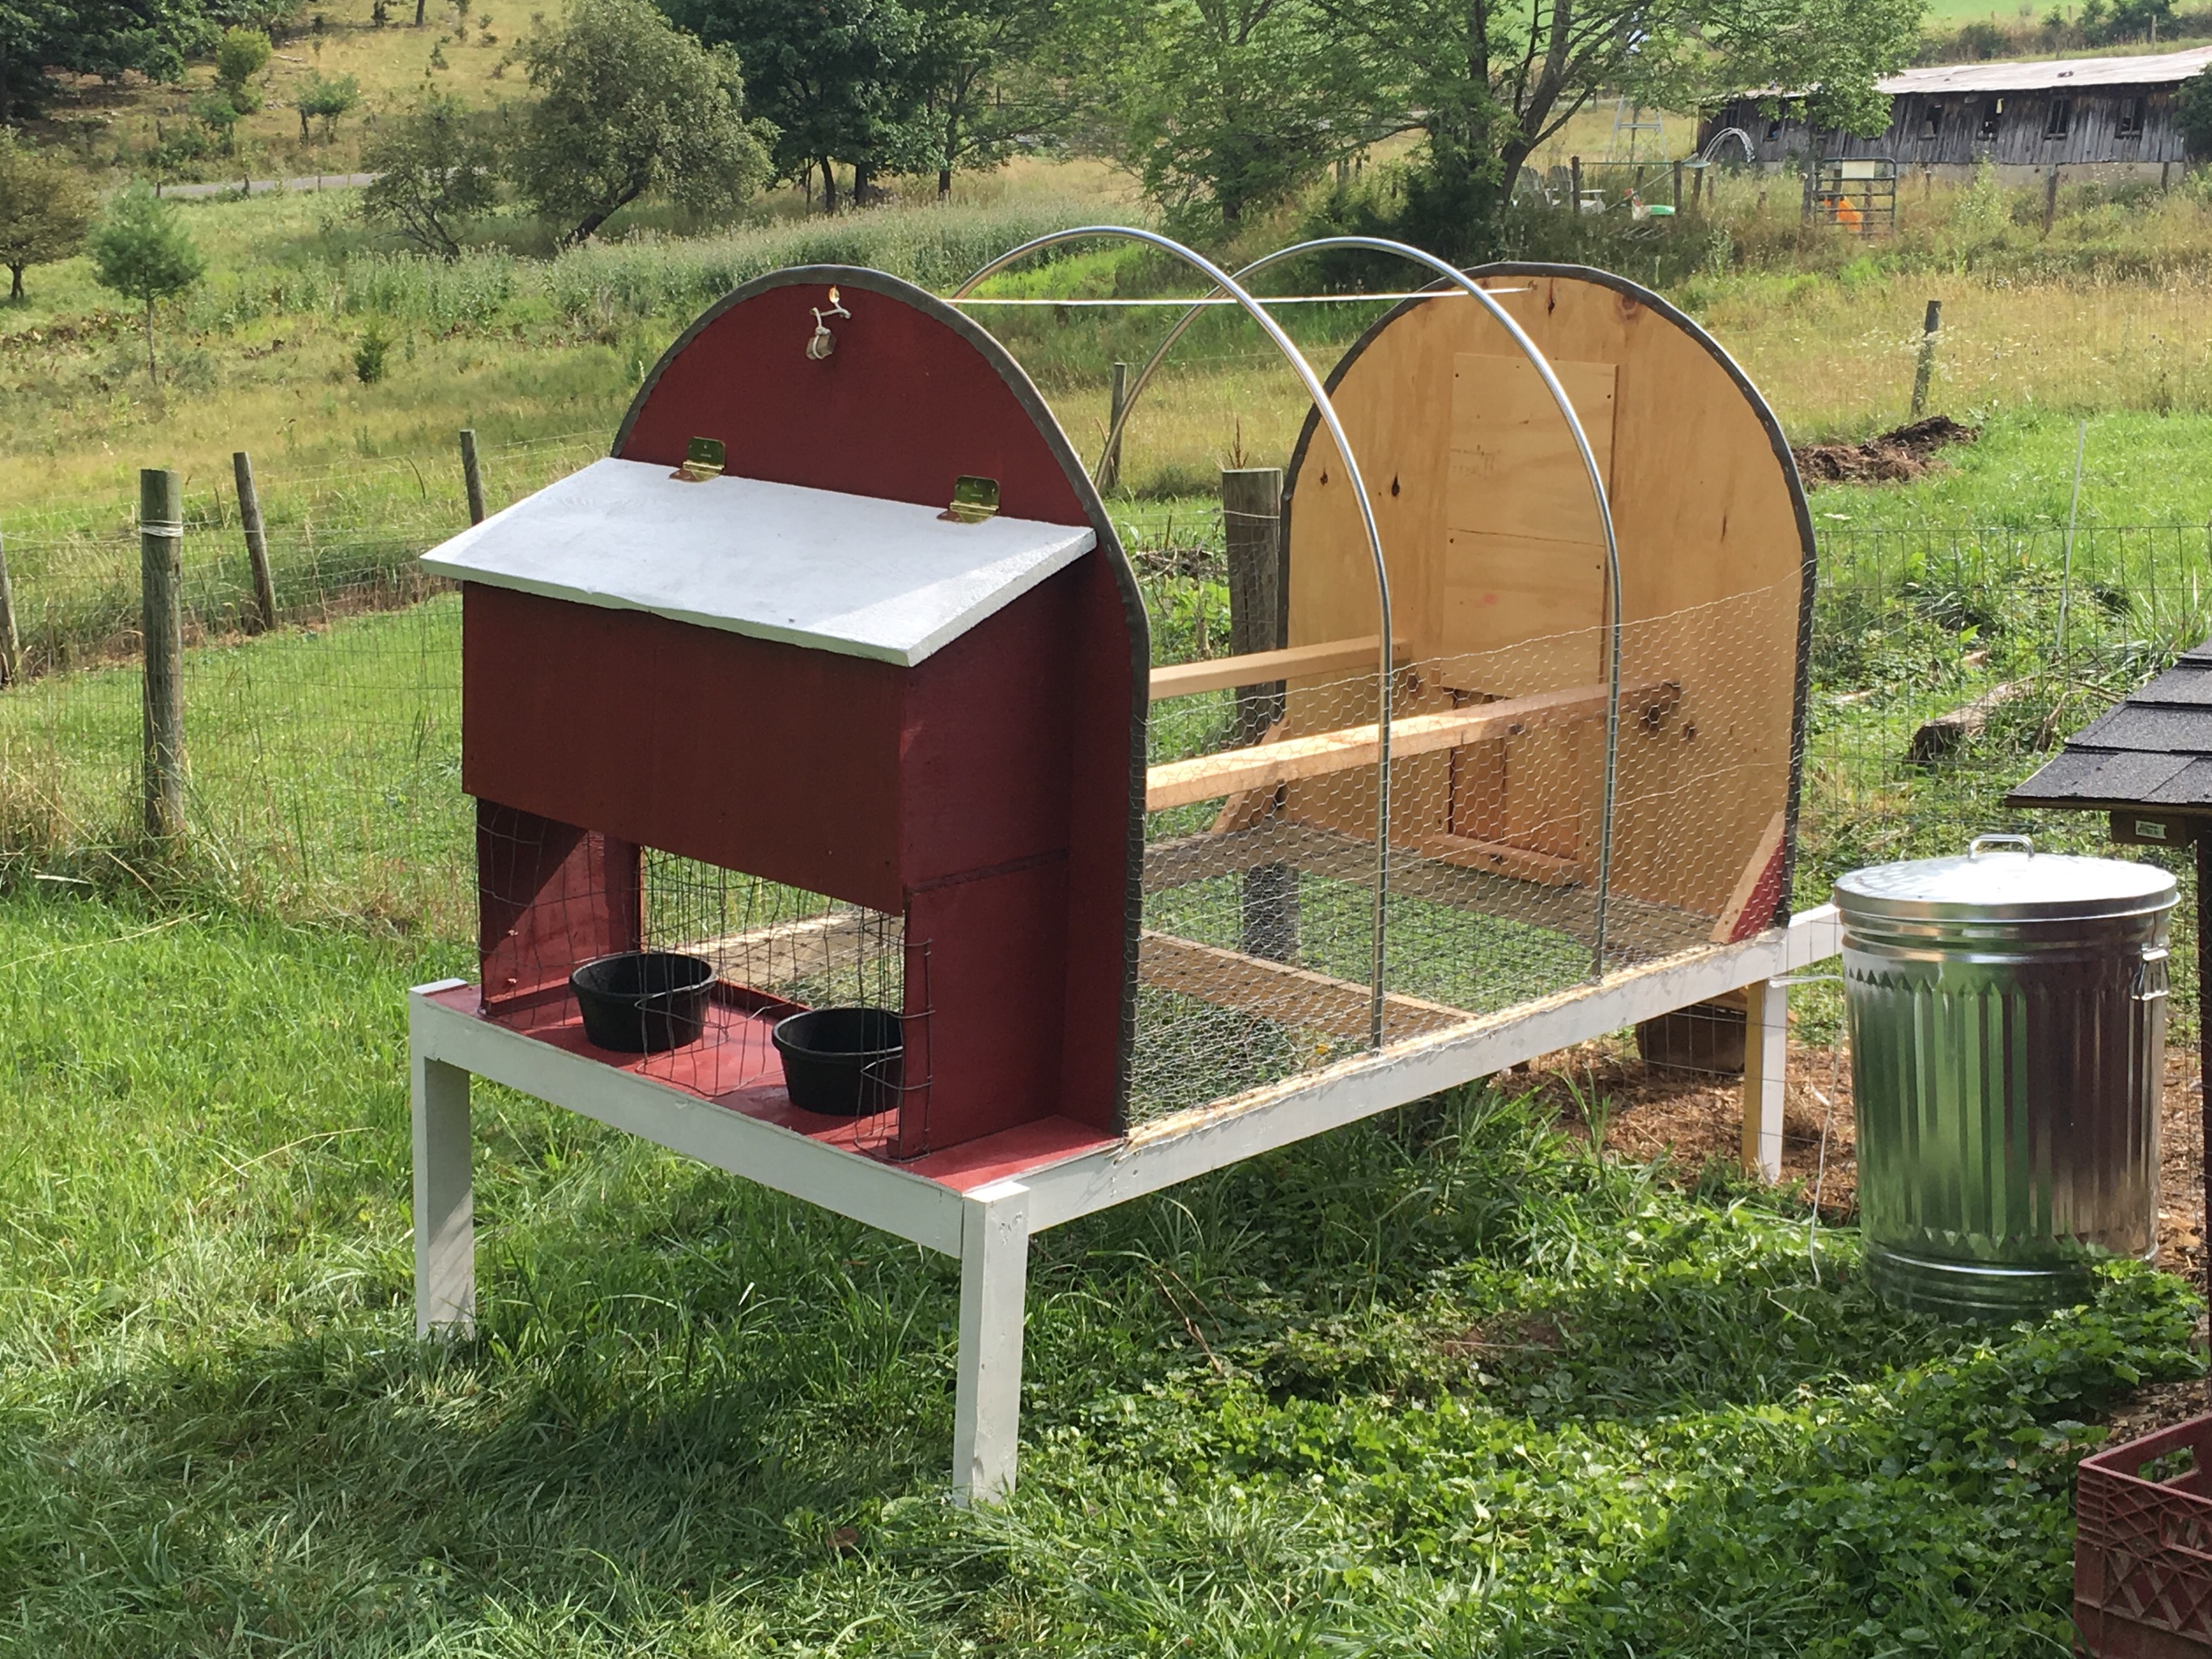
This coop’s wire floor is 4′ x 6′. It has two 6′ long 2 X 4 perches (mounted sideways so birdies can tuck their toes in on cold winter nights). It has three nesting boxes, and below these is a food and water station. We plan to put 6 birds (one cock and five hens) in each of these coops, but its maximum size according to normal chicken math (because they will have outdoor space as well) is 12 large fowl.
Both ends of this coop are made from one 4′ X 8′ sheet of exterior grade 1/2″ plywood. We paint the edges, and then encase them in old garden hose shells (or duct tape) in an effort to preserve their life span. The middle two ribs of the coop are made from bent 10′ metal conduit. These are attached by setting them atop 10″ carriage bolts and wiring them to poultry netting. They end up being slightly taller than the ends, but this helps shed rain and snow, so we don’t cut them down. The nesting boxes/feed stand are all made from an additional half-sheet of exterior grade 1/2″ plywood.
About Tarps

In the prototype design, a silver tarp covered the coop, providing shade in the summer and protection from drafts in the winter. While this will work great, sometimes necessity is the mother of invention! We ordered 7′ X 10′ tarps, but (surprise, surprise) those are not the finished dimensions of the tarp — oh, no! They are actually 6′ 5″ X 9′ 6″. Grrrrr~ Let the imitator of our coop beware!
Luckily, I know how to sew, and I had some heavy duty vinyl left over from a different project. I cut the tarp and sewed in a clear panel (see picture right). We carefully considered how high this panel should go. We wanted to have plenty of shade for the birds in hot summer weather, but allow sunlight in (for warmth and increased egg laying) in the winter.

My husband calculated beautifully. The clear panel is south facing, and the high summer sun barely kisses the uphill perch, while leaving more than half of the coop in shade. In the winter, the sun will slant lower, filling the coop with light and warmth for much of the day, yet the birds can still go outside if on those rare, freaky days it gets too hot.
Yay for mistakes, huh? (If you are imitating us but don’t sew, a wee bit more expensive (but effective) option would be to purchase a clear tarp and an opaque one, and lap them so that the clear tarp would show similarly to the picture, right. (We have tried duplicating the sewing results with duck tape, and it doesn’t work, alas.)
 More recently, we have made a great discovery for non-sewers, though! We have used a corrugated plastic panel and put the tarp over top. It works great! On the left is a pictur of one in production.
Under the tarp (as you can see in the picture at the top of this post) the coop has 24″ poultry netting lining both sides of the tarped area. The wire is laced to the conduit ribs (stabilizing both wire and ribs). This netting adds a layer of protection for the birds (especially at night) from raiders — around here, it’s usually raccoons — and also allows us to safely raise the tarp six inches or so on hot summer nights so that breezes can cool the coop. We considered putting netting all the way around the hoops, but rejected it because we wanted a way to access the coop (without installing a door) for winterizing. When we need to get inside the coop body (for winterizing, say, or to do deep cleaning in spring), all we do is shoo the birds out into their pen, close the pop door, remove the tarp, and work on the coop.
One more note on tarps: the one pictured advertized grommets every 18″. This is fine on the sides of the coop, but not good enough for the front and back (the 10′ sides). In these pictures, you can see the tarp as it came to us. However, my plan is to install grommets every 9″ on the next tarp we use. They are easy to put in — no sewing required! You can get grommets at some hardware stores, but even more reliably at sewing supply (fabric) stores.
Mobile or Not: Your Choice~
We are making these coops stationary, mounting them 18″ above the ground around our garden perimeter, but they are easily modified to become chicken tractors by adding wheels to the back side floor framing and repositioning the wire floors, attaching them to the bottom of the floor framing instead of on top, as we did. Such tractors would be light weight and can be easily moved by one person, especially if one added a cross piece between the two front “handles.” I am 5′ 2″ and, though I can carry this coop with my husband, I cannot reach the 4′ span. A cross piece here and wheels in the rear would make moving this coop a breeze, even for me!

In our application, we’ve cut a hole in our garden fence the size of the pop door. (If your eye tells you that the coop is not quite level or lined up, you are accurate! What you need to know is that the land is sloping quite a bit and the garden fence follows the lay of the land. The coop floor — and perches and nesting boxes — are level.)
We first intended that the ramp would be the door. However, in refining our design, we came up with the current design (of standing at the back of the coop and operating the door from there) so the ramp became stationary. Therefore, on this version, we filled in the space we had first cut out with a piece of plywood, and then painted it red. In future versions, the cut out will be 1′ square, so the front will be solid except for that low opening. You could build this coop either way, or without any ramp at all, if it functions as a chicken tractor and sits on the ground.
We cut another another hole in our garden fence under the pop door and put wire to the ground under the coop’s frame so that our birds get even more space to enjoy that is shaded: under the coop! This has the added benefits of 1) more greens for the birds, 2) less trouble for my husband to mow, in summers, 3) the dogs can’t run under the coop for shade and scare the chickens half to death, and 4) in winter, the ground under there stays clear of snow so the chickens can get out more often! Word of advice, though. When introducing (especially young) birds to the coop, don’t allow them under it at first or you’ll have a hard time training them to go in at night! (Ask me how I know this… no, don’t.)
Stand in One Place and Do All the Chores? Yes, Please!
 To continue: the coop’s pop door that is operated from the coop’s back side by a clothesline. The farmer, standing in front of the nest box and feeding station at the coop’s back, can 1) collect eggs, 2) open/close the pop door, and 3) feed and water the coop’s occupants.
We prefer to hand water, feed, and regulate the door ourselves daily (morning and evening) because we both battle rats and don’t trust automation. However, one could rig these coops with an automatic pop doors and watering systems, or bucket waterers.
There are two details to notice about how the pop door cord was constructed:

1) On the front of the coop, we were concerned about how the cotton cording would hold up, and/or operate when wet, if we just ran it through the hole without a pulley. Unfortunately, we couldn’t find a pulley that mounted easily the right way. In the end, we used a 1/2″ PVC elbow (pictured right) as a guide/preserver of the cording when running the line up from the pop door and through the drilled hole in the front face of the coop.

2) As you can see in the detail picture at the left, the line that then comes through the space at the top of the hoop coop (under the tarp) exits through a hole at the back and is cleated around two screws. (Be sure to put those screws about 6″ down from the top, or you’ll be fighting with the tarp each time you use it!) Because there is no downward pressure on the line in this area, we didn’t need to put the same PVC elbow, but we did insert a wooden toggle so that, when the cord shortens as the door is closed, the line can’t disappear into the coop.
Feed and Water Station Details
We prefer to not use electricity to heat water in the winter, so we have these shallow, thick yet flexible, rubber feed and water bowls (see below) which are easily dumped when frozen. In the dead of winter, I will use a wagon and go down the row of coops, popping out frozen water and replacing it with heated water morning and evening at least, and sometimes at noon. However, again, one could put a small nipple bucket with heater in the feeding area.

The bowls are wired off from the birds with 2″ X 4″ galvanized field fencing, curved in an “double S” format. The wire spaces are plenty wide for adult birds to put their heads through for feed/water, but do not allow for scratching of food or sitting on the water. (They can and do still fling it some, though.) This makes for less waste of food and purer water for longer.
Notes: Chickens regurgitate when they drink, so the water still needs changing morning and evening. Also, very young birds can go through these wire spaces. If I were housing juveniles in these coops, I would put a wooden panel on the back of the feeding station and remove the wire barrier until the babies were big enough that they couldn’t go through it.

I dump the unused feed back into my metal trash can each night (even brushing spilled feed in as well) so that varmints have nothing to eat here. With the tarp in place, and nesting boxes above, shade keeps the water bowl from growing algea, and the overhang keeps food from being spoiled during rainstorms. I painted the floor of the feeding area in an effort to preserve the life of the plywood. If I was making this a chicken tractor, I think that I would put a lip on its back so that when I moved it, the bowls would stay put.
Nesting Boxes

The coop is designed for a family of 6-8 birds on our farm, but as I said above, you could house 12 here. With more than 6 hens, though, it might get a little tight when it comes to nest boxes. Because we anticipate housing only 5-6 hens and one rooster most of the time, we chose to provide three nest boxes. In our experience, multiple hens often choose to use the same box no matter how many are provided. We often find three to four eggs in one favorite box among our laying flock, but that is up to the hens!
The general rule of thumb is to provide one box for every two hens. Our boxes are raised, which laying hens prefer, and the lip in front of them keeps the shavings that we put there to help with egg cleanliness in the boxes, and not falling through to the floor. We do have hens that will sleep in the nesting boxes, so they do need cleaning out regularly (not my favorite farm chore) but that’s so with every nesting box we’ve ever built.
Winter Modifications
 We live in the mountains of WV, where temperatures do go to zero in some months of the winter. In the fall, staple feed bags or landscaping cloth over the wire floor of the coop and fill it with dried fall leaves and wood shavings to a depth of 4″. Deep litter will result, insulating and remaining in the coop until spring (with monthly additions), when we will remove the barrier and the coop will become self cleaning again.
In winter, we also staple a clear vinyl flap or landscaping cloth to the back of the feeding/water area in order to cut the flow of winter winds into the coop. It’s great to have the vinyl in the back and on the side so that I can look out at any time and see how my chickens are doing, but an opaque landscaping cloth flap works just as well. In the picture at the right, you see that we added a landscaping cloth skirt. This was actually added in summer because this run had zero shade. But, as winter came on, we left it there for added protection against the cold, both in daytimes and at night.
You can get more detailed information about winterizing in this post.
Want More Information?
 How do you like our design? Do you have any improvements to suggest? Got any questions you’d like to ask? Leave them in comments.
Update: We’ve now constructed seven of these coops, and have used them for over 6 months. We are thrilled with the results, so we’ve written up a detailed set of plans for those who are interested!
If you would like to purchase plans, click here. They are $25/set (delivered via PDF), have lots of detailed step-by-step instructions and pictures, and include a bill of materials.
The basic cost to construct one of these coops depends on how many of the materials you have on hand, and how much you need to buy, and where you live. For instance, you only need 6′ of four-foot galvanized wire per coop, but wire is sold in minimum rolls of 25′. If you’re just building one coop, that’s expensive wire! If you’re building eight coops, it’s cheap. (The good news on this wire is that you can also use it for the birds’ run as well.)
A ballpark figure for all materials purchased new, but assuming that you have tools needed for assembly, is in the neighborhood of $75-$100. (We’re building 12 of them, and they are costing us more like $60 apiece.)