I love our goats, with all their antics and fun moments. But I probably love kidding season best. Recently, I turned a few of my favorite birthing photos into paintings. Enjoy these precious memories with me!
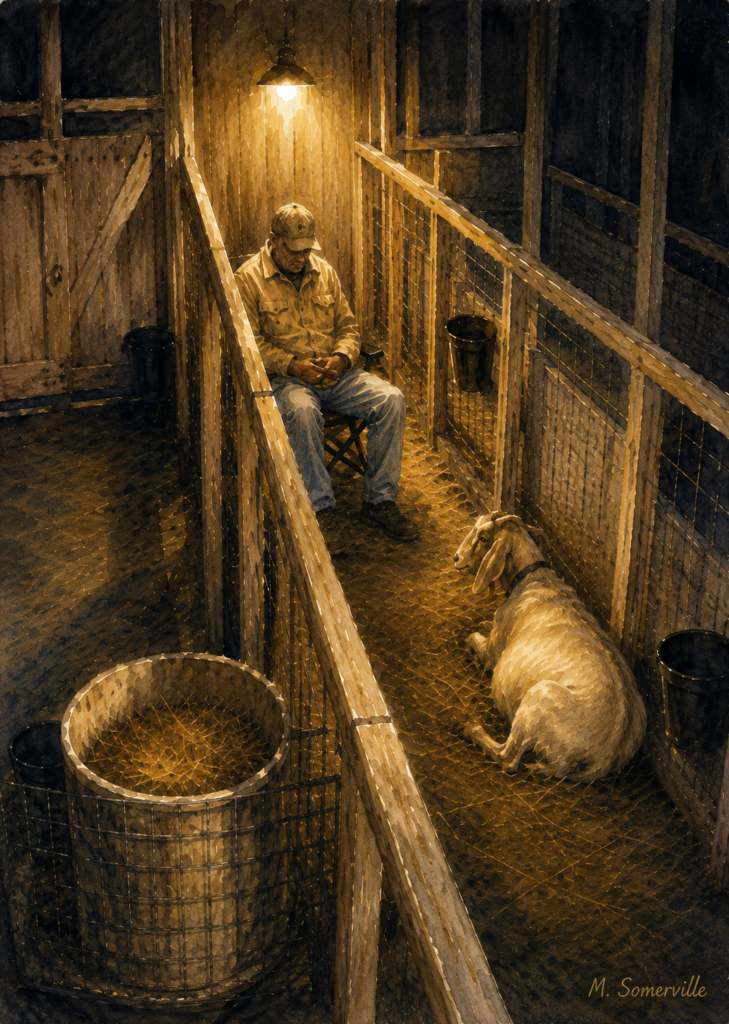
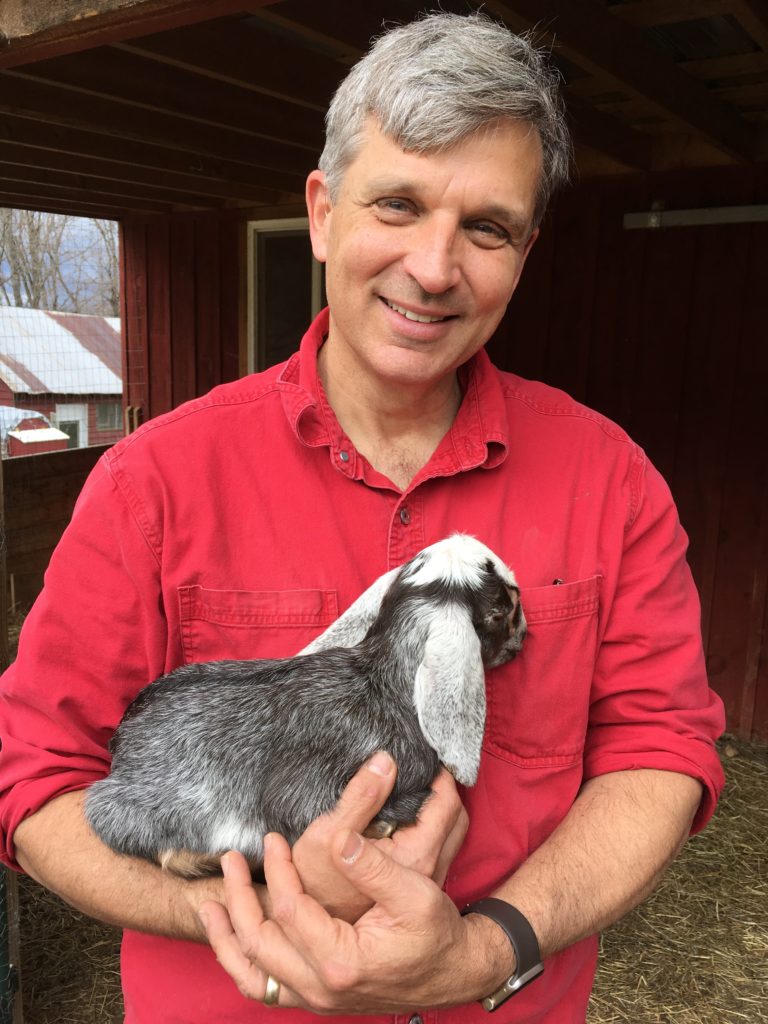
The first one is of my husband, Scott, at 2 AM, waiting for this first freshener to go into active labor. It’s entitled “Waiting Up With A Friend.”
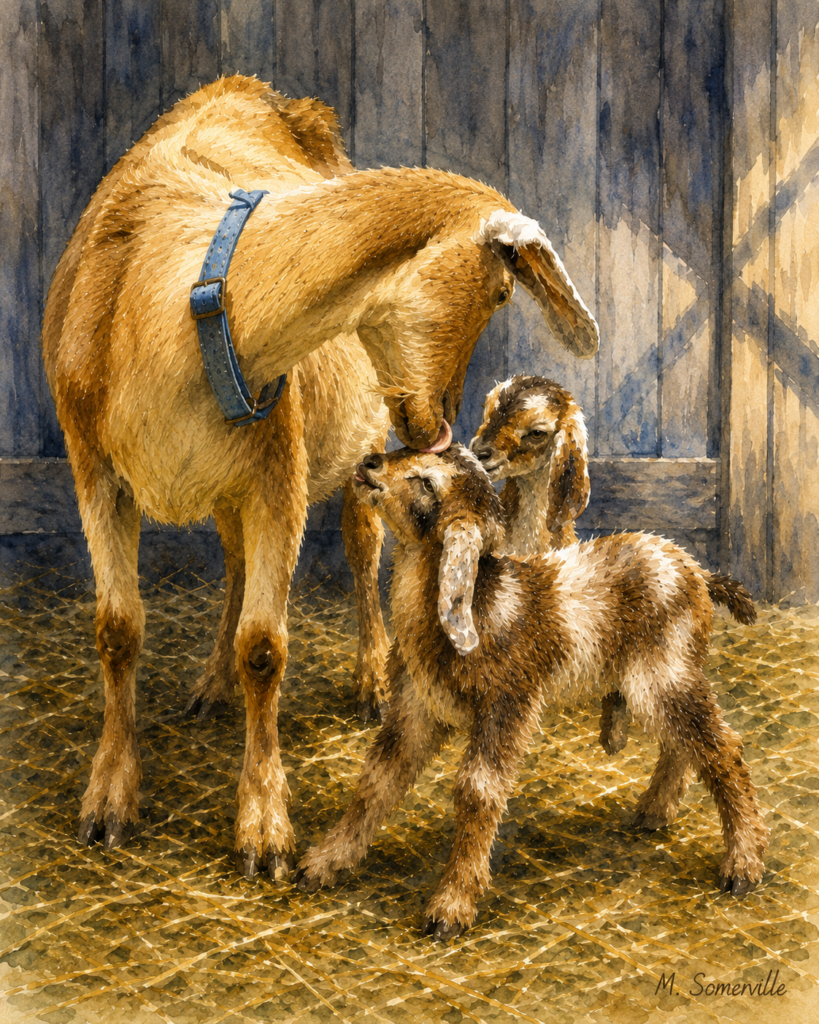
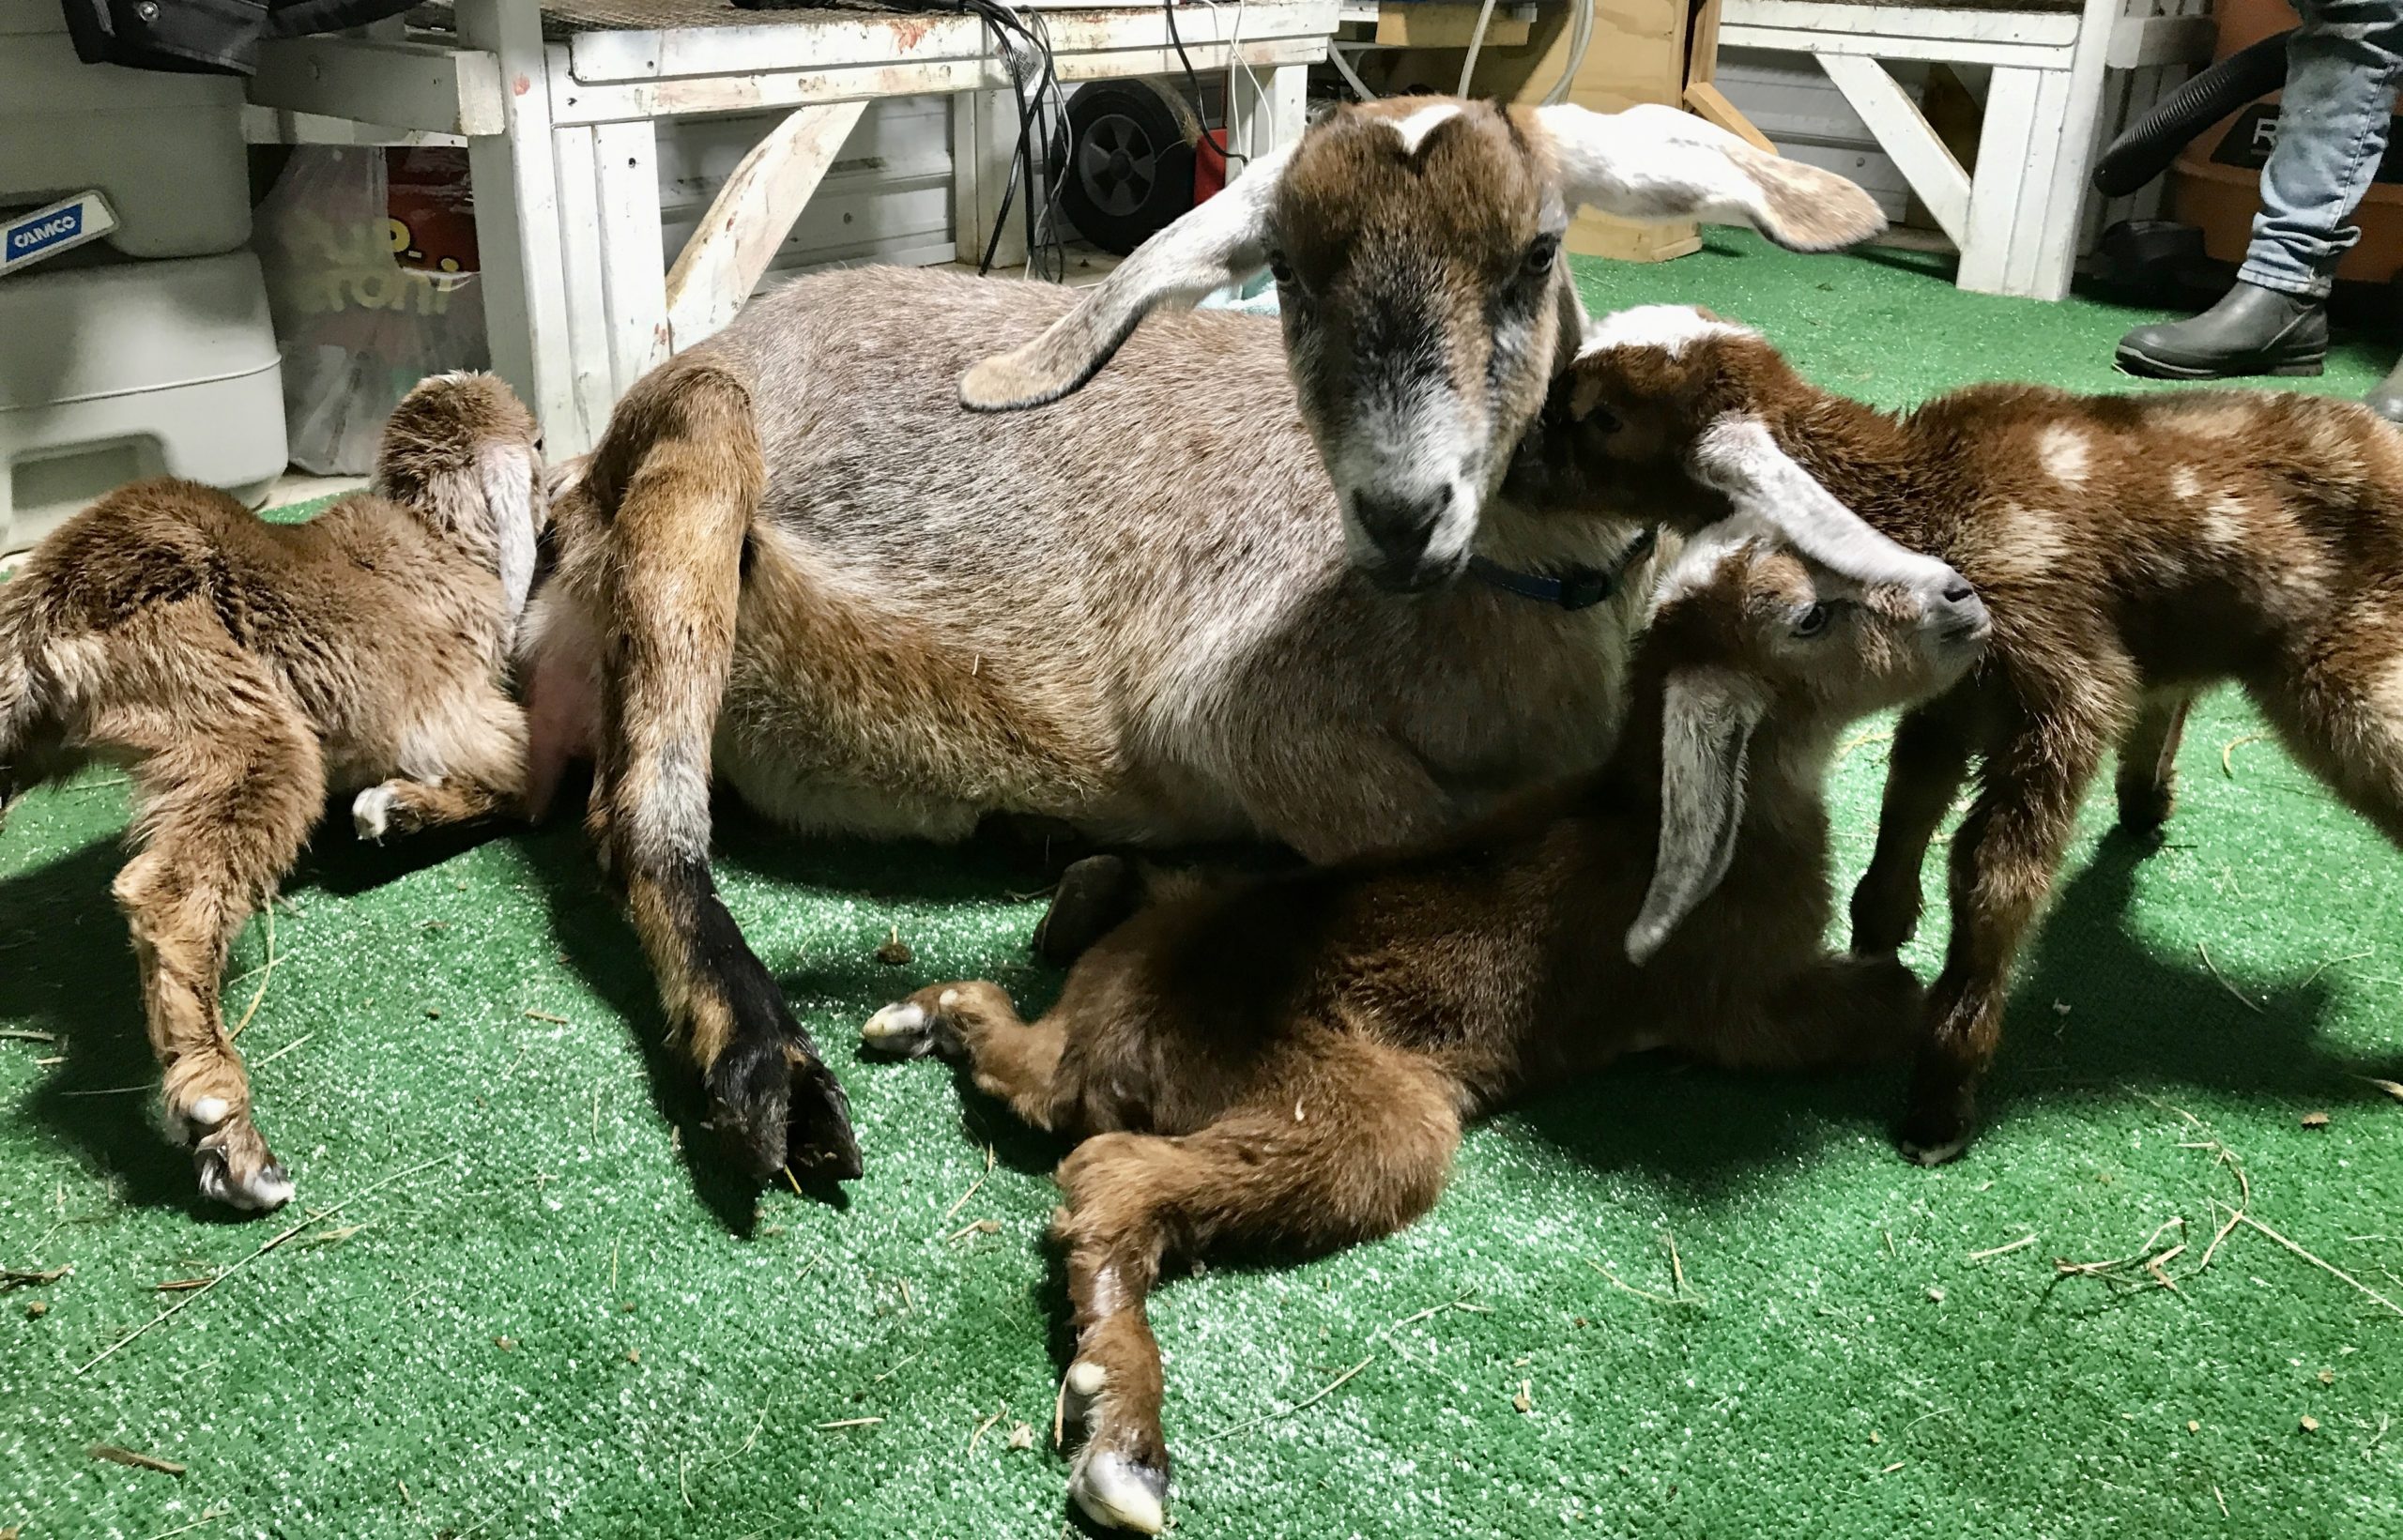
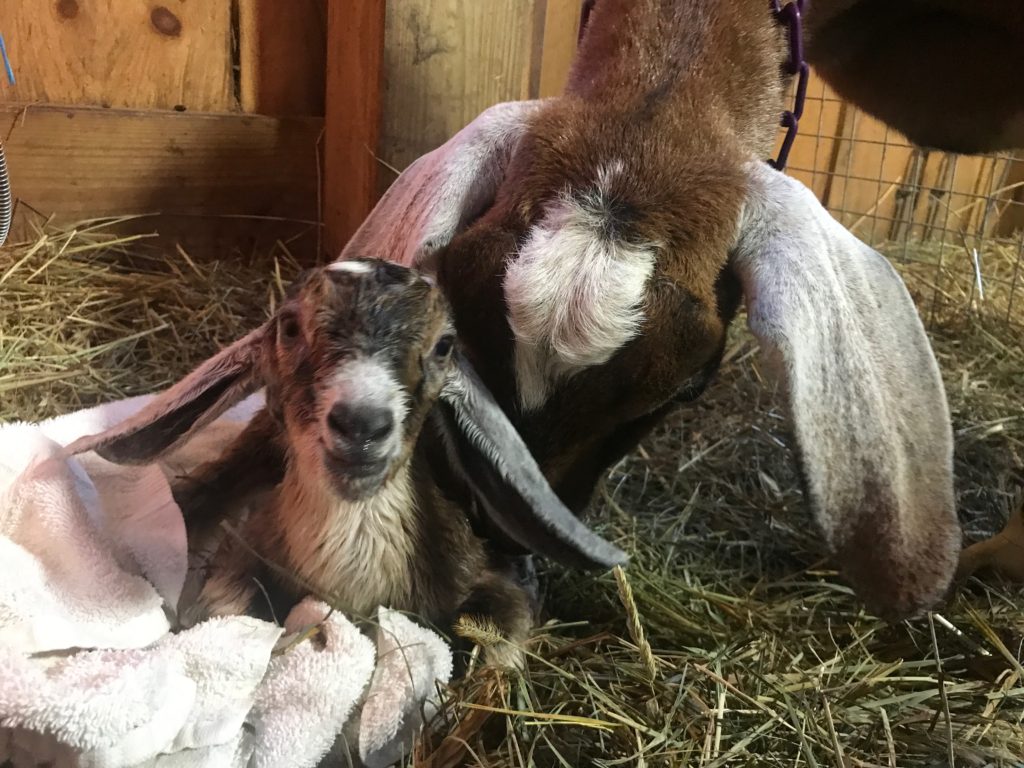
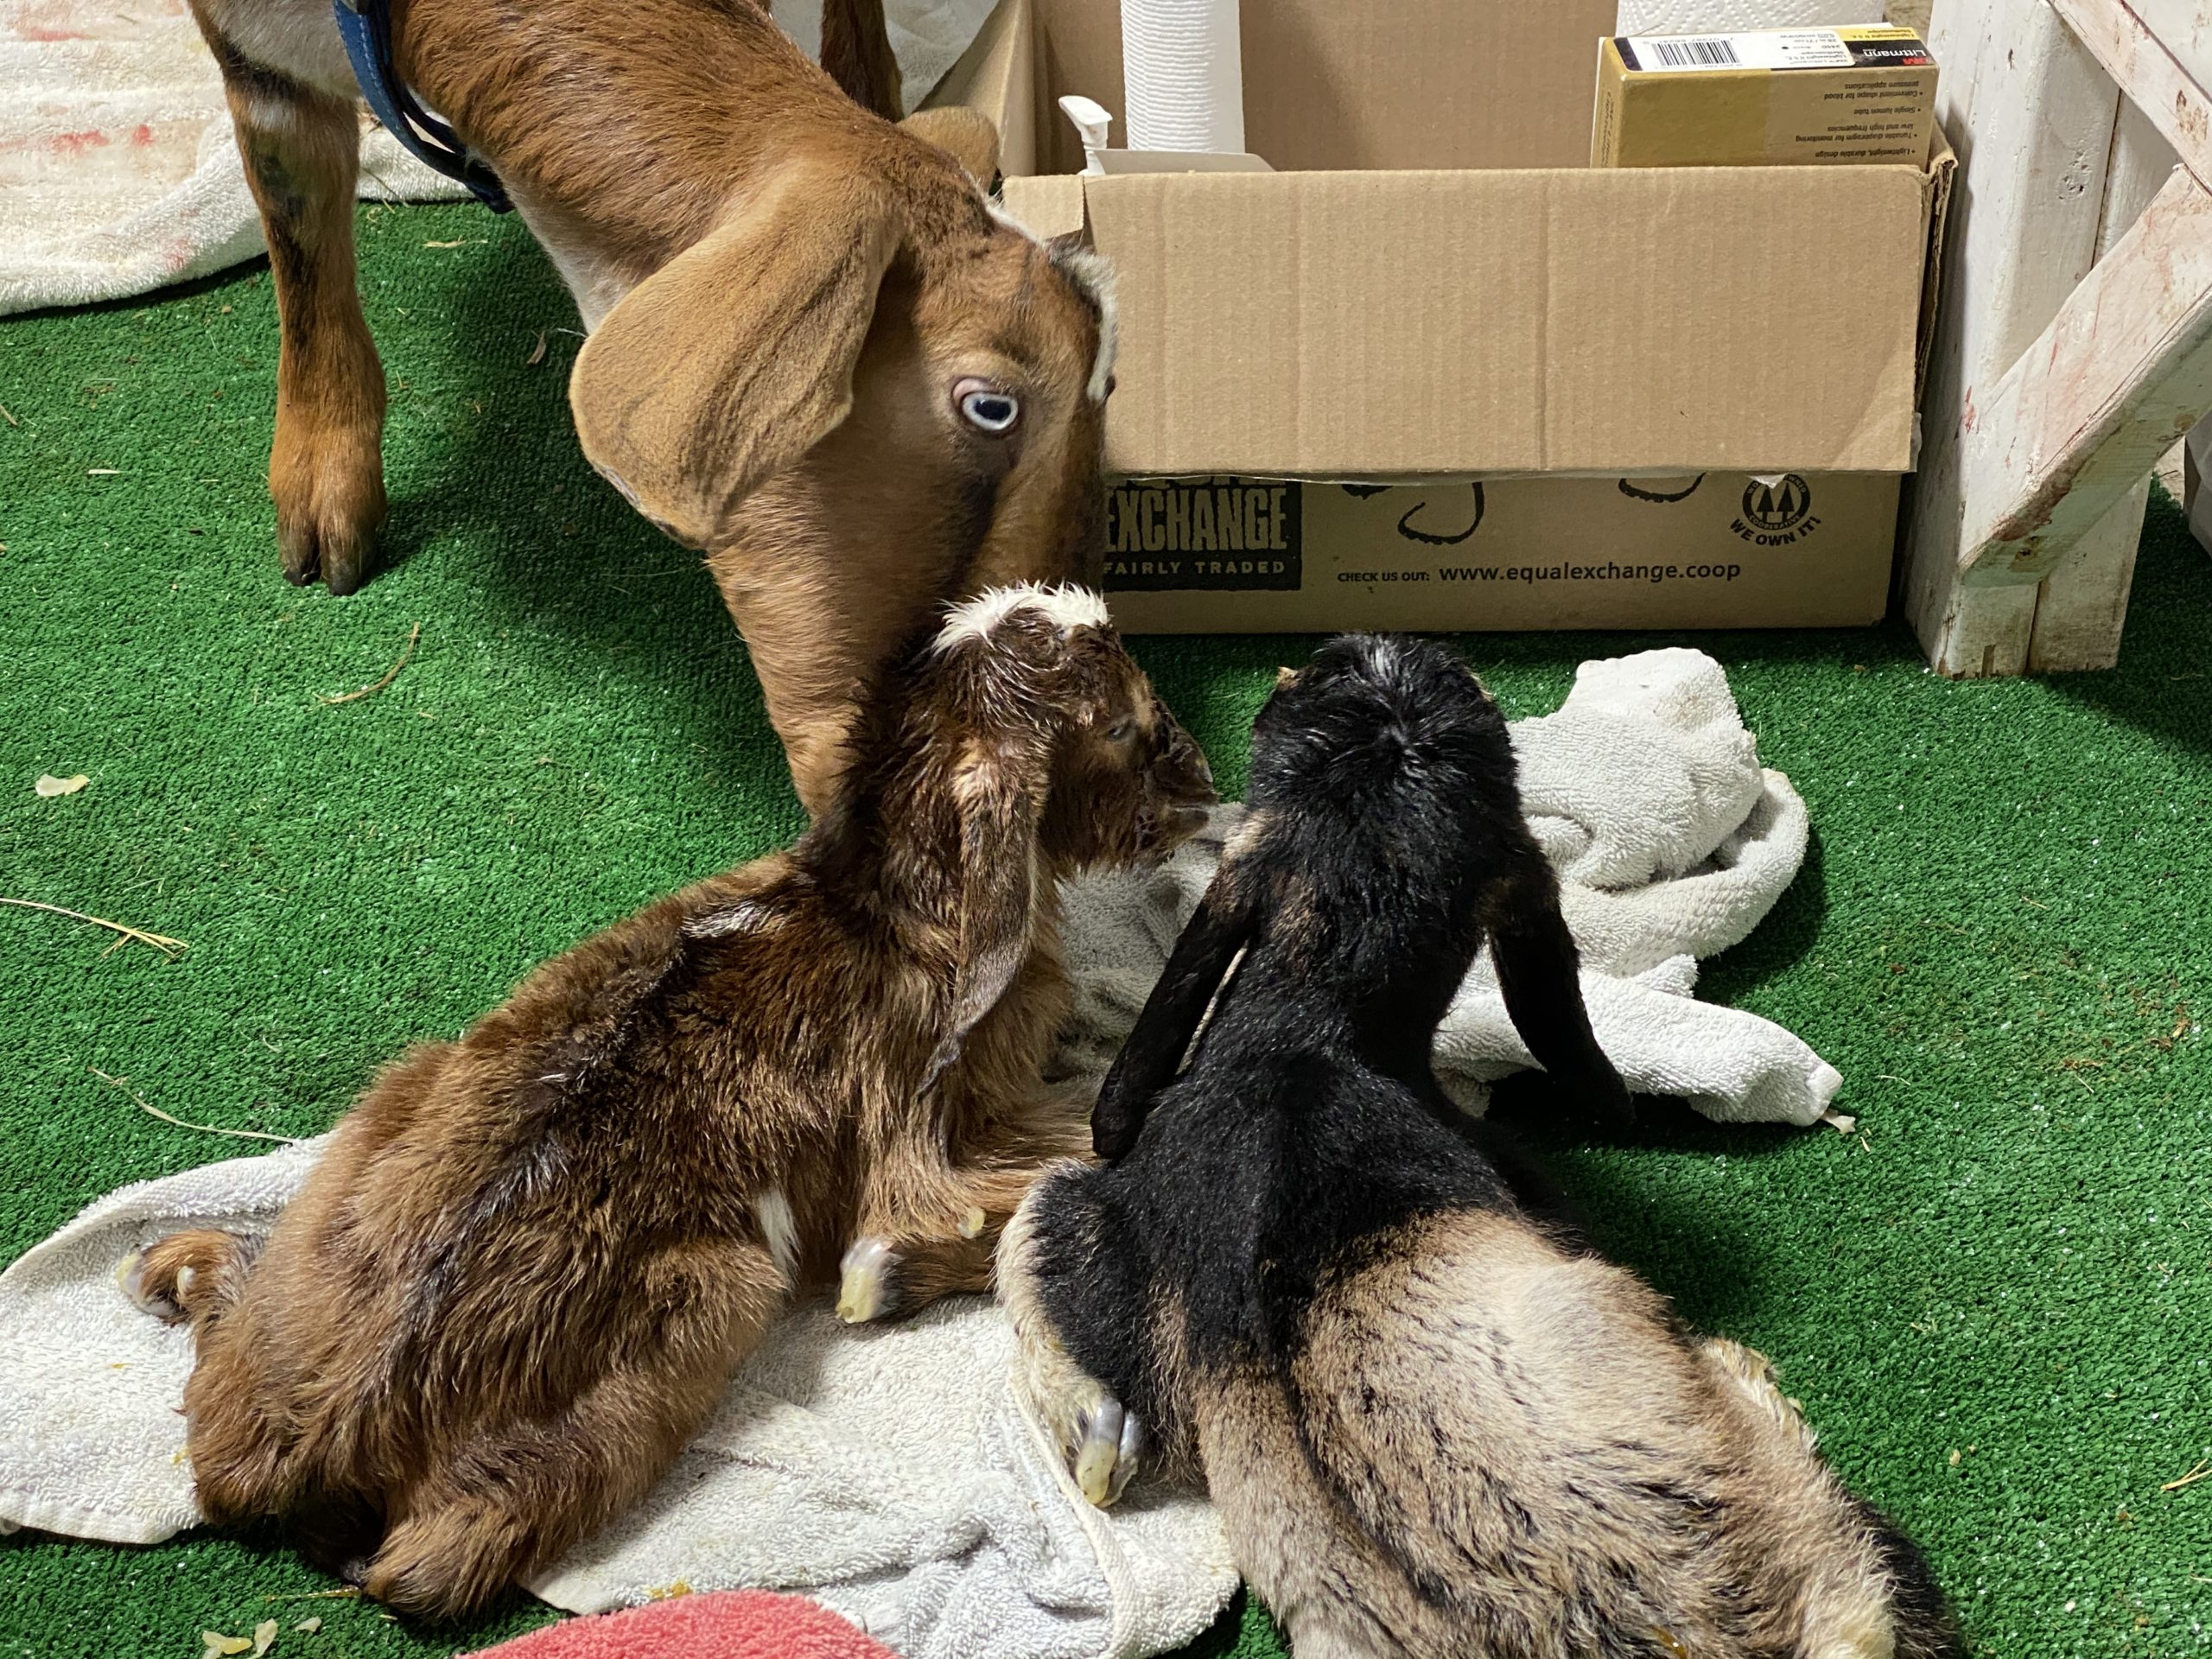
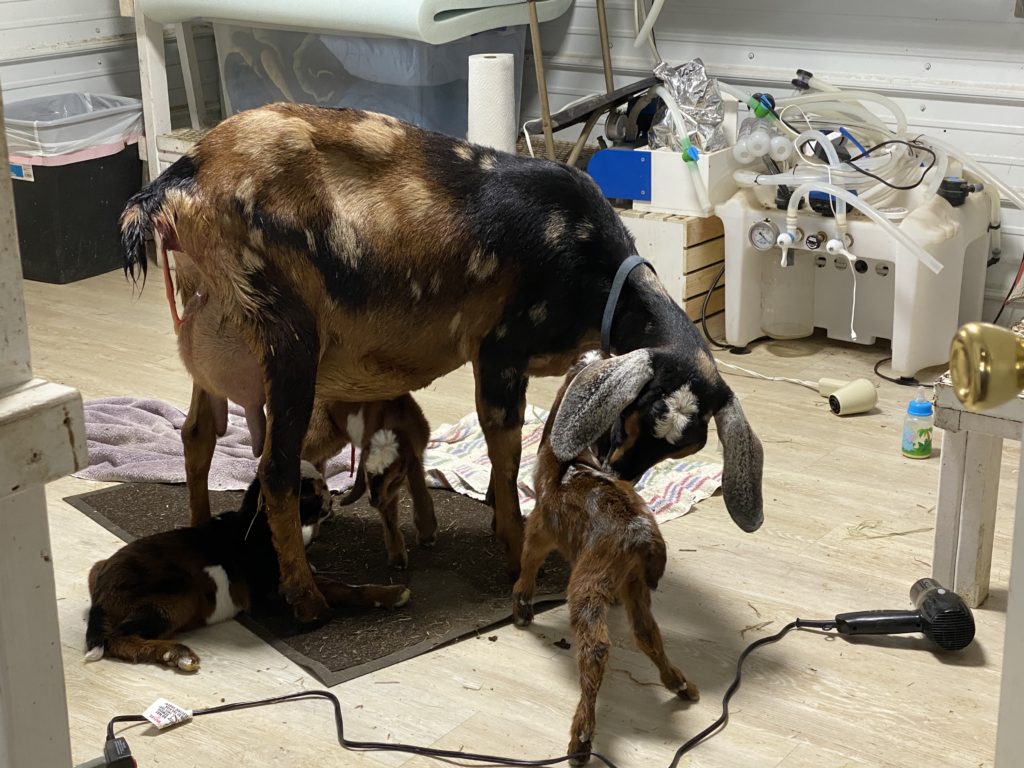
The second is of the moments after birth when Beauty was licking one kid, her doeling, Phoenix, while Izzy helped the second one to the teat.
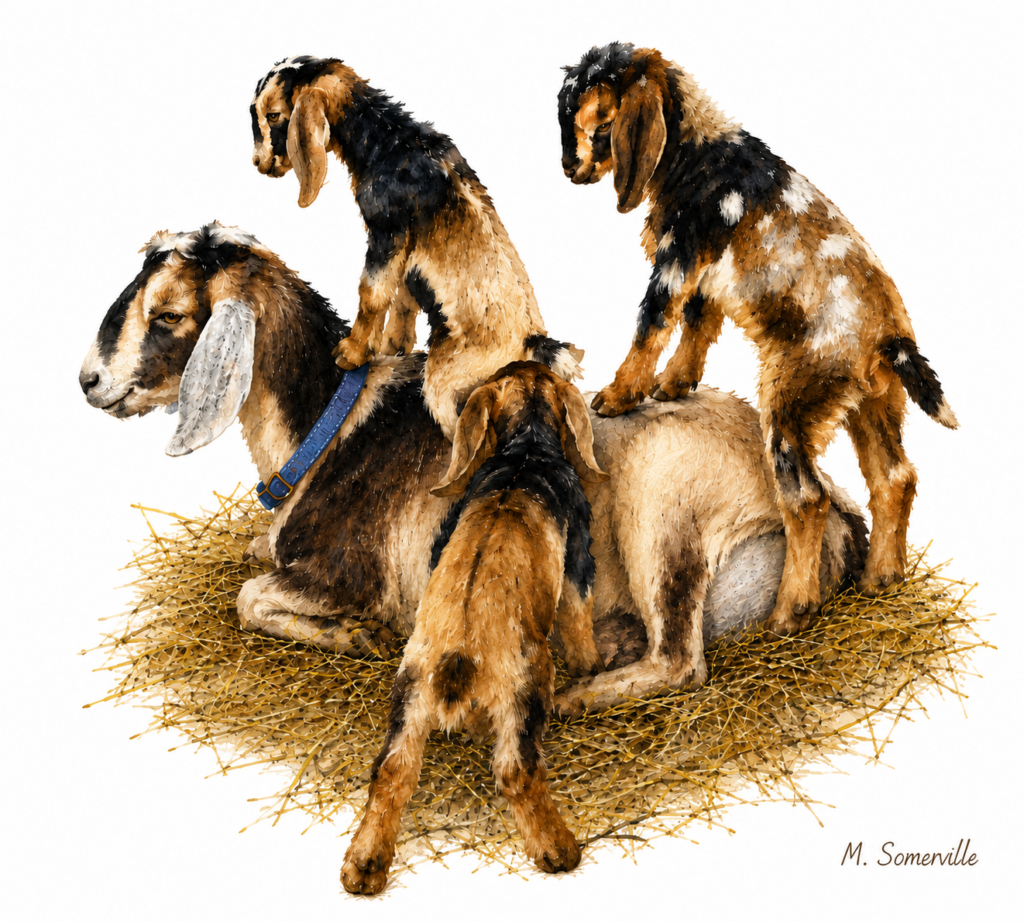
The third was when Tiger Lily’s kids were on their feet and mom keeps licking and nickering to them.
The last shows the patience these does have (in this case, Champagne) with their bouncy offspring a few days later.
We purchased Storybook farm in April of 2011, and so much has happened to the farm, and in our lives. As we have been reflecting on the events and memories tied to faith, family, and farming, I’ve been gathering precious pictures that spark smiles, sighs, and memories. It’s been great.
Someone suggested that some of my photos, converted into watercolor paintings or line drawings, might bless others as prints or cards, so I’m going to start sharing them here. If there is interest, I can make them available as greeting cards or as prints.
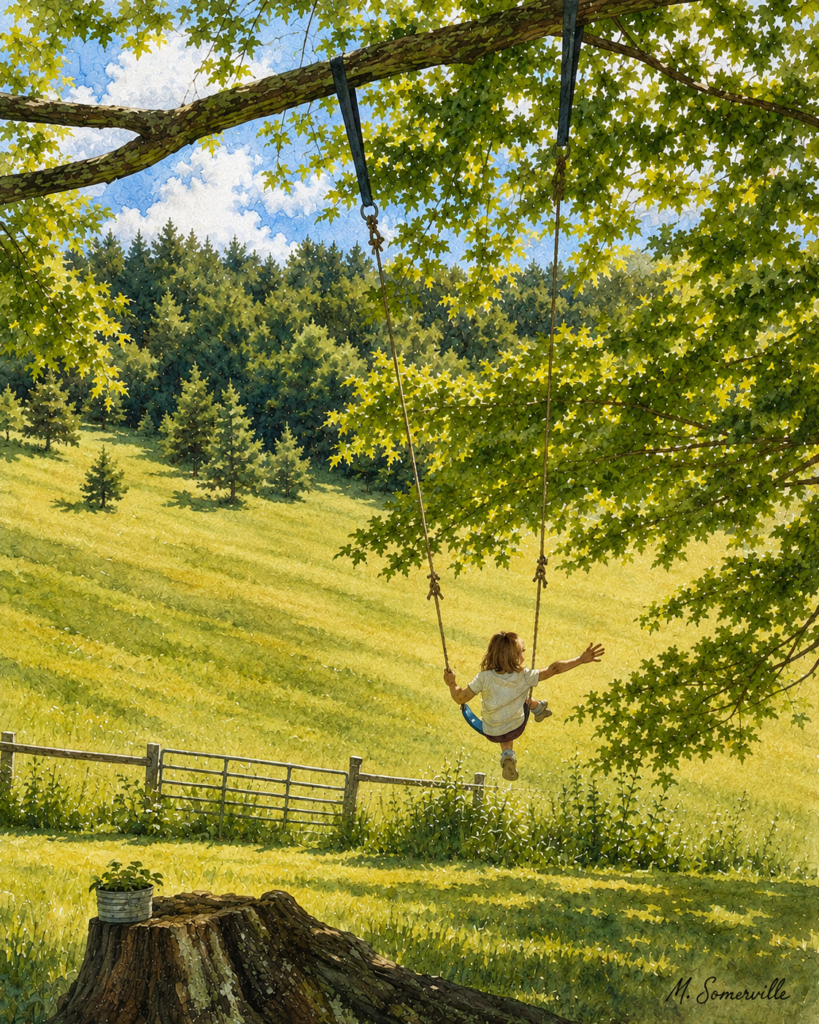
For now, let me share the first two. These are from high summer on the farm, and express the freedom and joy that our family has experienced here on our very private 40 acres. Enjoy the pictures: the children are our grandchildren, the setting is Storybook Farm.
This series is not meant to be comprehensive, but I hope that it’s helpful, especially to those having pregnant does with no experience. I wish I had had such a webpage series when I was where you are now!
Part 1 covered preparations for kidding, including prenatal care of does.
Part 2 focused in on the basic steps and signs of normal labors and deliveries, which a vast majority of deliveries are.
In this last post, we will focus on delivering kids who present more difficult positions (called dystocia), and gives a few ideas of how to help distressed kids after they are born. The time to think about dystocic positions is now, before it happens, so that you can at least know what you might encounter and the basic gist of how to solve problems that may be presented!
First: As I suggested in Part 1, watching YouTube videos of normal births is a very good preparation.
Second: I hope you have a mentor who will be there for you (by phone or in person) if you need her. Online groups are not a good substitute here. Try to develop a relationship with an experienced goat momma before you need her!
Third: Ditto for a vet. God forbid that you’ll need one, but it’s important that you have a relationship with one before you need his or her services. Find out what your vet considers a relationship: registration, perhaps, or a well check before delivery? It may be money well spent to make sure that the vet will be there for you should you need him or her.
Fourth: Make sure that your nails are closely clipped as kidding approaches. Have hot, soapy water ready when pushing starts, and have gloves and KY jelly nearby. You’ll also need to give a shot of LA 200 antibiotic after kidding if you have had to reach inside a doe.
On to some self help strategies
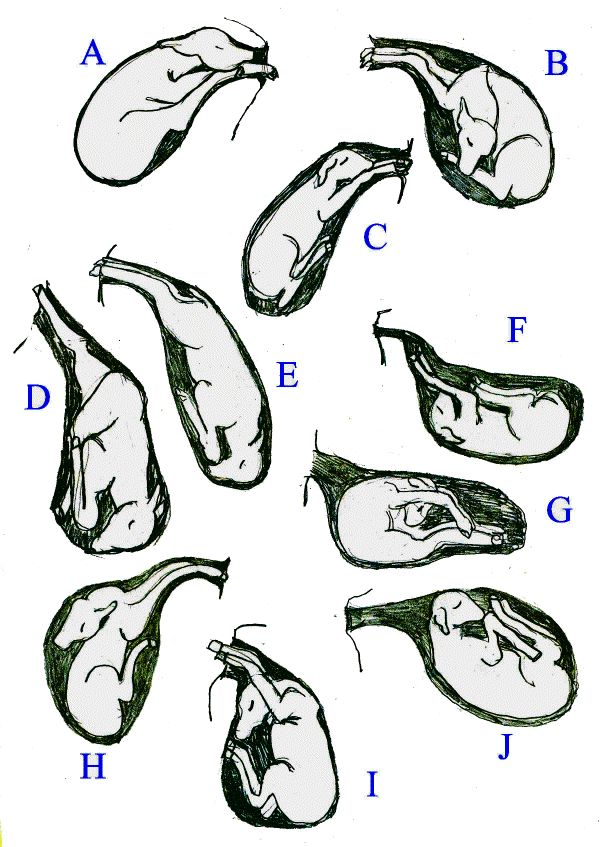
Study diagrams of both ideal and dystotia positions. (The link here is extremely helpful, with a free PDF that you can print, laminate, and keep in your kidding box for reference.) Print out these diagrams and think hard about why the kids can’t be born in certain positions without adjustments.
Credit for the diagram on the left to thegoatchick.com. Click on the link to see positions explained.
If you have to reposition a kid inside a mother, you will need to have the kid’s anatomy well fixed in your mind because you’ll be working by feel only! Try these exercises before your first doe kids:
Study your adult goat’s body carefully, looking for features that you’ve seen in diagrams. Picture her internal anatomy.
Now, closing your eyes, run your hands over your adult goat’s body, slowly. (Maybe while she’s eating.)
Start with the front end. Put your hand on her head. Move your hand down her jaw to her neck, and then to her shoulder. Make your way down the front right leg, noting the ways that the various joints bend.
Feel the point of the elbow at the back of the front leg, and then the foreleg. The elbow bends the knee towards the chest and mouth.
Find the knee and bend it; it bends the lower leg away from the chest, towards the belly.
Find the fetlock and bend it; it bends the hoof towards the belly.
Find the pastern and the hoof.
Pick up the front leg and stretch it out in front and back under the belly.
Do the same with the hind end and legs. The hock bends the lower hind leg towards the body, as does the front knee.
Now, using the diagrams that you have of kids that are not in good positions imagine how you would reach inside a goat to find the initial dystocia and then correct it by moving limbs.
In doing this over the years, I have found that I need first to become sure of one body part. Then I can usually work from it to figure out what I’ve got and how to deal with it.
The biggest challenges are these: to make sure that you’re feeling all one kid (and not parts of multiples, if they’re tangled) and to work carefully, if quickly, because in breach situations, the umbilical cord separates once the kid enters the birth canal and he can run out of air and suffocate.
Study this picture: which way to limb joints bend. Where are the ears located on the head? How does the ear feel different from the tail? How does the back of the skull feel different from the nose?
Difficult Kid Presentations
As we discussed in Part 2, there are two ideal, or normal, kid presentations:
Front hooves and nose together, in a diving position, with legs stretched out behind
Back legs first, stretched out, and then the body, head, and forefeet.
Typically as well, each kid is lined up, one at a time, so that they can travel through the birth canal easily and slip out of the doe’s body, typically with only a handful of good, hard pushes.
Some older does can also push out small breached (butt first) kids, or kids with only one foreleg back unaided. First fresheners will typically have trouble with these positions, however, especially if it’s a singleton kid.
Generally speaking, one never goes inside the doe until she has worked hard at pushing (see time allotments below). The cervix must fully dilate (open) for the kids to pass through. In the normal course of events, early labor contractions line the well positioned kids up one at a time while opening the cervix. When the first kid has moved up and put pressure on the dilated cervix, the doe has the urge to push. She bears down on the well positioned kid, and it moves rapidly through the birth canal and is born. She may stand to do this, but most of mine lay down. It is important to not rush this process by going in before the cervix is fully dilated. That’s why we wait a good 30 minutes (time it!) from the first push if there has been no water bag rupture before exploring within the goat.
Each kid is encased in his own amniotic bag of waters. Kids can be born without rupturing these sacks, but most often they break either just before birth, or during it. The membrane that surrounds them is thin, flexible, wet, and translucent. It protects the kid from infection and helps to keep multiple kids apart while in the womb, protecting the all-important connections between umbilical cords and placenta(s). There are other birth fluids in the uterine cavity as well. This moist environment helps the kids to slide around and adds pressure to the cervix so the pushing impulse occurs.
Each kid has an umbilical cord that is connected to a placenta, which is supplying oxygen to the kid. During a normal delivery, the cord typically severs itself as the kids is pushed out of the doe’s body. The kid will amost immediately take a breath in response, and this is why we seek to wipe off their mouths and noses ASAP. It’s also where the challenge with distotya kids is significant. When either repositioning kids, or untangling them, or hauling them out hind end first, be prepared to move quickly so that they don’t gulp amniotic fluid, and aspirate it or, worst case, drown before you get them out.
When do we suspect that there might be issues with kid presentation and need to go inside the doe?
If the doe has been pushing hard for over 30 minutes and no kids have come, but no bag of waters has ruptured.
In this case, one suspects that either a kid is stuck in an awkward position in the canal, or kids are tangled, or that there is a singleton who is too big for the doe to push out unaided. Or a kid may be dead.
The preferable problem is the malpositioned kid. One can reach inside the doe and move body parts around to make birth possible fairly quickly and relatively easily. Often only one kid of multiples is dystocic.
If the bag of waters has broken and she has been pushing hard for only 15 minutes and no kid is presenting, or a kid is presenting no hooves, but an ear or a tail and his sack is ruptured.
This is a “stuck kid” that must be repositioned before it can pass through the birth canal. His head is turned, or he is breach.
It is important to go in sooner if the bag of waters has broken, because the birth process depends on things being slippery. If the birth canal and kid dry out, things cannot slide properly, and internal damage can be done.
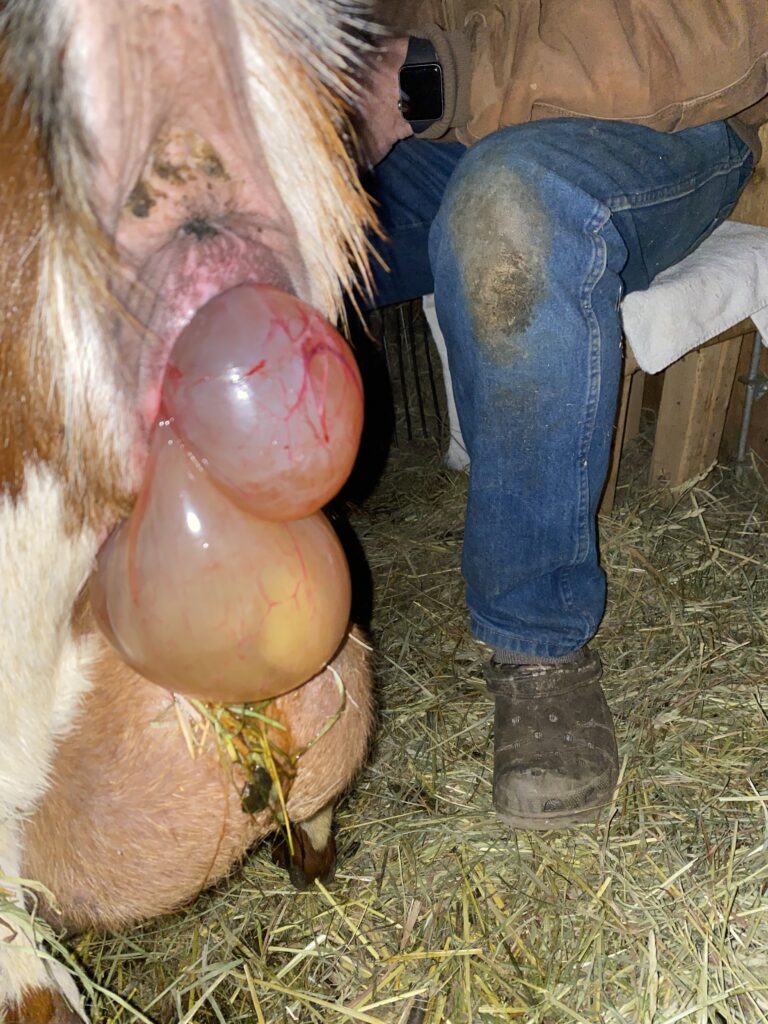
When, as in the picture here, there are more than one amniotic sack presenting (such that two kids are trying to come at the same time).
In this case, one must be pushed back into the birth canal, while the other is quickly eased out. It is necessary to go in carefully and find the one more close to birth (bottom one, here) and then GENTLY and slowly push the other back into the uterus. Once the first is born, try to get the second one out pronto.
The same concerns about air supply due to severed umbilical cords apply, so one has to work rather quickly.
What to do?
FIGHT to stay calm and get focused. Do what you have to to calm yourself. Pray. Breathe. Drink a bit of water (it’s probably been a long day) and tell yourself that you can only do your best. It truly is all in God’s hands, and not in human control.
Wash your hands really well in hot, soapy water.
Don gloves (or don’t), and get your hands slippery with KY jelly or olive oil (which has natural antibacterial properties).
Gently reach inside and start to feel for a part of the kid that you can recognize. I close my eyes so I can concentrate on what I’m feeling. Once you have a mouth, or a hoof, or a tail, follow the body to figure out what’s amiss.
Work with the doe’s contractions: wait to move limbs, or push a kid back if needed, then work with her contraction to pull a kid out.
You can pull hard when you get to pulling. Baby kids are much tougher than we think. But be gentle with the doe: protect her uterus from tears by shielding it from sharp little hooves with your hand as you reposition limbs, etc.
Singletons
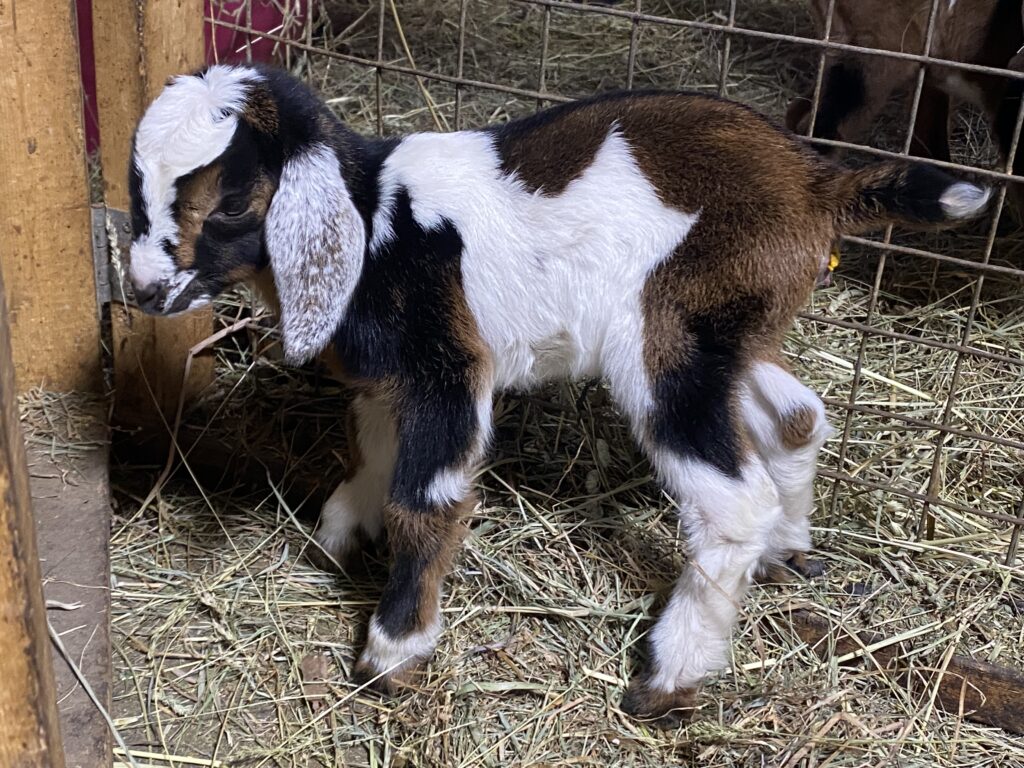
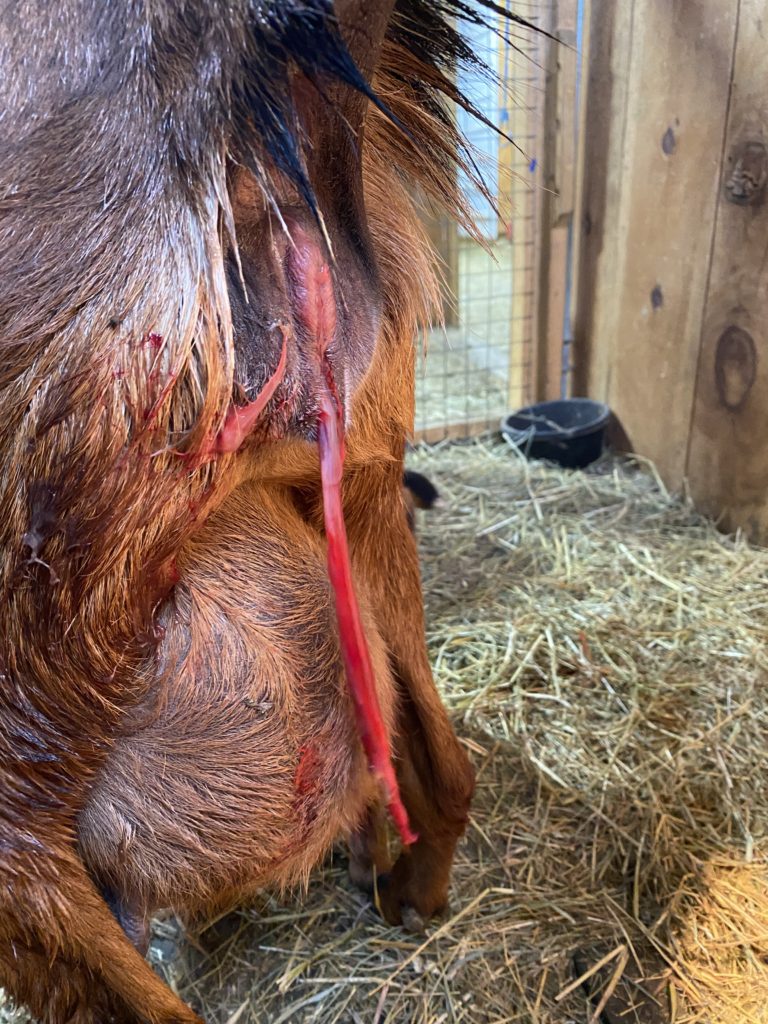
With first fresheners particularly, but really with all deliveries, one concern is with singleton kids, especially males because they are usually larger in general than female kids. A single kid can grow large because it gets all the prenatal nutrition to itself. Consequently, it can be difficult to deliver because the head is large for the birth canal, and doubly so if it’s malpositioned.
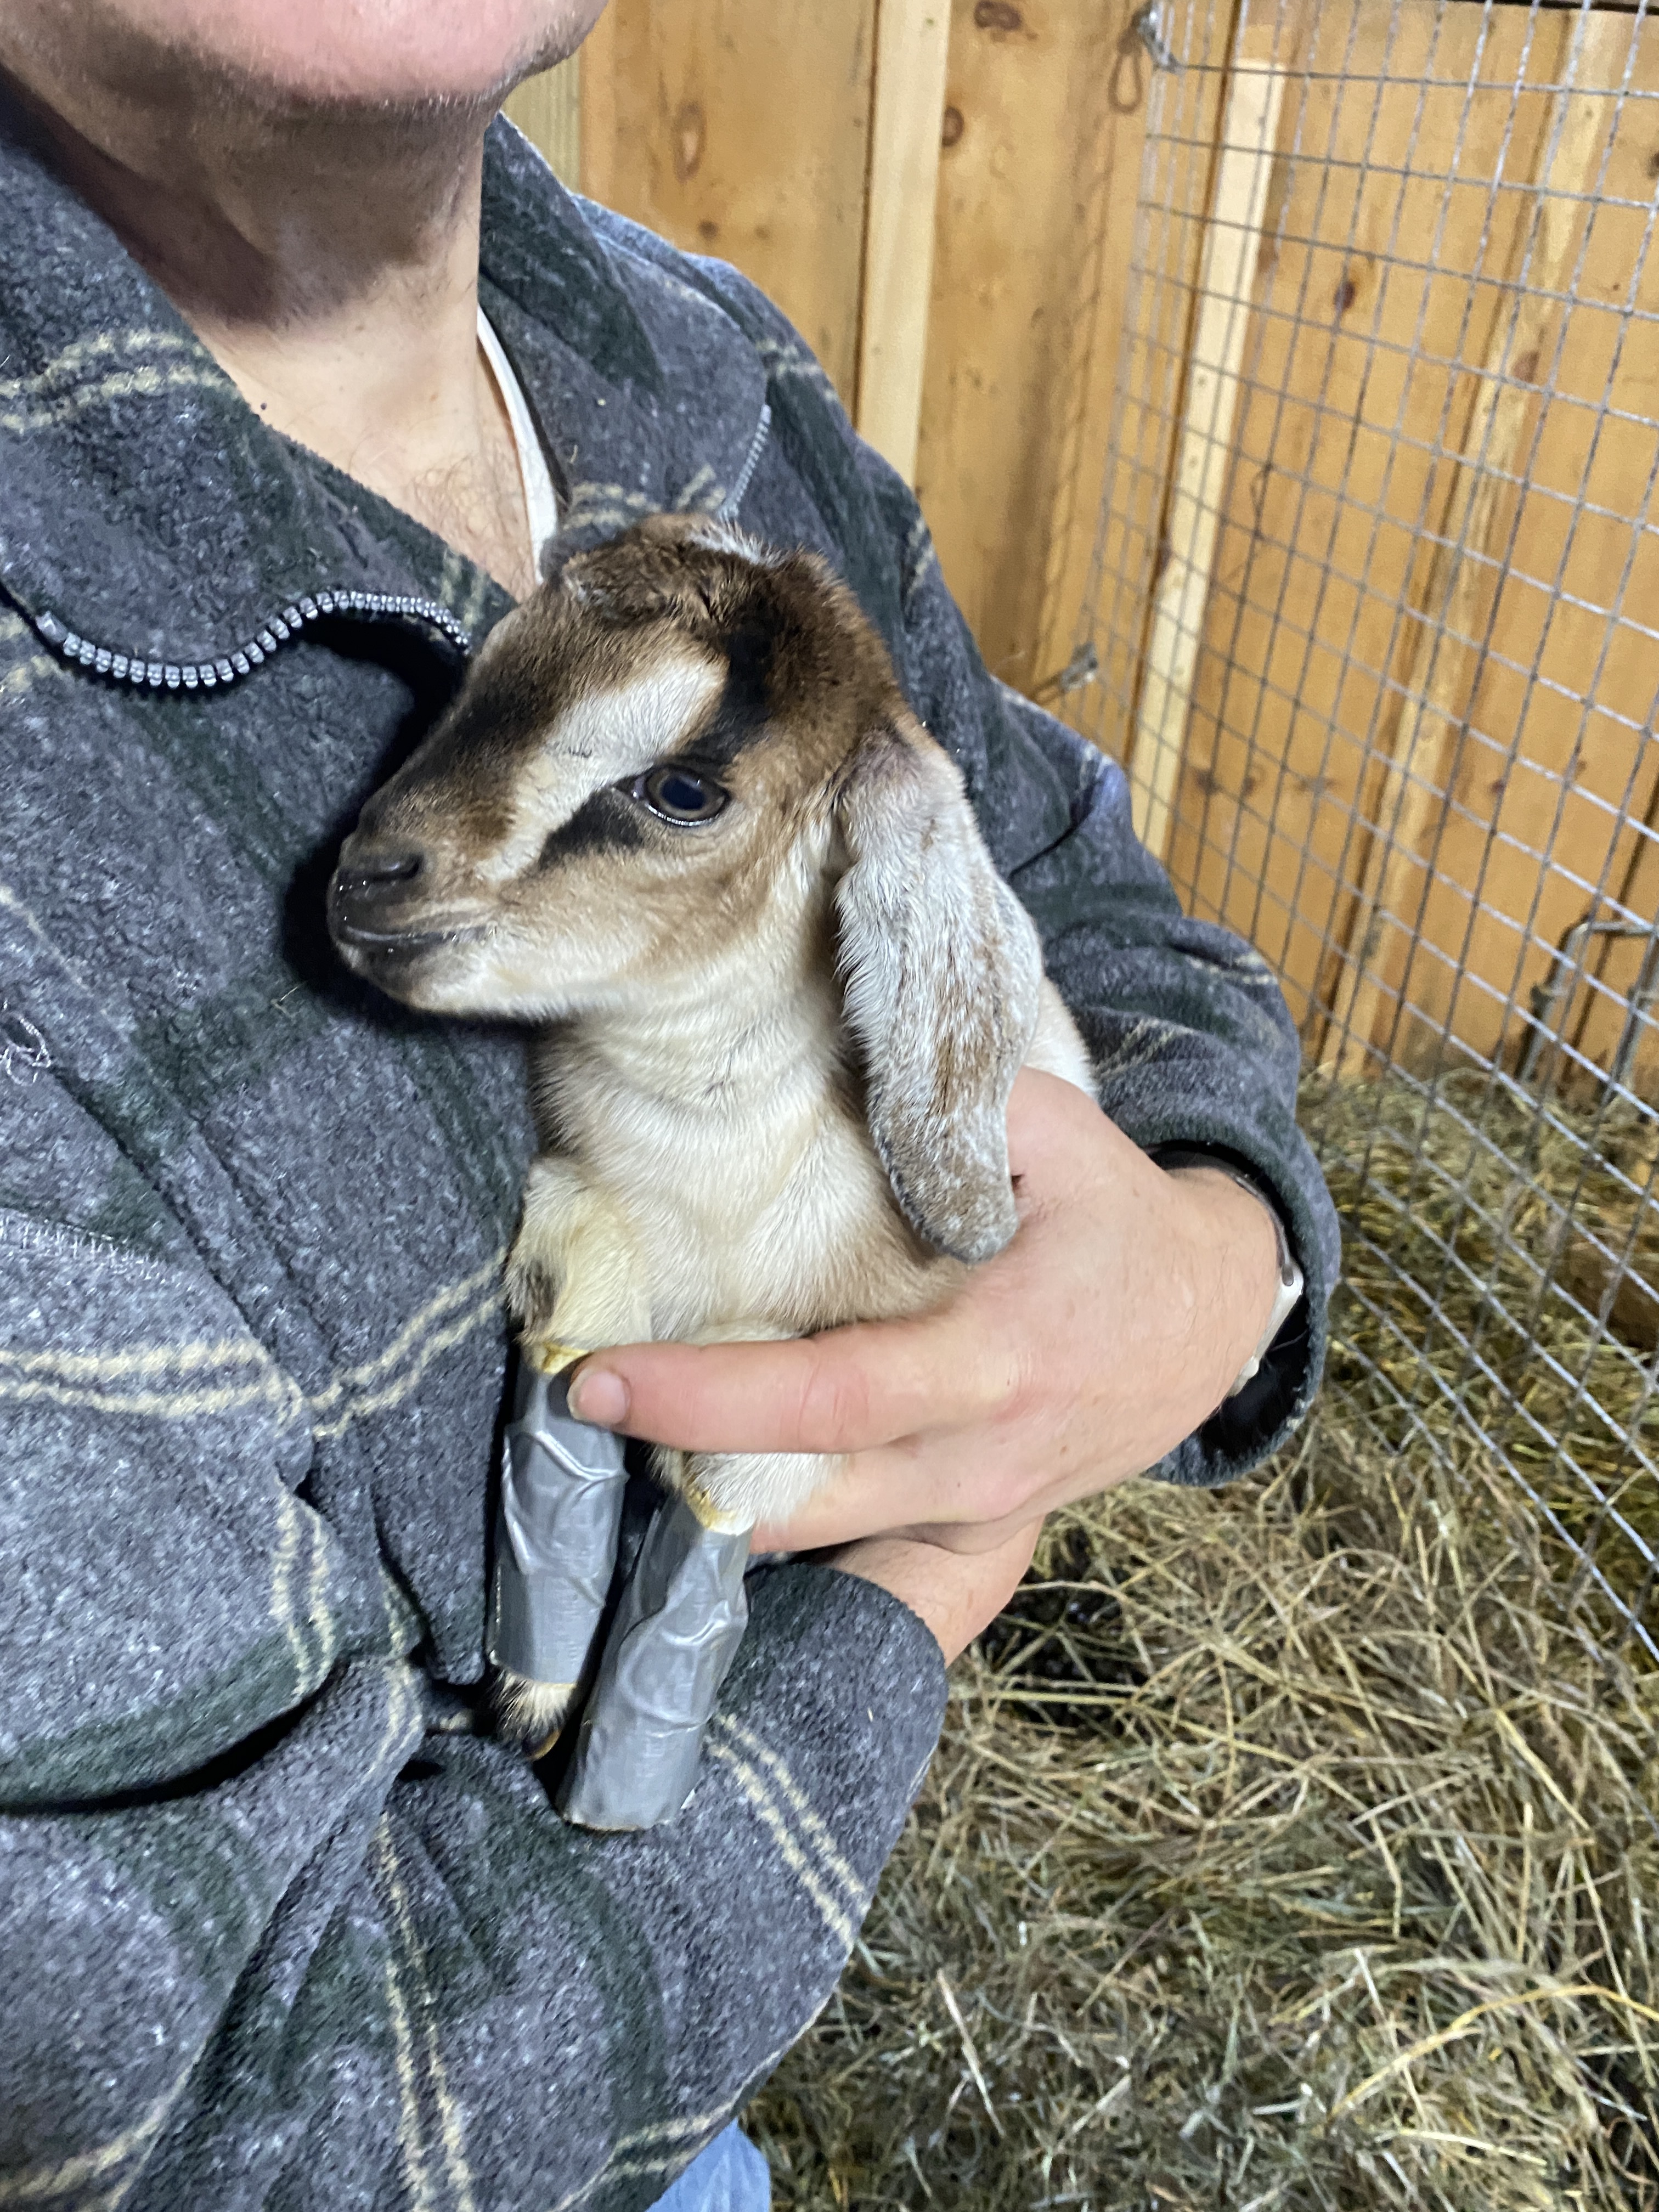
This doe was 10 days late with this singleton boy stuck, breached, inside. Look how big he was at birth!
In a first freshener, this kid is the first to open the birth canal, and things can be tighter and less elastic than with older does who have had a litter or two. Pulling is hard on the vulva, and it can look really bad when you get done. There will always be blood, and it’s hard to know how much blood is too much.
Does can go into shock. If she gets shocky, put cayenne pepper mixed with honey on her tongue every 20 minutes and keep her warm with a blanket. If she will, have her drink the warm tea that has molasses in it. It will give her energy and hydrate her.
Births can be quiet or a surprise, noisy or peaceful, chaotic and terrifying, or sweet.
In the end, births are always a miracle, and we should thank God that we get to participate in this process. We at Storybook Farm regularly pray for our does. We pray for their safety and good health through pregnancy and delivery. I always pray for twins, since they’re typically easiest on does. We pray for ourselves when perplexed or when we have to go in and rearrange babies. God is there; He cares, and He is good. Births don’t always go as we could wish, but He is there in those moments to comfort us and to remind us that we, too, are creatures.
Be of good cheer! You can only do your best at the end of the day. Pray that it’s good enough, and then trust your faithful Creator with the rest. May your kidding season be blessed!
In case you found this part first, it is the third in a series. Here are the links to Part 1 and Part 2.
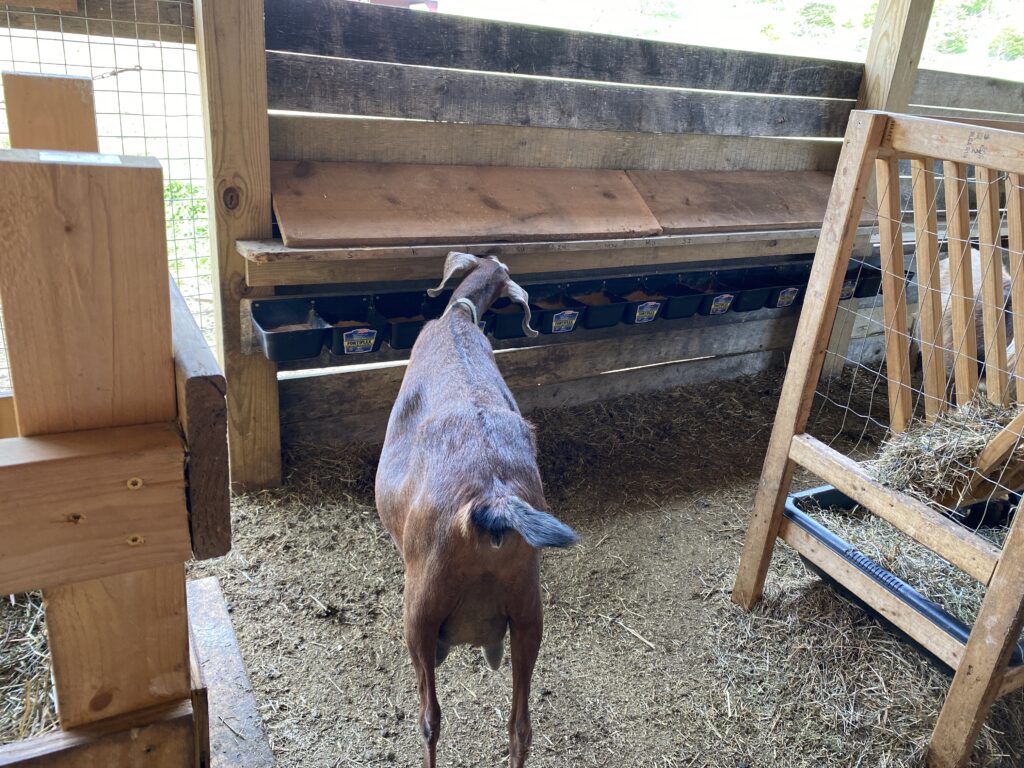
So, we’ve been using a mineral bar (20 free choice minerals) with our doe herd for going on three years. I can attest that it has made a HUGE difference (for the good) in our herd. Glossy coats and a marked increased the health of newborn kids: no knuckle dragging or floppy kids since the summer that we started with it.
I’ve always wanted a bar in our buck barn but never figured how. This is our doe mineral bar , which uses 11″ long, black, 2-hole mineral feeders from TSC (10 of them) which is quite a lot of wall space needed. (About 10 feet.)
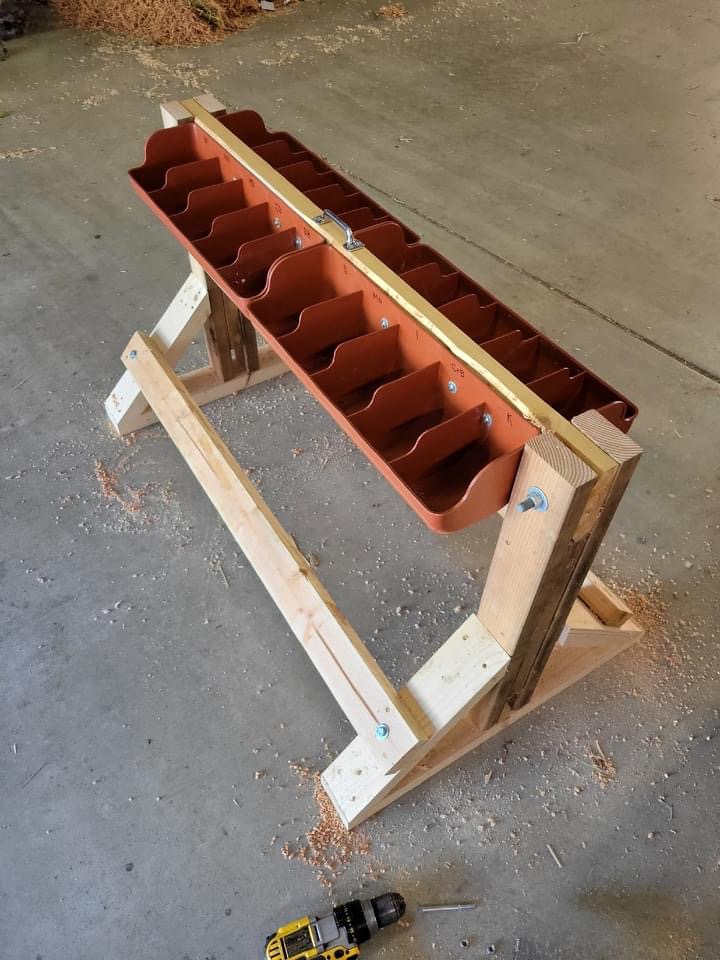
Recently, I saw a post on a FB group for mineral bar users by Lura Huff who used these reinforced pig feeders (available at Amazon and Walmart).
Each feeder unit has five holes, so you need 4 feeders for a full 20-mineral bar. Here is a picture of Lura’s design. It’s a portable version (which is what I thought I’d do when I ordered them, and may yet do in another buck barn).
It is ingenious because it can be unbolted quickly in order to service the dishes or to move it to another spot on the farm
The trouble was, of course, getting time to make it.
Photo Credit to Lura Huff
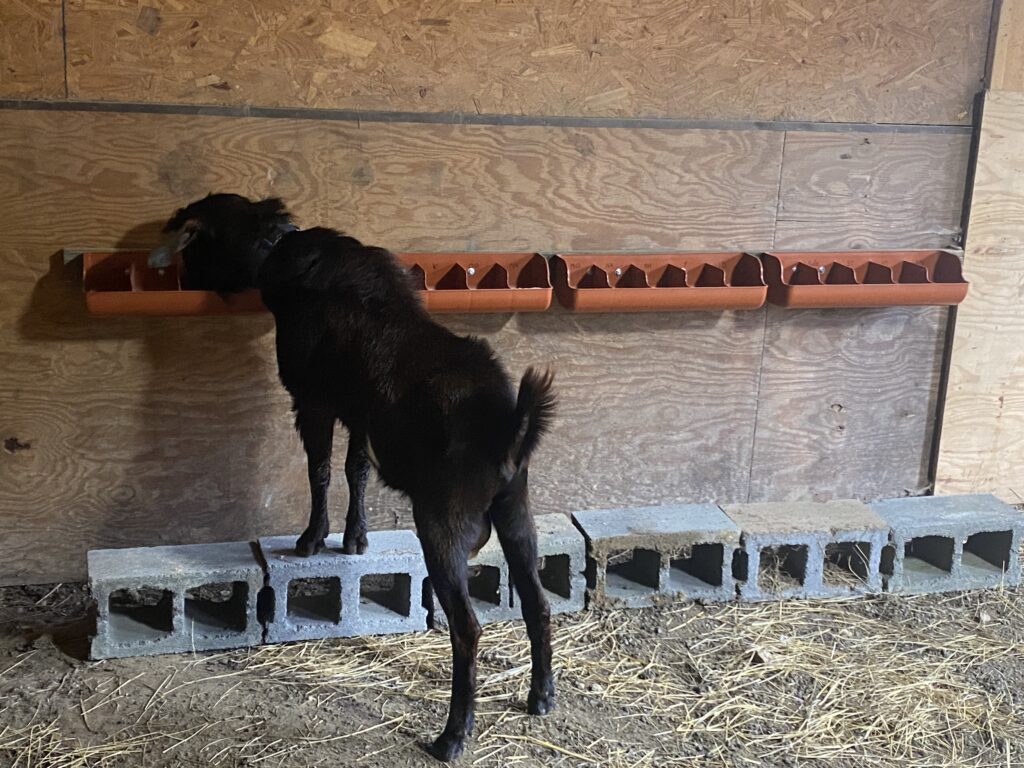
As I took inventory of our second barn’s interior space (where we usually house junior does in winter and/or bucks during breeding months, I realized that we had about 8 feet of wall space… enough to easily put all four, five-hole feeders onto one 8-foot 2×4. So, we screwed them on with lug bolts and washers, measured up the same height as our manger openings, and screwed it to the wall.
We have found that when you put the dishes higher and give goats a step up (in this case, cinder blocks) you have less poop in the feeders.
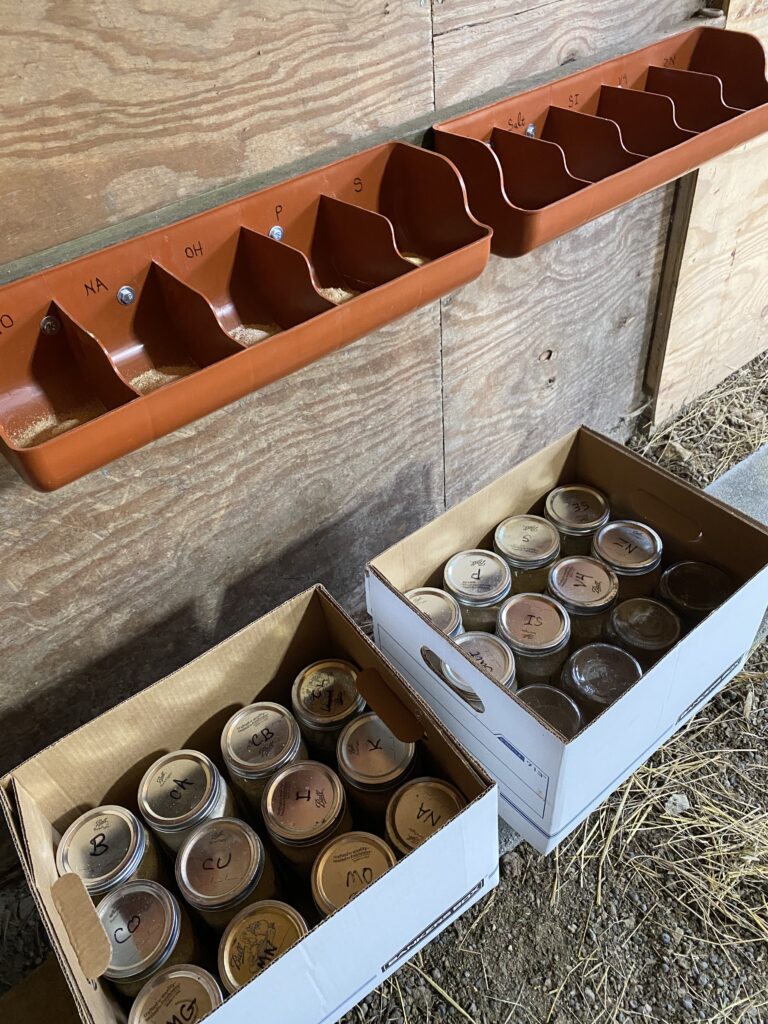
Our supply buckets (5 gallong Home Depot buckets) are in our main bard, about 200 feet away, so we had to think about how we were going to easily re-supply the mineral feeder in this new barn. We came up with using two file boxes (bought at Staples) to keep 12 quart-size mason jars in perfectly.
You only need 8 jars in the second box, but they stay put nicely with 12, so we double up on some of the most-loved minerals in the remaining 4 jars.
We labeled the tops of the jars, and now I only make two trips to refill all the minerals with ease!
This series is not meant to be comprehensive, but I hope that it’s helpful, especially to those facing pregnant mommas with no experience. I wish I had had such a webpage series when I was where you are now!
Part 2 focuses in on the basic steps and signs of normal labors and deliveries, which a vast majority of deliveries are. Part 3 focuses on delivering with more difficult kid positions and gives a few ideas of how to help distressed kids.
I always pray for my animals when they are pregnant, and especially so during delivery. God is very gracious to help our animals and us through deliveries. He loves the animals that He has created (see Numbers 18: 14-17) and redeemed. I have done some of my deepest spiritual growth during stressful labors. Turning to the only One Who can really help is natural to me, and I highly recommend it as a normal practice for you!
Is She OK?
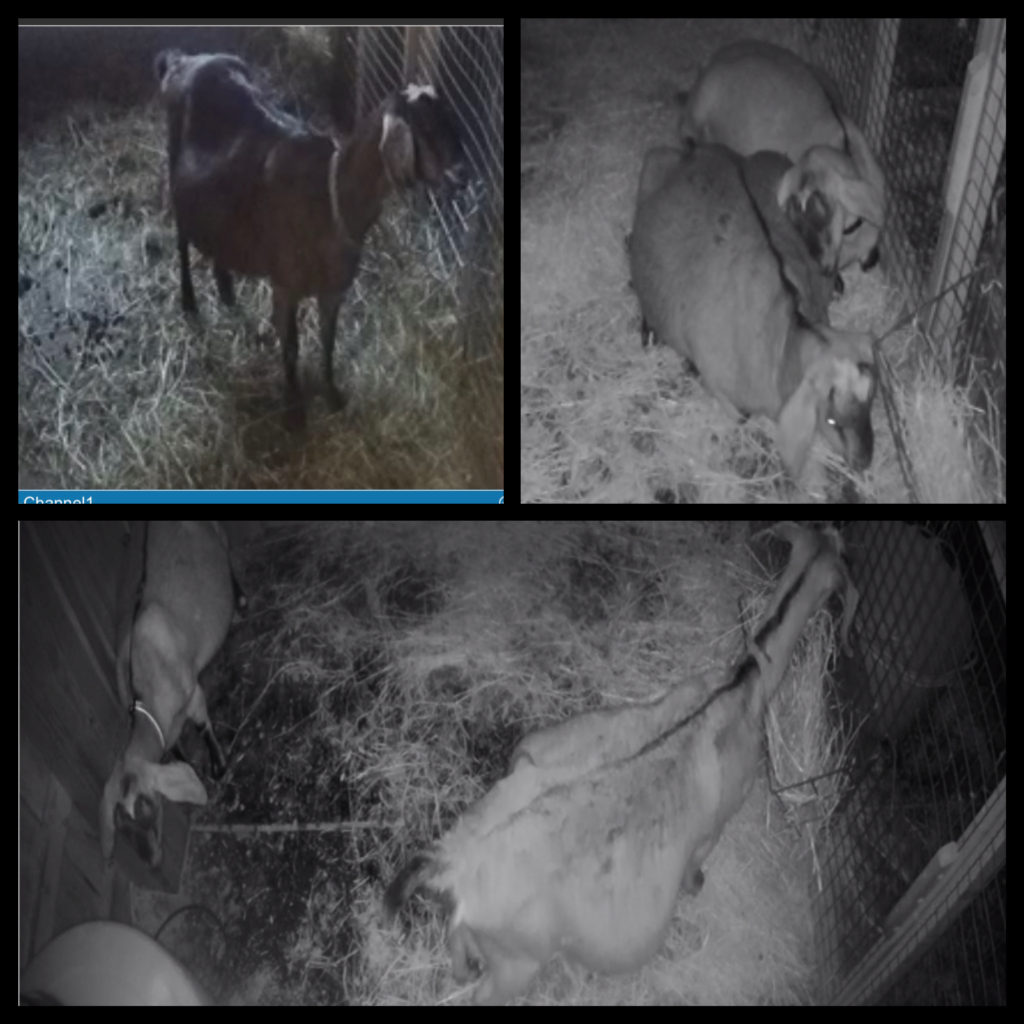
Our does can get SO big and look SO uncomfortable during the last month or weeks of pregnancy. Here is a small gallery of pictures of Candy (two with my barn cam at night) in her last week of pregnancy in 2023. I just feel SO BAD for them, but be reassured, they are fine and those babies will eventually come out.
The thing to watch for most when does are big with multiple kids is their behavior. If they seem listless, low energy, or “walking on eggshells” then suspect pregnancy toxemia and/or ketosis. Read up on these and lay in supplies so that you can detect/treat them!
To detect or confirm these conditions, I buy new each year (because they do expire) Ketone strips. You can find them at any drug store. You hold them in a doe’s pee to detect ketones. We give our girls small amounts of grain, with Vitamin E and red raspberry leaves starting at 3 weeks out from their due dates.
Signs That She’s Getting Ready or in Early Labor
Spoiler Alert: A doe may have none of these signs, or all of them. The Doe Code keeps us guessing!
Taken together, the signs give a pretty good warning that “today’s the day (or night!)” but a doe can fool you.
For grins and giggles, watch THIS VIDEO to give yourself a stress reliever and reality check. Does have their own body clocks, and usually obey Murphy’s Law to the letter! 😉
The Doe Code is real, so find some stress relievers and pace yourself. Try to not stay up all night watching the barn cam from a week before the due date. My husband and I check a doe who’s soon due, watch and watch, every two hours (He wakes up at 2 AM and 6 AM, while I wake up at 12 AM and 4 AM). Thus, we both get 4 hours sleep at a time on those nights when it’s feasible that a doe could deliver, or is overdue and needs watching. Given your resources, choose a pace that’s sustainable for you!
OK: the list of SIGNS. From the earliest indicators to “this is probably IT!” signs.
Check her ligaments. Next to the tail, there are two ligaments (that support tail wagging) which, before delivery, soften and seem to “disappear.” (See more details on the ligs here.) In goat-speak, we talk of a goat’s “ligs being gone.”
Full disclosure: I’ve had does whose ligs go a week or two before delivery. But, for many does, it’s a good indicator that labor is a day or two away — or closer. Remember, it’s just one of the many signs that labor is close at hand.
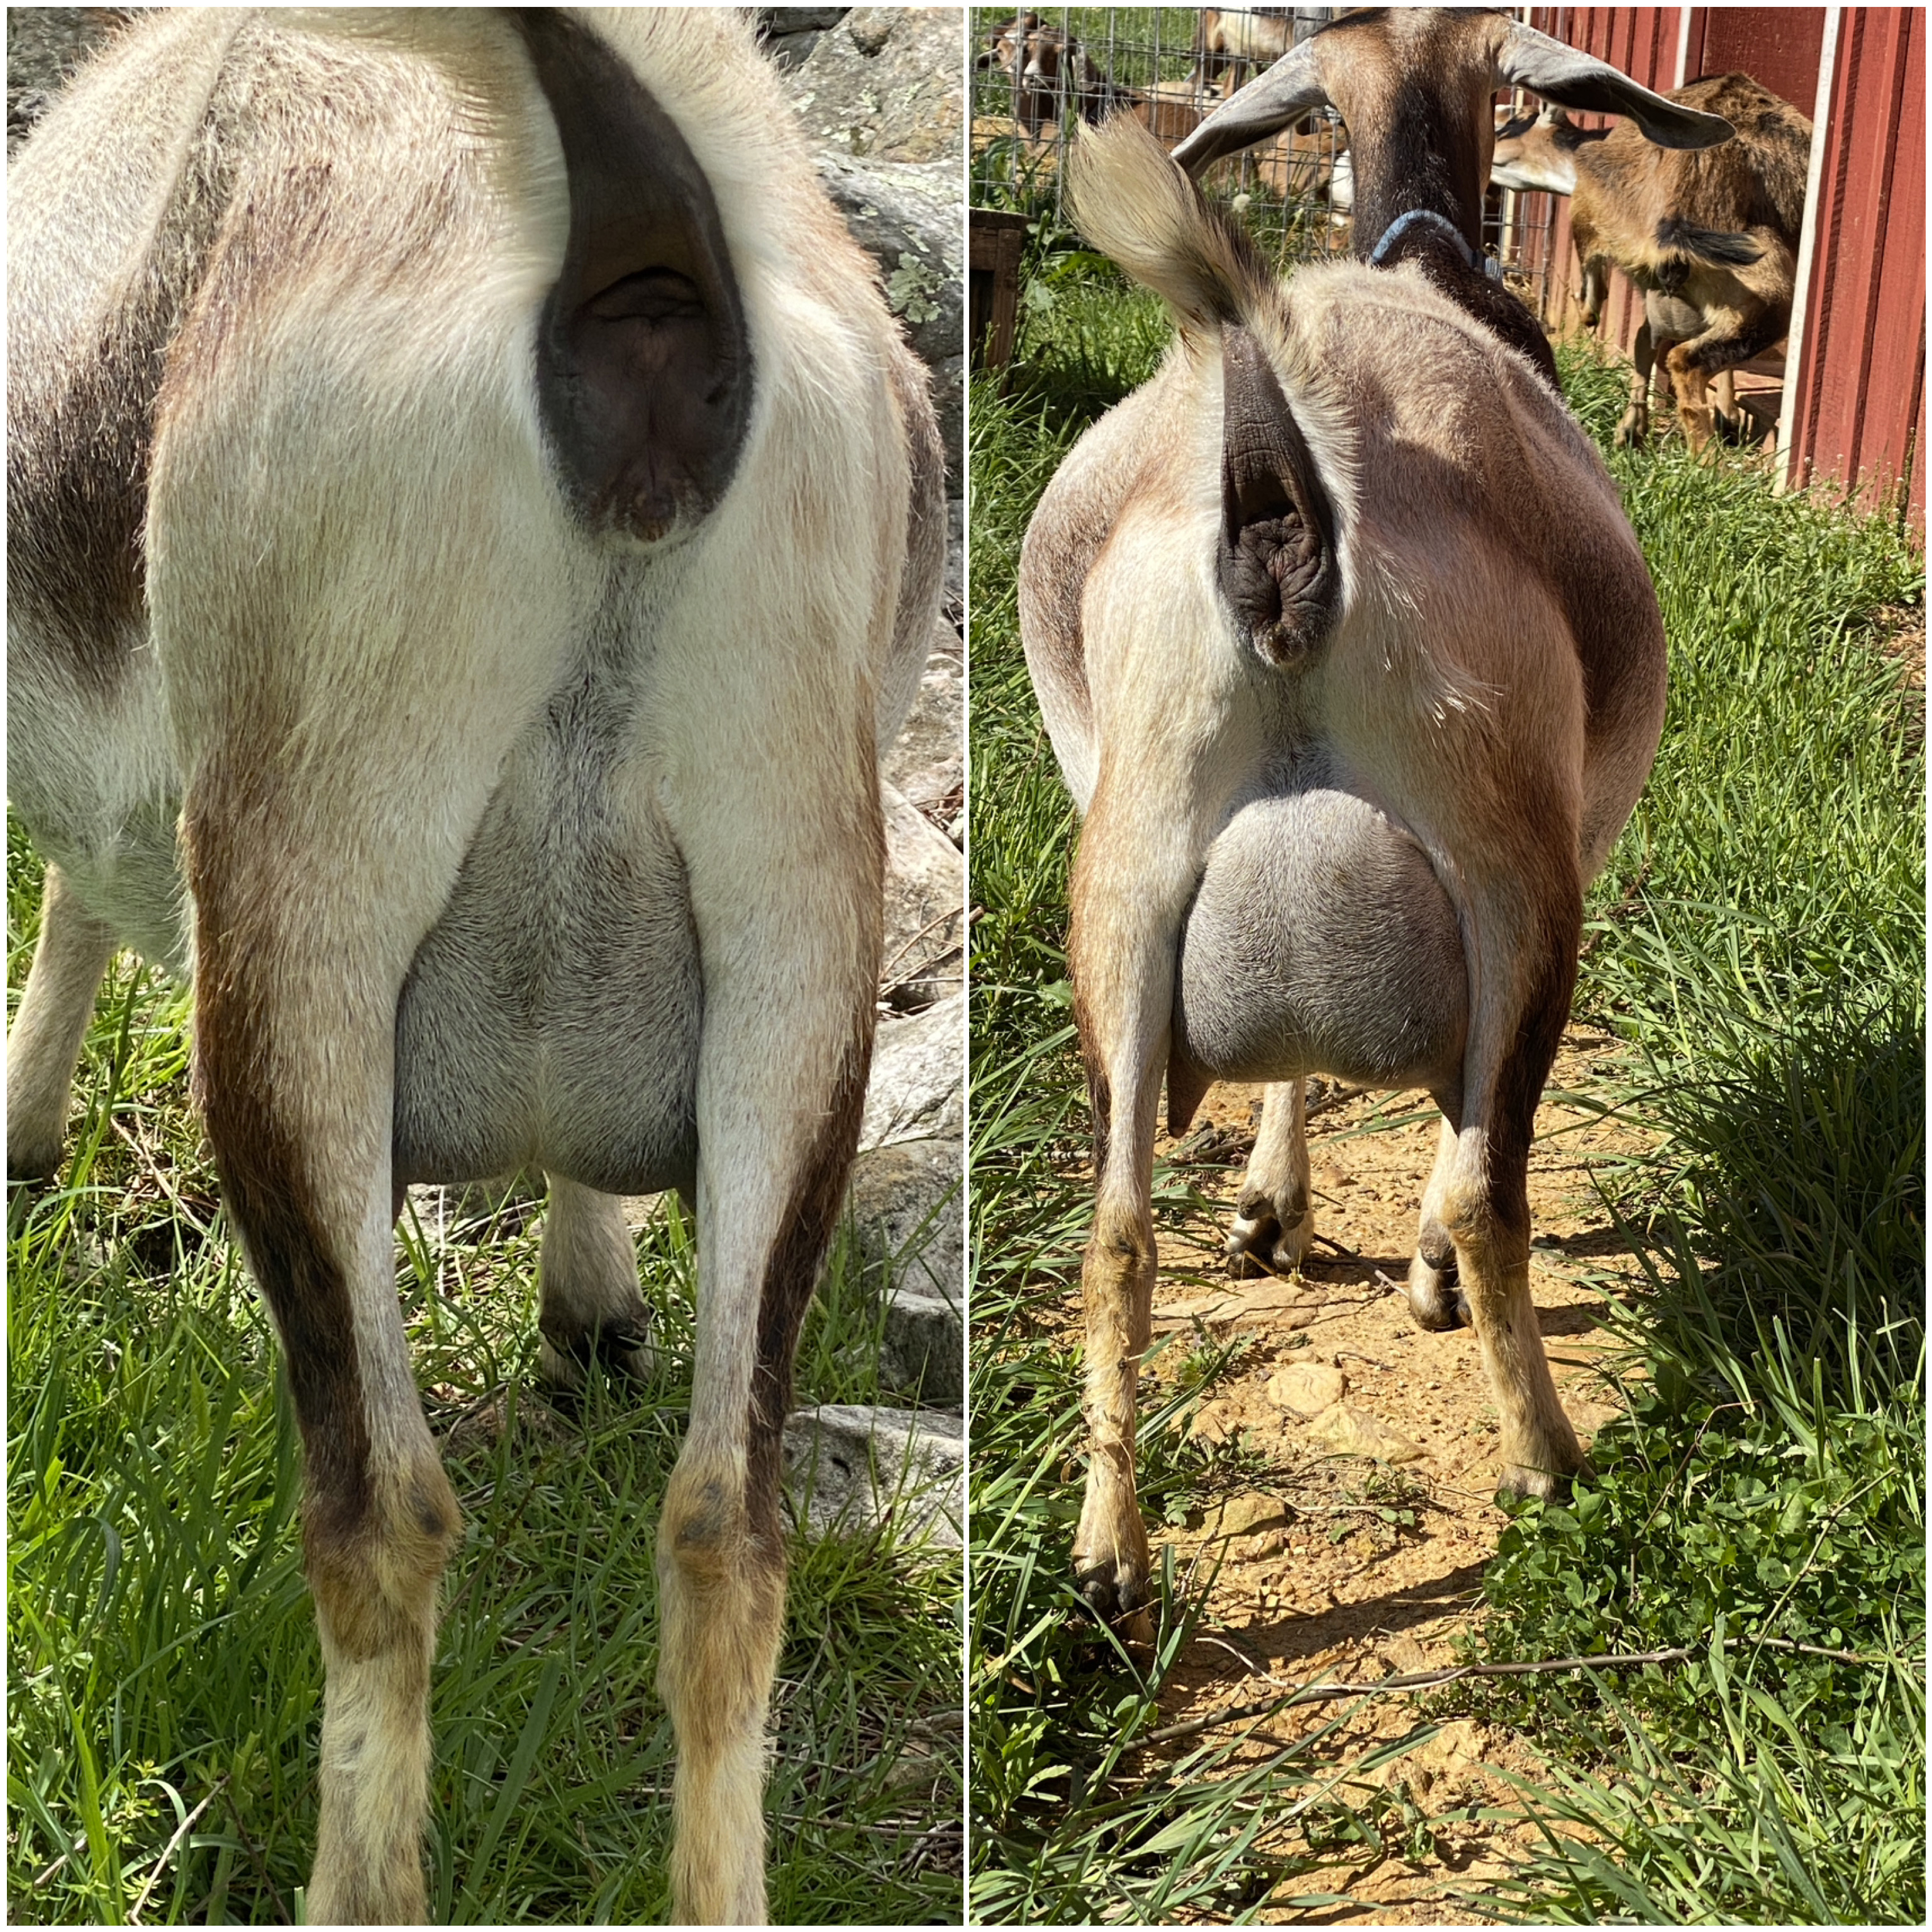
Look at her udder. Taking pictures every couple of days, starting when they are 2 weeks out or so, can really help newbies to see changes. A doe’s udder starts to be noticable anywhere from 6-8 weeks before due date. BUT, it really grows in the last few weeks, and typically, you can really tell a difference in the udder and teats when labor is 24 hours (or less) away (right picture is 2 days later than left). The udder will be engorged, and the teats will be firm to stiff.
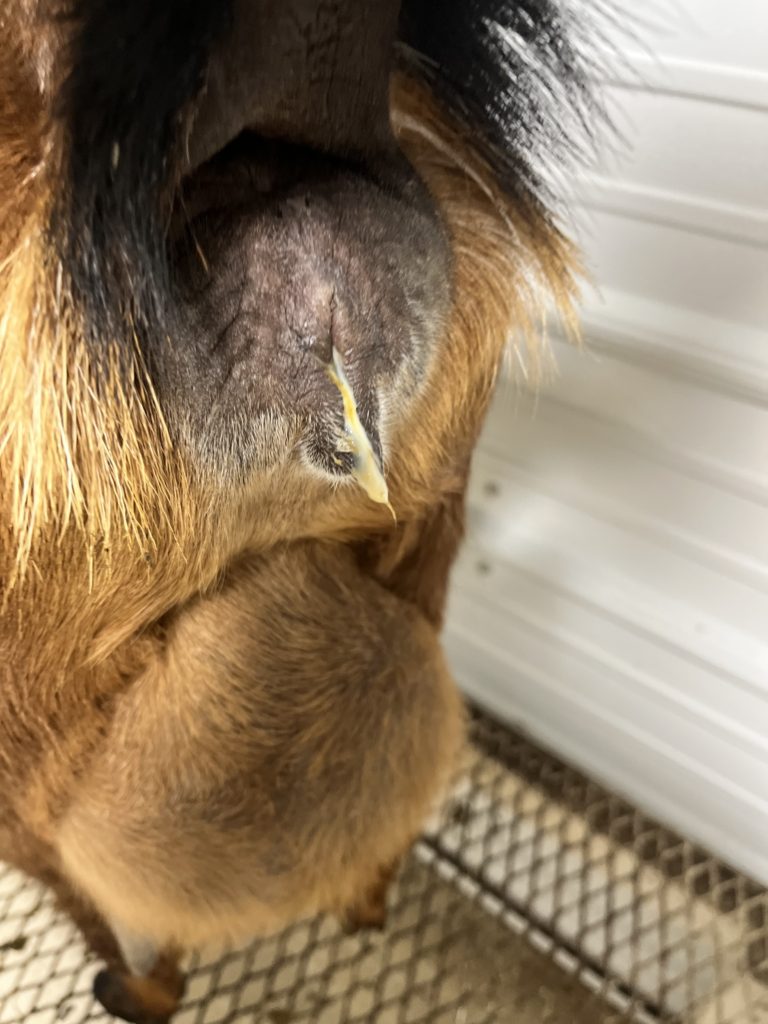
Watch for her mucus plug. This is my most reliable sign. If I see an inch or more of mucus hanging out of her butt, I know that we are going to have babies within the next… oh… 10 hours on the outside, but typically more like 6. 🙂
Signs of Early Labor
Not eating her breakfast. Or, not eating hay, if it’s after breakfast.
If I’m watching a doe through the night on the barn camera, and she’s eating away, I’m thinking she’s not in labor, nor will she be, for the next few hours.
Generally speaking, does kid on an empty rumen, so they don’t tank up right before delivery.
Here’s a free tip: LOAD up does who are near to deliveries on hay in the evenings and you may not have as many night time labors.
Standing off by herself in a way not usual for her.
An “inward look.” She’s not alert to her surroundings. She concentrating on what’s going on inside her.
Mucus is visible on her butt, or even a long stream of mucus as in this picture… six to eight inches long, thick and white or yellowish and more transparent. This doe is well into labor.
Generally, the closer to delivery she is, the more liquid or transparent it will be.
Stretching and moving, looking uncomfortable. Some will lie down and then get up several times.
Biting her sides.
She may want to be licking your hands.
Visible contractions: tensing of muscles, while tail extends straight upward.
Her vulva may look convex (pushed out).
She may paw at the ground.
NOTE: You may have all these signs going, and then they will diminish, and the doe may eat and/or drink. It’s normal. She is taking a break. Typically, labor will start up again after a bit.
You should not think of intervening until the doe has been actively pushing for 30 minutes. The early contractions are lining the kids up inside, and the cervix is opening. The doe must feel the pressure of the first kid to be born pressing on her cervix before she will begin to push him out. If you intervene too soon, you will be trying to pull a kid through a tight cervix, and can do real damage.
In these pictures, Candy is not pushing. She is having heavy contractions and stretching so as to line up her kids, but she is silent.
When the doe is well into labor, you’ll want to start brewing the red raspberry leaf tea. This warm drink given after all the kids are delivered will give her an energy boost and also help her uterus to contract and expel the placenta(s) sooner.
Get a 4 quart pot and a colander that will fit into it.
Put the red raspberry leaves (available on Amazon or other providers) into the colander and turn the water on to medium heat.
Allow the leaves to steep, making tea. Set a stopwatch for about 20 minutes.
After the tea is made, turn down the burner to “warm.” (Make sure it doesn’t boil away…)
Get out your molasses and a large serving spoon. Put them nearby.
Right after the doe is done kidding, you’ll stir in a big dollop of molasses and serve the tea warm (but not hot) to the weary momma.
Pushing and Delivery: Normal or Ideal Presentations.
Normally, after a few hours of contractions, the doe will begin pushing. I’ve only had two does who was soundless in this. Most will give prolonged grunts as they bear down; a few will actually give high-pitched screaming at this stage.
Pushing is different from contractions: you can tell that she is bearing down. You can hear it on a barn cam, so I always leave the sound on at night. I’ve had one birth in particular to which I was only alerted through hearing the doe pushing, since it was mid-morning, and she was out of sight behind a manger, and we had no idea since our last barn check that she was in labor.
The dam may push standing up or lying down. Mine almost always lie down, and almost always wedge their butts into the most uncomfortable (for me) location available. This is one good reason for kidding in the open, and not in a tight kidding stall. It gives us humans more room to maneuver around the doe.
Pushing is the stage when you will begin to see the kid. Below are details of what you’ll hope to see and do …
Focus on the dam…
Each normal, live kid is encased in an amniotic sack, filled with fluid. This sack can look white or yellowish, and is translucent. As the kid begins to be pushed out of the doe, you’ll see a “bubble” — it’s the tip end of this sack.
There aretwo ideal (or normal) presentations: two feet and head first, or two hind feet first. Both of these are “normal” or “ideal” presentations. See these diagrams. (We will discuss abnormal presentations in Part 3.)
If you have a bright light (such as a flashlight or cell phone light) you can look into the bubble, and hope to see two hooves encased in a protective, white casing. Ideally, there’s a nose there, too. Often you can see teeth and a tongue.
Sometimes, the sack will burst as the doe pushes the baby out. This is normal. If it does, and the kid is nose first, you can wipe its face and nose with your towel, as it may start to gasp and breath before it’s fully born, or not.
Typically, after the head and shoulders are out, in a normal delivery, the rest of the kid slides out and onto the floor.
Ideally, you are waiting with a towel (or feed sack) placed right near the scene of the action. You should wipe the kid’s head with a towel first, clearing its nasal passages (carefully — they are delicate) and throat if needed with the bulb aspirator.
After the kid is breathing well, which should be within 30 seconds, put the kid in front of the doe so that she will lick it and smell it.
This is VERY important.She needs to bond with her baby, and should eagerly lick it. You can assist with drying, but do not get in her way, especially if she’s a first freshener. Such new dams might not know to do this. Present the baby to the doe, and if she’s uncertain, back away and see whether she will start to lick it on her own.
If it’s not cold in the barn, you don’t have to assist with drying at all.
In most cases, there will be about 15-20 minutes between kids. It can go longer, or shorter. Sometimes multiple kids can come fast: one after the other. During the interval, it is a great idea to get each kid nursing if possible. (See details below)
Bumping her: If you think the doe may be done delivering kids, you can try a little test to see if there are any kids left inside her. If she is standing up, stand behind her butt and reach around her belly and lace your fingers together. Then pull up on the belly and then let it drop again into your hands. (This is not a big motion, but it is quick. Be gentle, but firm.) If there are kids left, you can typically feel sharp hooves or bony butts bumping against your hands.
When she is finished delivering kids, you will want to give her the red raspberry tea with molasses as an energy boost and to help the uterus contract to expel the placenta(s). (If the tea is too hot, cool it by adding some cold water.) Most of mine gratefully suck down nearly a gallon of the stuff.
Also focus on the Kids…
As each kid is born, it will need to breathe freely first, and then quickly be presented to the dam for cleaning, sniffing, and bonding. Additionally, you need to be concerned with each kid’s temperature and note their sucking reflexes.
Healthy kids will emerge with open eyes and a perfect mouth. They are miracles on hooves, ready to stand and eat within 5-10 minutes of birth.
They will be slick and wet from birth fluids.
As the dam licks them, she is drying and stimulating (and thus warming) them. However, if the barn temperatures are cold… under 40° or so… the wet kid can get chilled.
If your barn is cold, help to dry the kid with a towel and, if the kid is “floppy” — i.e. not attempting to get up to nurse — put your finger in its mouth. If it is cool to the touch, then you need to warm the kid.
We use a styrofoam cooler and a hair dryer. Put the kid into the cooler; turn the hair dryer on a low but warm setting, and then put a towel over the cooler. Be careful not to burn the kid, but fill the cooler with warm air from the hair dryer. Typically, this only takes 5-10 minutes. If this is the kid’s issue, it will brighten considerably and start looking to nurse your hands and/or to stand up. Take it back to its mother and help it to nurse, as described below.
As you are helping to dry a healthy kid with a towel, don’t be too gentle. Friction on its skin will stimulate and warm it.
As the kid warms, it should attempt to get on its feet. Because it is using its ligaments and muscles for the first time, it will usually take many tries for the kid to be on his feet, and some only seem to know how to go in “reverse.”
You can assist with this process, maybe by untangling limbs and making sure that the surface under the kid gives him good footing, but also do let the kid struggle to right himself. This is how his muscles strengthen.
IDEALLY, each kid should get some colostrum in him within 30 minutes of being born, the sooner the better. It is vital that the kid be warm, or he will neither seek the teat nor be able to digest the colostrum.
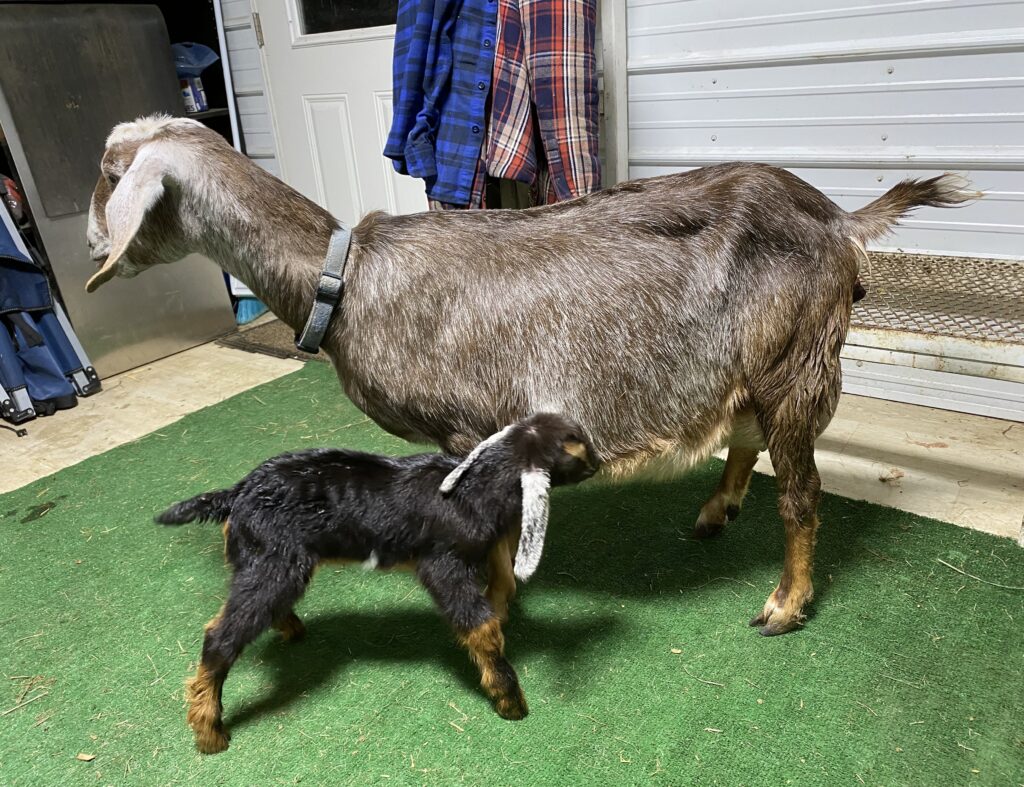
If the kid is warm and active, it will start searching for the dam’s teat. She will nuzzle her dam’s side and bump her head on her dam’s belly (or your hands). She may go the wrong way, nuzzling along the dam’s chest or ear.
If it’s been about 15 minutes and no active pushing is going on, urge the doe to stand so that the firstborn can nurse. (Nursing will stimulate uterine contractions!)
You can pick the kid up and bring her to the teat. Don’t try pushing her butt or her head towards the teat, as her instinct will be to push back. The kid has eyes; you can put her in front of the teat, and then bend the teat towards her mouth. Her God-given reflex will be to “latch on” and suck vigorously.
If the kid just “sips” at the teat, that’s OK for a first try, but attempt to get the kid back to the teat in a very short while. You want to see vigorous, prolonged suckling as soon as can be.
Take a break from trying to get kids to nurse if the doe starts to deliver another kid. Make sure that the first one is safe from being sat or stepped on, and then give your attention to the delivery of the next kid.
As soon as you can, dip each kid’s umbilical cord in iodine.
The Clean Out
Typically, after the last kid is born, there will be long, stringy, bloody tissue hanging out of the doe’s vulva.
Do not touch it! Between one and twenty-four hours later, the placenta(s) will emerge on its own.
Most of my does have birthed their placenta(s) within 2-4 hours, but it’s not unsafe in goats for it to take up to five days to deliver placentas, especially if there are birth complications (see Part 3).
Again, NEVER pull on the tissue that is hanging out of the vulva. You want the placenta(s) to disengage naturally.
Did you notice that (s) on the end of “placenta”? Yup. Sometimes there are two.
A goat’s uterus is pronged: it has two “horns” in which kids can be lodged. In some cases, each of these “horns” can have its own placenta.
VERY rarely, you can have a kid or two born, and then a placenta, and then another kid (or two). This has only happened only a few times to me.
It’s the time of year when many of us are expecting goat kids, so I thought I’d put together a primer for newbies. I make no claims to be an expert, but am just trying to share how we do things, and offer a few lists and tips. This turned into a three-part series.
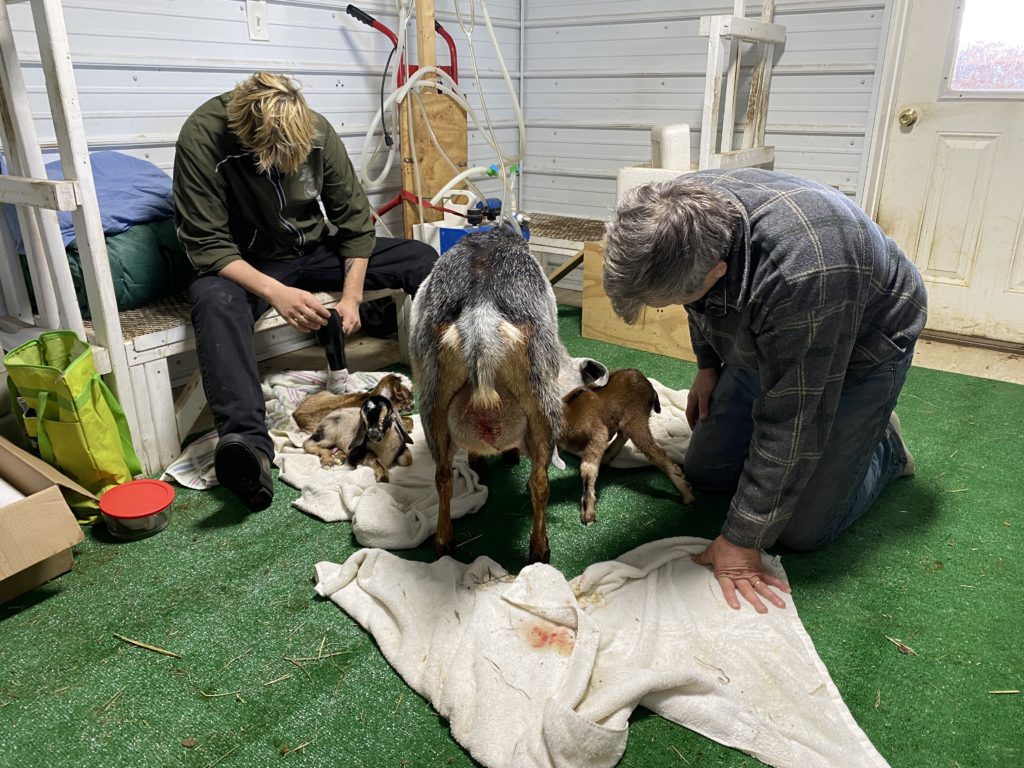
I so remember my first kidding season. We bought two pregnant does to start our herd, and our very first kid got stuck in her mom. When we finally got her out, she had stopped breathing. My husband, Scott, gave her mouth to mouth resuscitation for over half an hour.
When we called to say that we wouldn’t be making it to our Care Group, our pastor, who had raised sheep all his life, advised us to put this kid into a styrofoam box with a hair dryer blowing on her to warm her up.
She finally made it through all this! Her name is JC’s Bluebelle 3*P, and she’s been one of our best dams ever since. Here are Scott and Bluebelle, days after the birth.
As we are starting our fifth kidding season, I thought I would share some basic information for those who are just starting out. Many have written much more comprehensive articles on this subject (and books). I’m not an expert by any means! But I have had preemie kids (who we lost) and tangled kids, most of whom we’ve pulled through, but not all. Birth is a scary business, and all the more so when you are just starting out. My prayer as I write is that this will help someone to have more confidence, and/or knowledge, as they enter their first kidding season.
Prenatal Care of Expectant Dams
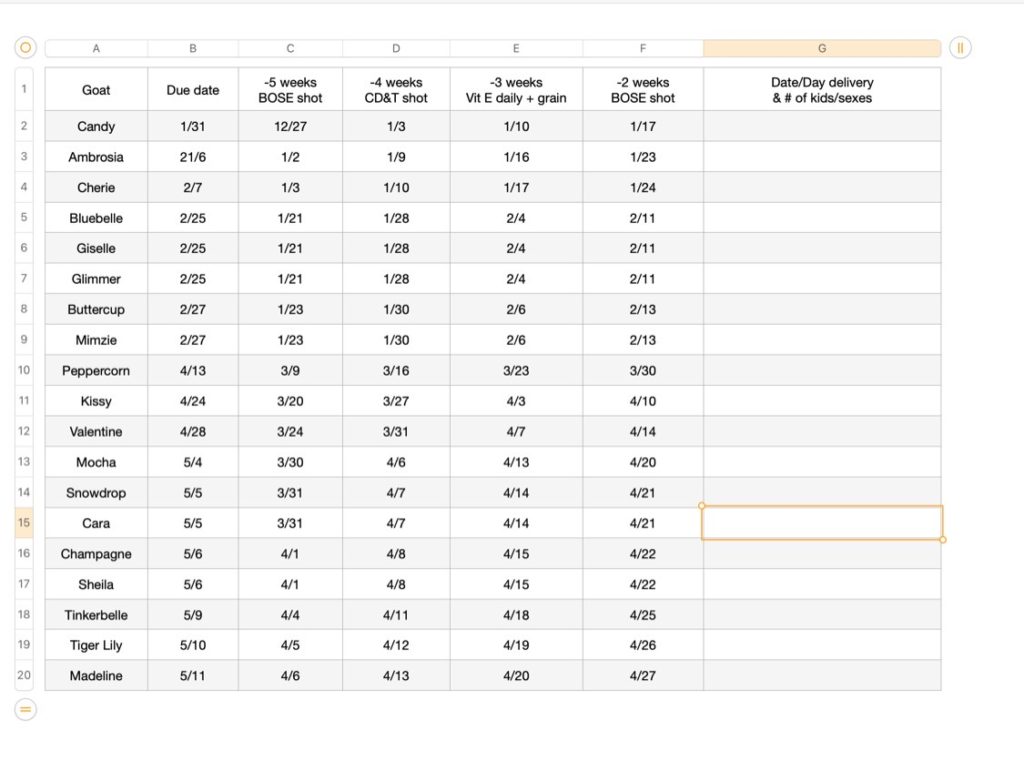
We have a chart that I create each year. The information here is then also transferred to my day calendar.
A picture of this chart goes onto our cell phones for easy reference in the barn, but it’s also helpful to me to have it printed and posted where it can be cross checked, and a reminder in the paper calendar.
For each doe, here is our care list, counted back from a due date that is figured at 150 days from breeding.
5 weeks before delivery: BOSe shot (Vitamin E and selenium shot: read more here)
4 weeks before delivery: CD&T shot (this will cover kids from tetanus during disbudding)
3 weeks before delivery:
Start feeding a handful of grain 1X/day to get the rumen ready for bigger feedings immediately post partum. In this grain, we put one Vitamin E liquid capsule (cut open) and a small handful of red raspberry leaves. The grain gradually increases to about 1 cup/day until delivery. We find that we’ve never had pregnancy toxemia using this protocol.
We also start pregnant dams on alfalfa hay around this time. Since we have 20+ does kidding, this is not as strictly controlled, since they all eat together. We usually house about 10-15 of the does nearest delivery together, and feed one bale of alfalfa to all each morning, then feed high quality grass hay through the day.
2 weeks before delivery: another BOSe shot
One more note about prenatal care: For our first 2.5 years of kidding we used various brands of loose, all-in-one, goat minerals. In our first kidding season, we frequently saw kids with weak front legs, or kids who “walked on their knuckles” — really, their pasterns. Both of these conditions required splinting.
In our third season, we switched to a free-choice mineral bar. We have seen a marked change ever since. We have had extremely healthy, vigorous kids ever since, and not one has needed splinting, or walked on their pasterns. Additionally, our does have had glossier coats and brighter eyes overall.
Getting Ready for Kids
When I was starting, I spent an entire day searching out and watching every single goat birth video on YouTube or blogs. It really DID help. I saw normal birth after normal birth. Some videos showed tips and tricks that helped. Almost none of them showed troubled births because, well, if things are going awry, there’s not always the desire or attention to give to capturing events on film.
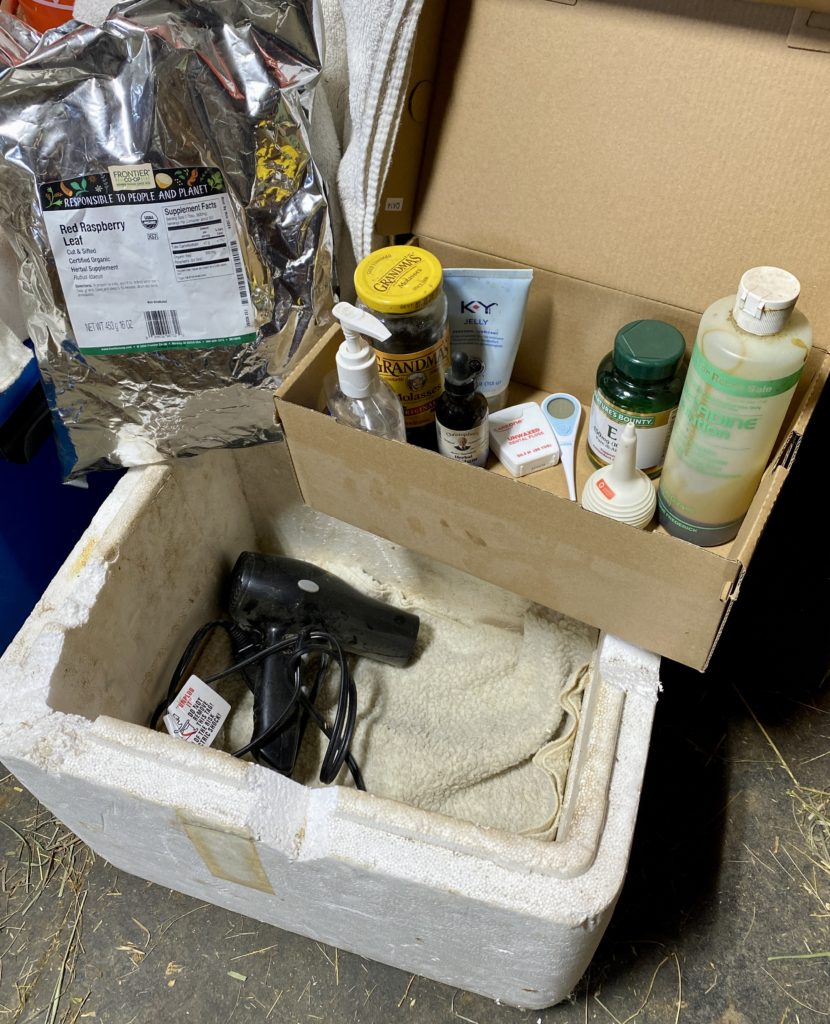
I also gathered supplies specific to kidding. I gathered far more than I needed, so this list is in order of things that we really use almost every time, down to things we are sure glad to have when we need them!
Equipment for Normal Deliveries
Barn Cameras: Top of my list. Saves us so much sleep and so many steps. I wrote a whole blog post on ours, and you can search to find tons of articles on various systems, from baby monitors to security cameras. Do it! (You can thank me later!)
Towels. We use 4-6 bath towels, and 1-2 hand towels per birth. We wash them afterwards, and use them each year. We keep them in a tote from year to year, and just pull it out with the first kids.
Hand Sanitizer, or better, soap and hot water, for sanitizing hands before you go inside a goat. Put it in a bucket and have it handy as the goat goes into serious labor.
KY Jelly: Lubricant to be used AFTER cleansing hands, or with gloves.
Bulb syringe (also called a nose sucker) to help clear mucus from nostrils and throats of baby goats.
Gloves (throw away, latex or other kind). I don’t always use gloves, as in hairy situations they can impair my grip on tangled kids. I soap up and go in without them. But, we always give LA200 antibiotics to does whom I have had to enter deeply, regardless of whether or not I was wearing gloves.
Iodine: because you need to dip the kids’ cords in iodine as quickly after birth as is practical. Find a container about 1″ deep with a lid and use the same 1/2 cup full for the season.
Scissors: for cutting a cord. Mostly never used.
Supplements
Red raspberry leaves and molasses: to make a post partum tea for does. The sugar restores their energy and the raspberry leaves help the uterus to contract and expel the placenta. Put the leaves into a colander and thence into hot water in a pot to brew the tea while the goat is in advanced labor.
When she finishes, serve it warm with a big dollop of molasses stirred in. Most of them LOVE this brew!
Herbal calcium drops: Can help does during long labors or pushing sessions with added calcium. It helps the uterus to contract. I administer two dropperfuls at 30-minute intervals during protracted labor.
Helps for Distressed Dams/Kids
Styrofoam cooler: About 12″ x 18″ inside. This is used with a hair dryer to warm up chilled kids. (See Part 2)
LA 200 antibiotic: (see above). It’s available at feed stores. Also check your supply of syringes and needles. We have syringes in 1 ml, 3 ml, 6 ml, and 10 ml sizes, and needles from 1/2″ 20 gauge to 1″ 20, 16 and 18 gauge.
Colostrum substitute (or frozen colostrum cubes from last year’s kidding) in case the mom doesn’t make it, or rejects a newborn. Save fresh from year to year, freezing some as soon as the first doe kids.
Thermometer: rectal type. Normal goat temperature is 102° F.
Newborns need to have temps above 100°F to digest colostrum. If a kid is cold (feel mouth to see, or take temp) you must warm them before feeding (whether they nurse from dams or are tube fed.)
Winter kids sometimes get pneumonia, or hypothermia. Read up about distressed goat kids so you can recognize the signs.
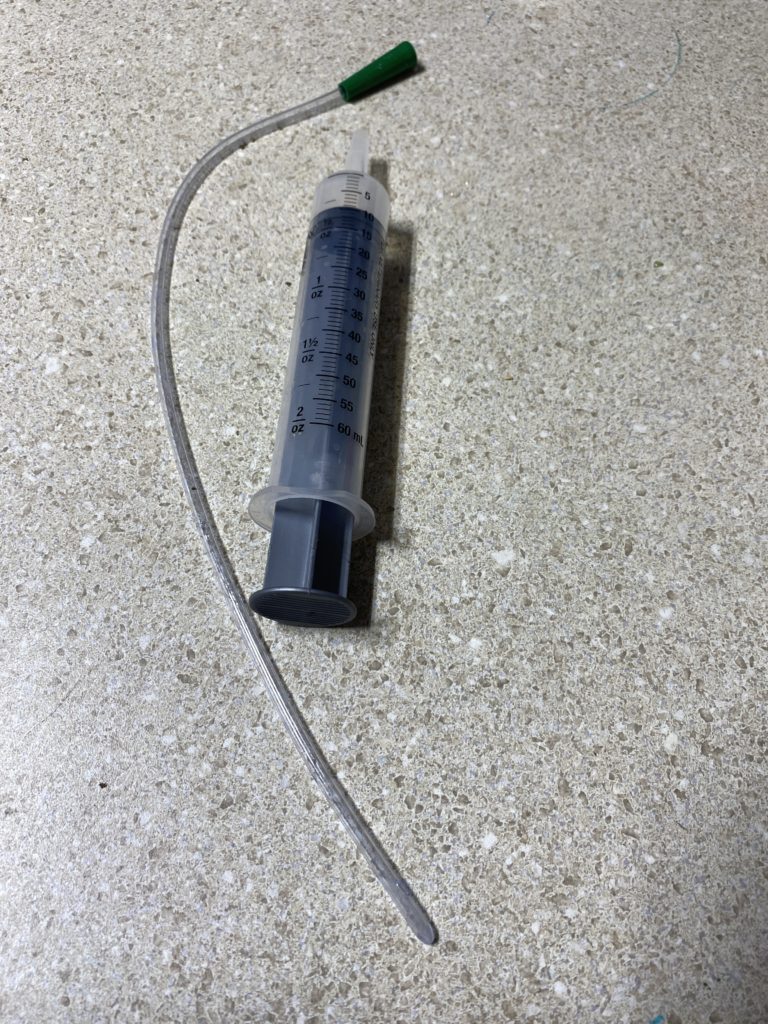
Feeding tube: This has two uses.
One is for tube feeding distressed kids, but I use the apparatus far more often for helping very small or weak kids with constipation issues. See Part 3 for more on this.
Again, YouTube videos on tube feeding are a great resource. If you’re new to kidding, watch some while you are waiting for your babies to arrive! It’s easier than you think, but also very scary. You CAN do it, if you have to!
Kidding Stalls or Bonding Pens
Whether or not your doe delivers among her friends in the general population or in a kidding stall is personal preference. We have tried it both ways, and we prefer kidding out in the general pop area (where clean up is easy and goats may be less stressed) and then transfer to a clean, waiting bonding pen with a kid-warming hut, water and minerals, and fresh hay waiting for mom and babies.
There are articles on this website about various pop-up bonding pens/kidding stalls (we are fans of movable, modular goat enclosures) and kid-warming huts made of 50 gallon barrels or large totes equipped with dog house heating pads under. The larger barrel huts have heat lamps over. You may need HD (heavy duty) extension cords to supply hair dryers, heat lamps and/or heating pads with power.
NOTE: We NEVER, EVER leave the heat lamps on when we are not IN the barn. Too many animals and barns have been lost to heat lamp accidents. That said, heat lamps do warm up the larger huts initially and help newborns to dry off. Since we spend the night in the barn during cold weather (on cots in our heated milking parlor) in order to check on newborns through their first night, we do use the lamps. But, we never leave them on if we’re not there.
In winter, it’s nice to have hot pots (if you don’t have hot running water) in the barn. Does really appreciate warmed water on cold mornings with their alfalfa! Keeping them hydrated (particularly if they are nursing) is very important, and we find that they will readily drink down warmed water quicker than ice water.
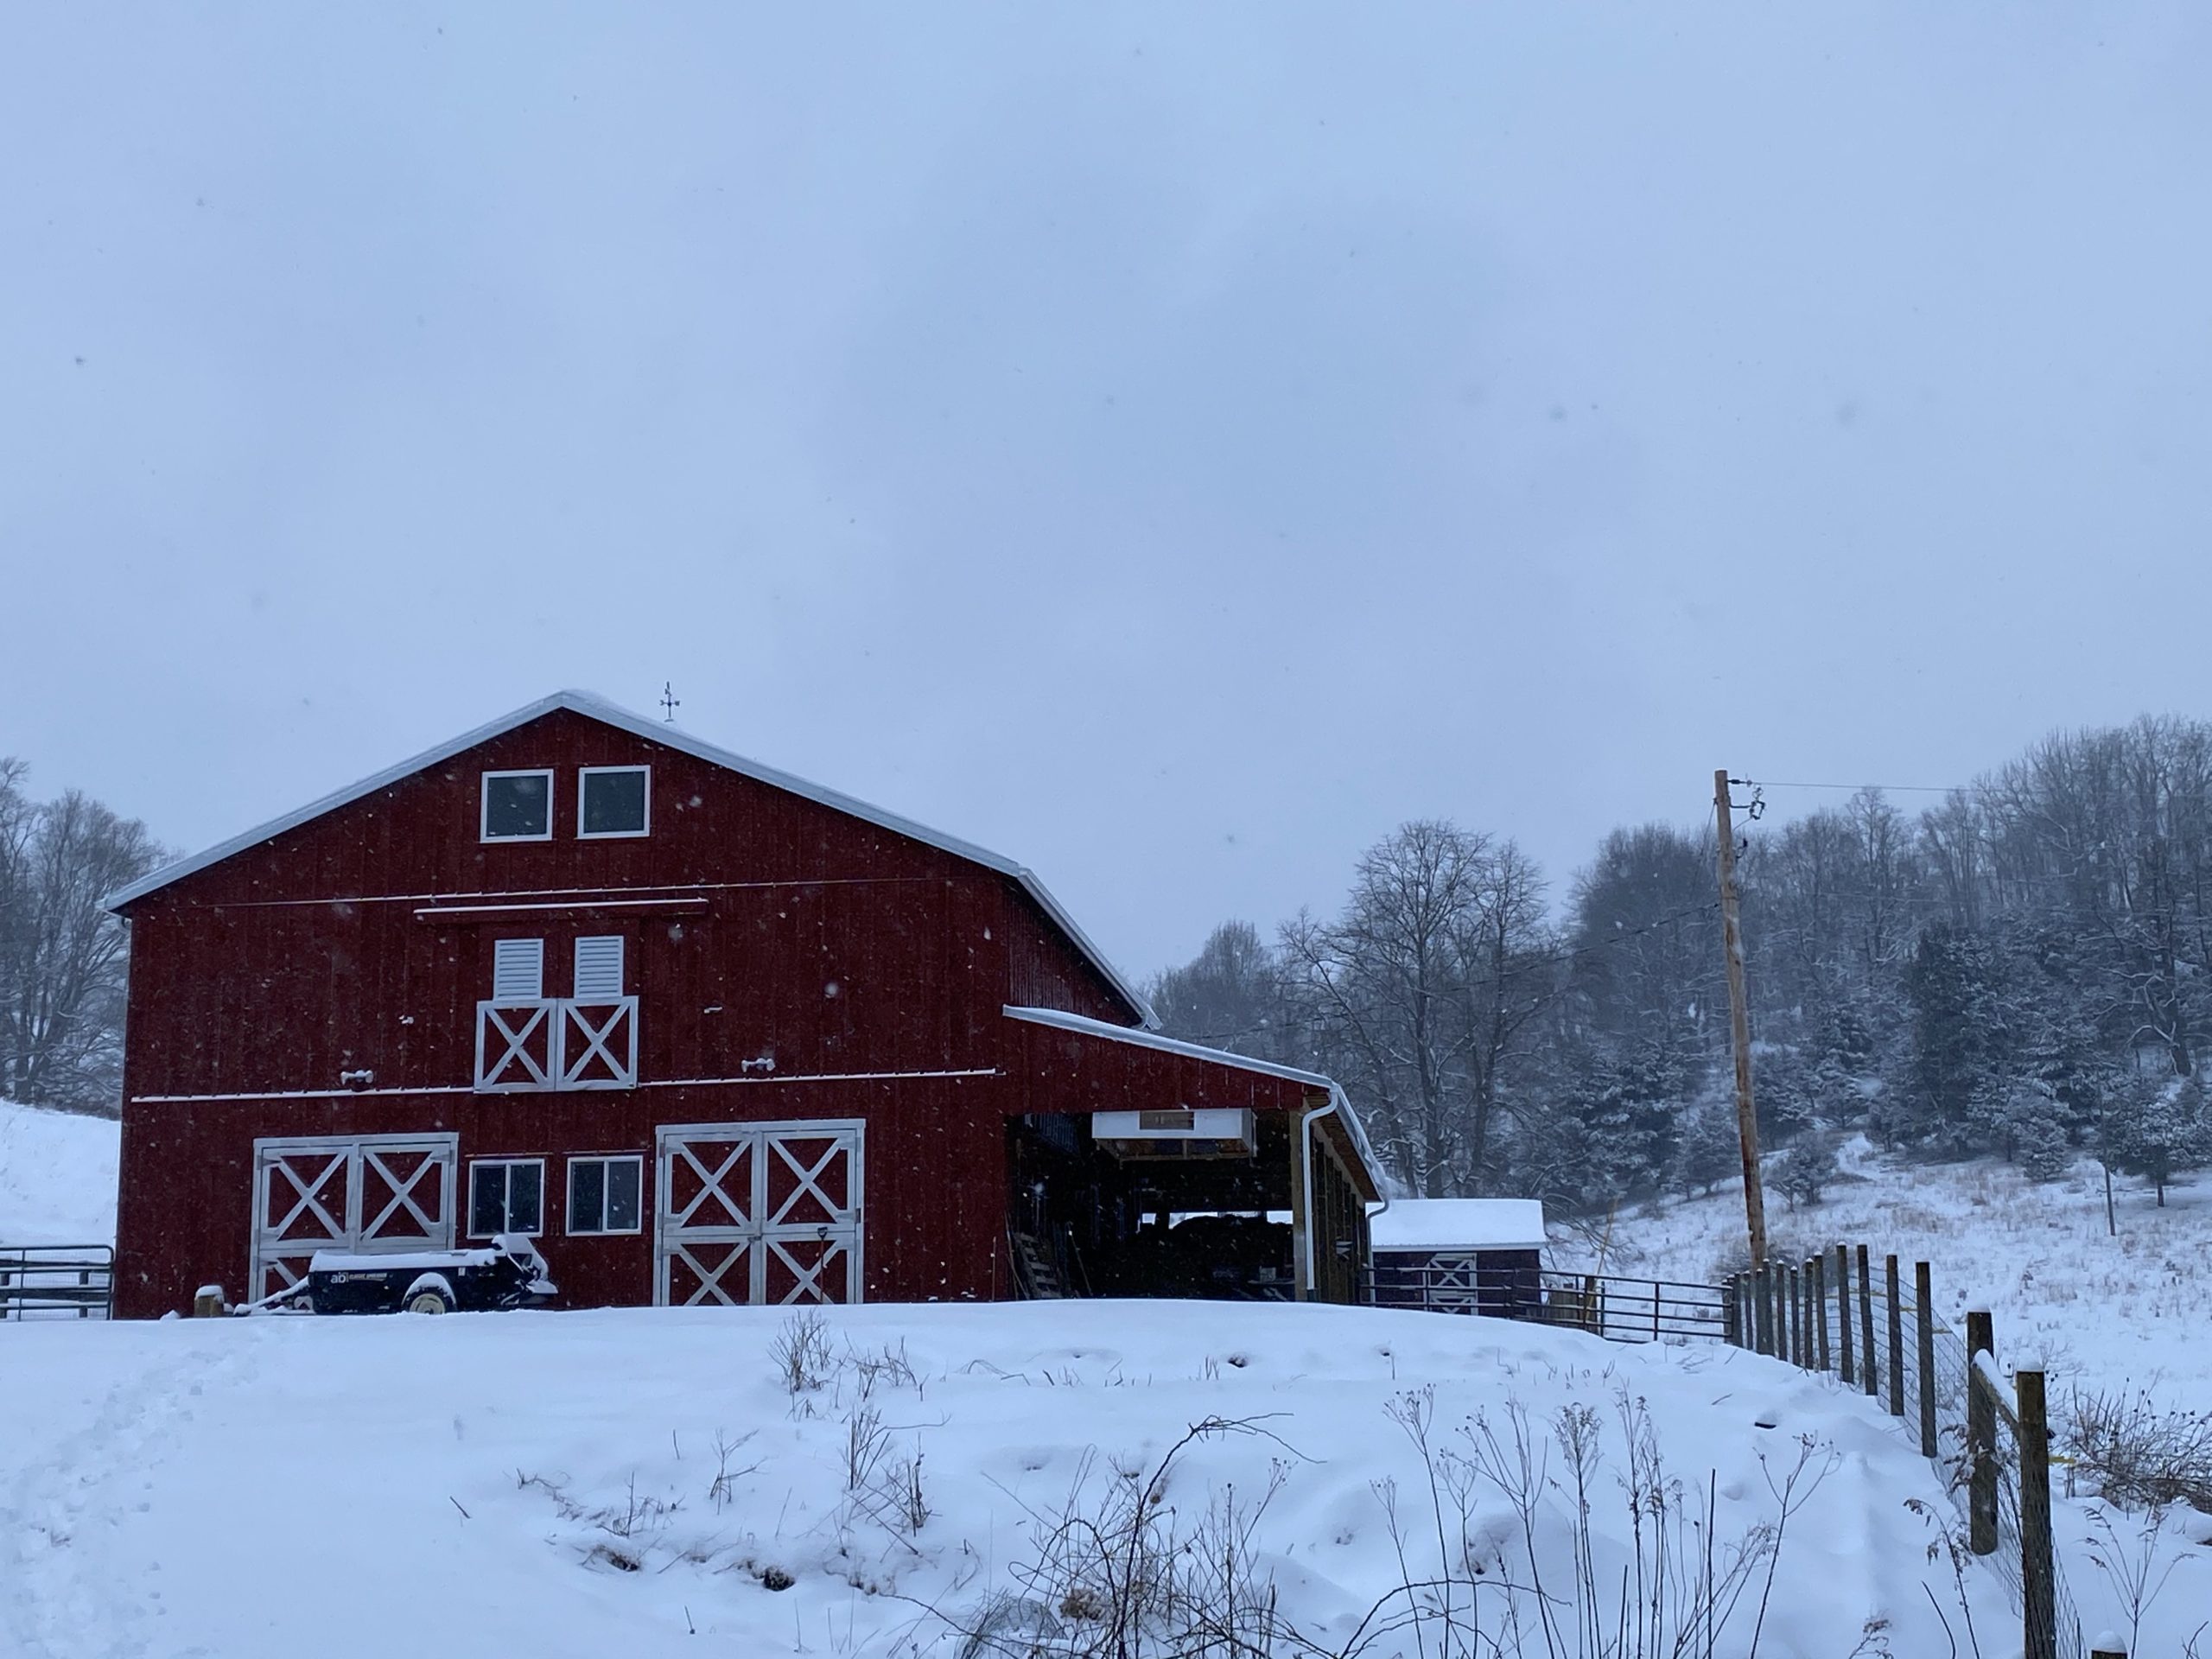
We have a newer barn, and it has a heated milking parlor. (Yes, I know how blessed I am!)
The floor of the milking parlor is washable vinyl planking, so it’s pretty slippery for newborns, compared to a barn floor with hay spread. We find this heated room invaluable for warming kids when the barn temperatures are in the low 30°s. As soon as all of her kids are born, we bring the doe and kids into this room. At our leisure, they are warmed, dried off, and fed. We then cool the room down slowly, and put the doe and her kids into the bonding pen, with the kids in their warming hut.
Last year, we bought a piece of inexpensive indoor / outdoor carpeting from Home Depot that we put down for good footing for kids in our milk room. This carpet gets used year after year.
The doe can deliver her placenta here, pee here, or poo here. It’s all good. We wash it off with a hose, or vacuum it with our shop vac, and it’s good to go again.
There are many ways to do this, of course. Most of the time, I like to use dog crates of various sizes. We generally put the crate into my Hyundai Santa Fe on top of a tarp that we then secure to the sides of the crate so that goat pee and poo are largely contained. In general, I help my buyers with transport only when I will travel up to four hours (making an 8-hour driving day, max). Most of those trips are made with young kids on board.
However, recently, I needed to take two adult does on an eight-hour trip one way. None of our crates would have contained them comfortably (or fit into my SUV, even). We do have a truck with a cap, but my back does not tolerate trips of this magnitude in that truck. What to do?
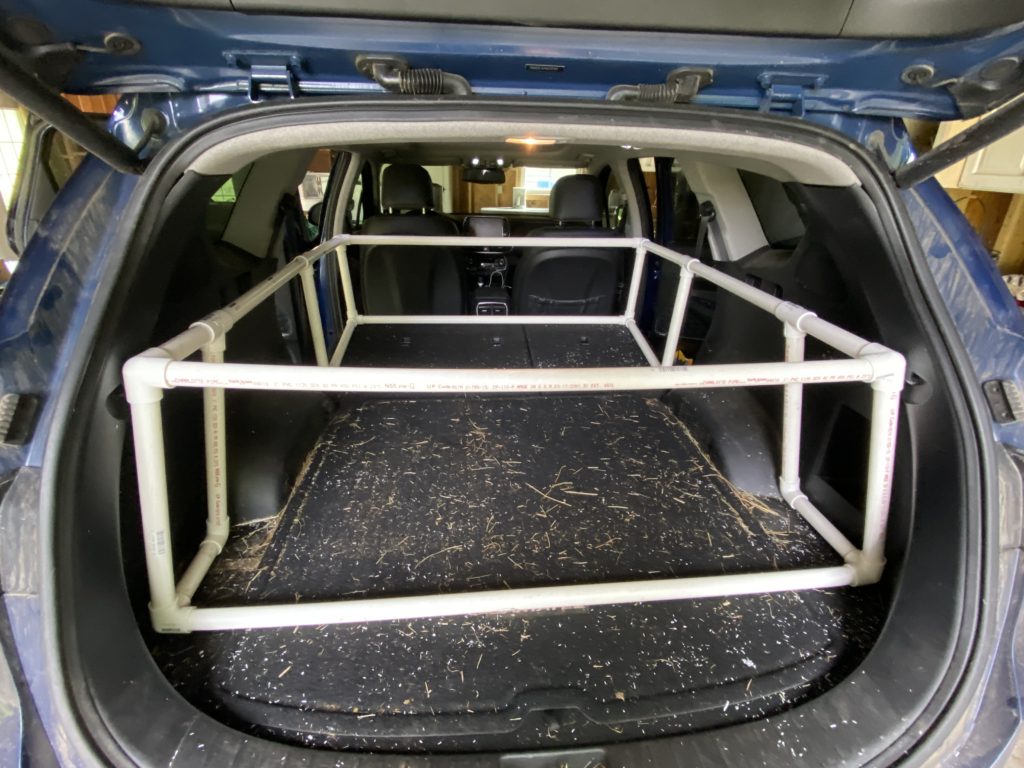
Ta da! The goat sling!
We made it out of 1″ PVC. The bar at the top rear is NOT cemented in. It is jammed in at the end, after we put in the goats.
The front and back sections *are* cemented together. The center, transverse pieces over the wheel wells are not cemented, but they are held in place with locking eye-hooks.
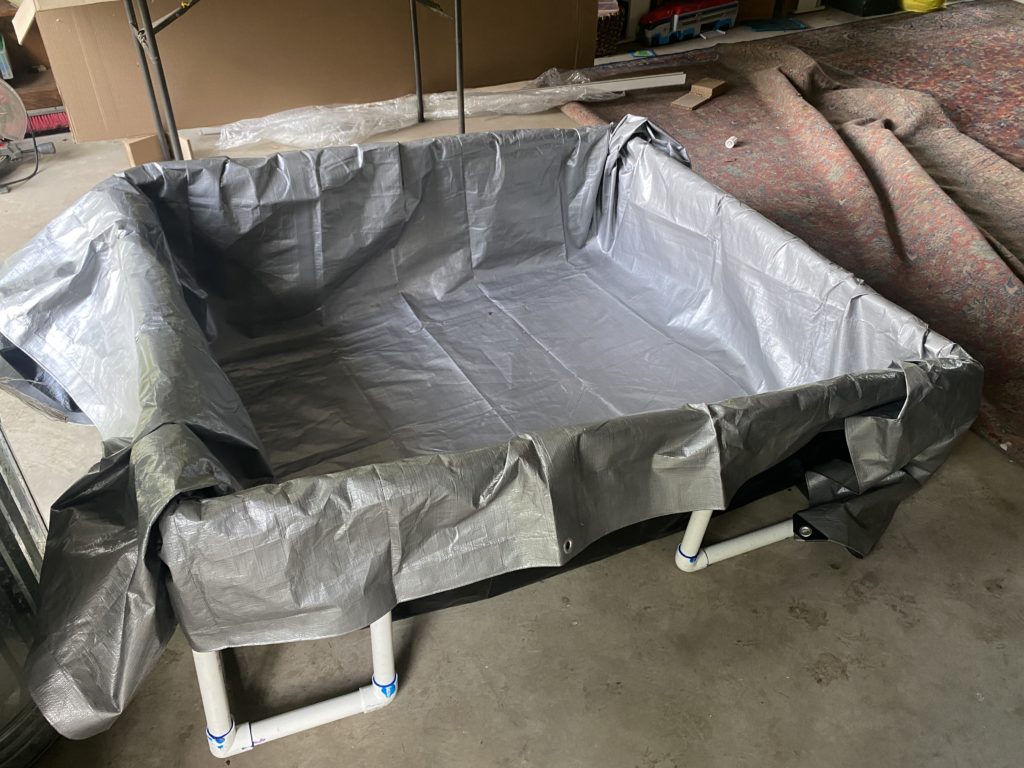
After we constructed the sling, we draped a tarp over it. In our case, the basic dimensions of the sling were 48″ wide by 60″ long, roughly. We bought an 8′ x 10′ tarp, and it worked perfectly.
We tied down the tarp in a few places with shock cords, but in truth, the whole sling is so close to the car sides that the tarp was held securely by friction.
Maiden Voyage
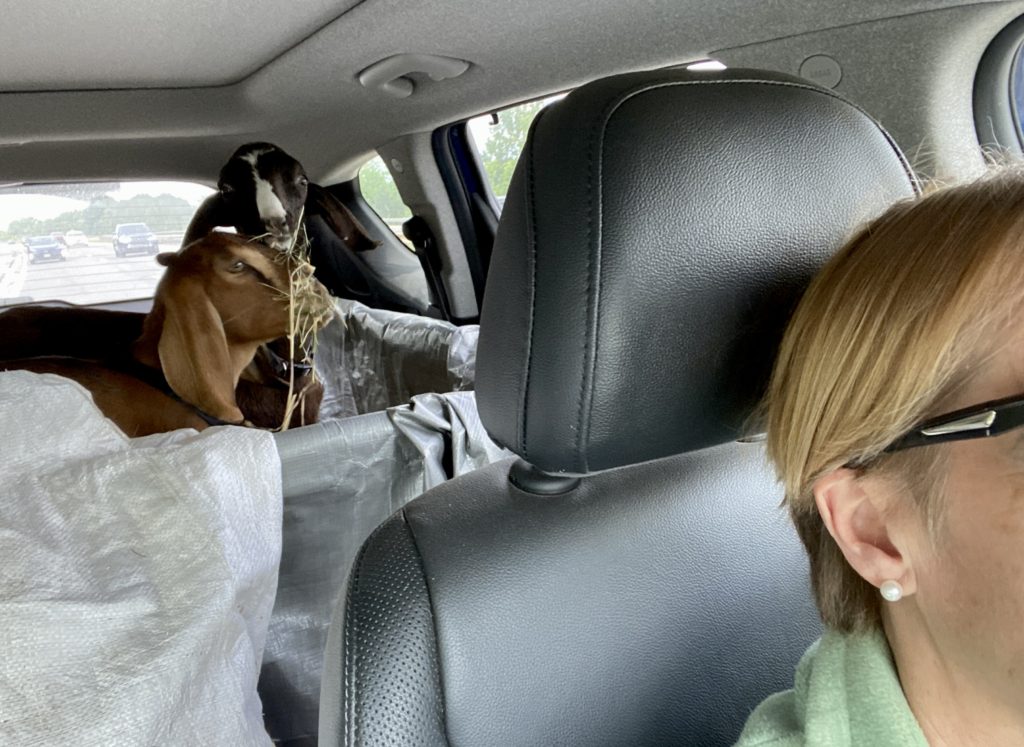
I had a two-day trip planned with this goat sling in place. On the outward leg (8+ hours) I took two adult does from WV to OH. The girls loved it. They could stand or lie down, eat, and move about as desired within the sling space.
On the way home, I had two 11-week-old kids (pictured). They were a buckling and a doeling. I was a bit nervous about them jumping the sling to the front seat, but neither tried it. I did have collars on them, and dog ties with me. At one point, the boy got bucky, so I did end up using the collar and tie to restrain him until he calmed down.
If I do another trip with young kids of different sexes, I think I will take along a collapsed dog crate and stick it behind my front seats, just to have that option to restrain/separate them if needed. It was a bit of a sticky wicket when the boy started to be bucky while I was in traffic. Otherwise, the sling was perfect, and I’m sure we’ll get a lot of use out of it in the next few years. It kept my SUV spotless of hay/poop/pee. Very pleased!
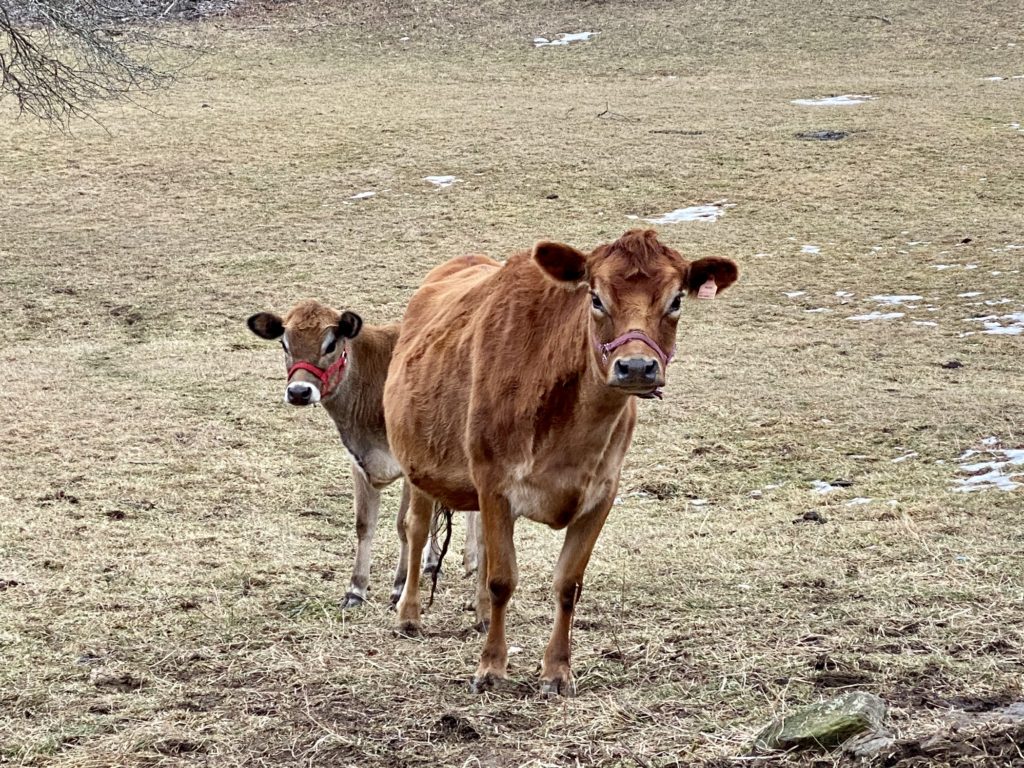
Last year, we bought our first two dairy cows. Maude is the larger girl. She is pregnant and should deliver sometime in mid to late June. She is a small standard, impregnated by a mini bull. You can read more about Maude here.
Charlotte is a mid mini heifer, born in late November of 2019. We are hoping to get her pregnant via AI sometime in July for a spring calf in 2021.
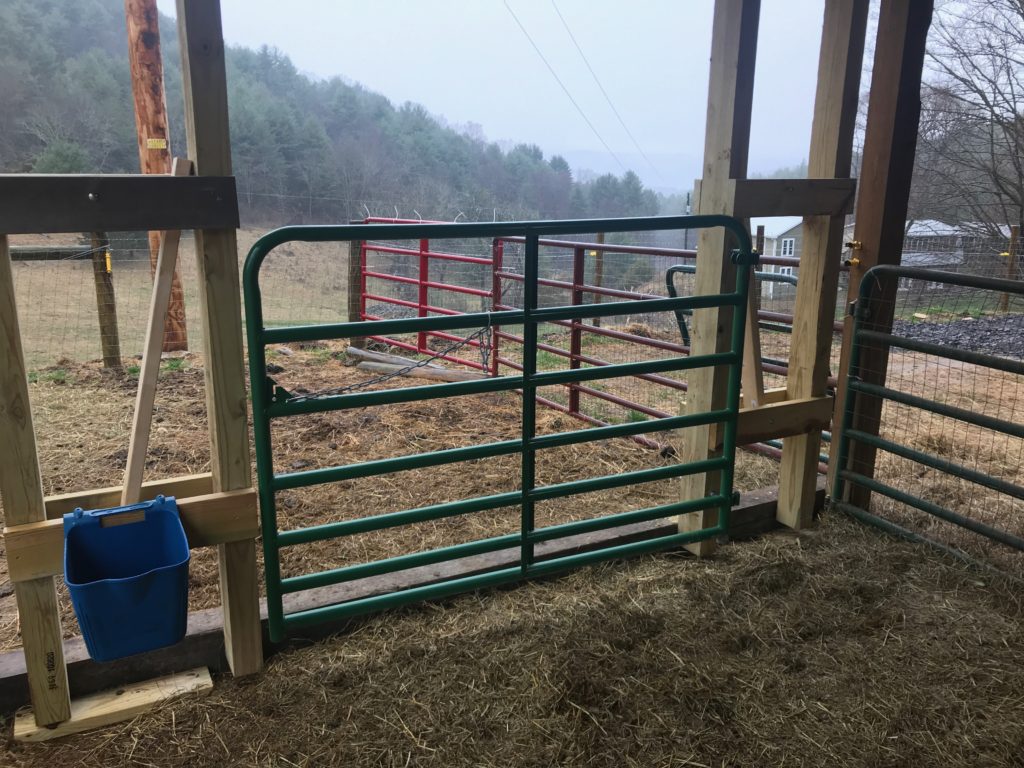
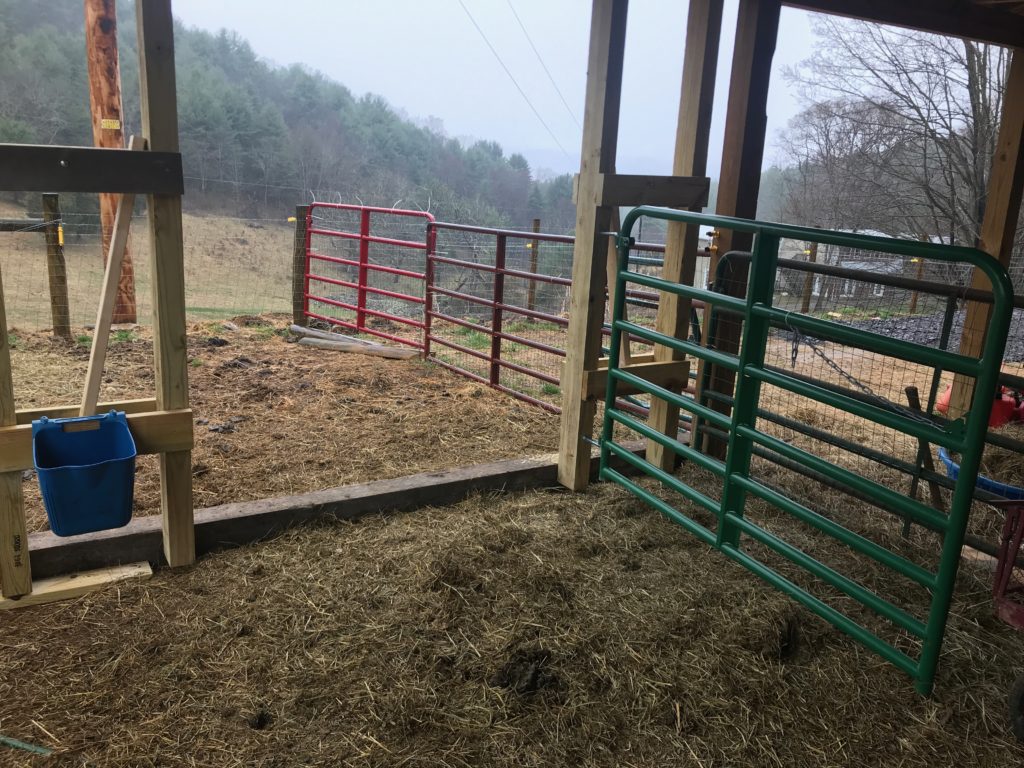
Recently, we needed to get these girls their spring vaccinations. Maude is an experienced milk cow, and has been a pleasure to work with, but Charlotte’s breeder had a family crisis at just the wrong time in her development and was unable to work with her as a young calf. Therefore, she is skittish and shy, and does not know how to follow a lead.
Our vet required our cows to be restrained before he could give shots, so son Jarred and I set in to build stanchions for both milking and vetting last week. We are very excited about how they turned out.
These are the two stanchions that we built into the overhang of our dairy barn roof. Eventually, we’ll probably enclose this 12 x 12 foot area so that winter milking will be out of the wind.
What I said as we stood back to survey the finished work was “Gee, I’d love to have that view at breakfast and dinner every day!”
The design of the stanchion on the right is for maximum restraint. Since Charlotte is so skittish and has never been milked, we felt that we needed one of these stanchions to have sides as well as a front restraint.
The wired, green gate on the far right was already in place (and will be replaced with a board wall in future days). The green gate between the two stanchions opens in to form a pen, and the chain for the gate attaches to the opposite one to form a butt restraint for the cow.
In this picture, the goats were exploring the finished stanchions before we put up the green gate between them. These stanchions did their job! The vet has come and gone, and the girls are both vaccinated.
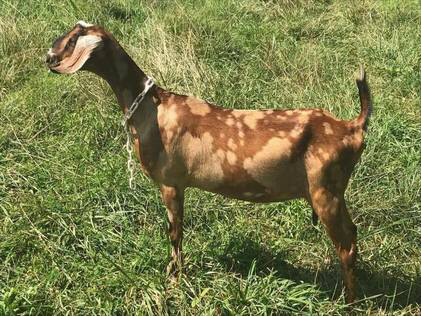
Many newcomers to Mini Nubian goats ask, “What is the BEST generation to buy (or breed) with Mini Nubians?” The obvious answer seems to be “the higher the generation, the better!” After all, “purebred” sure sounds like it would be better than “experimental.” Right? Maybe not. This post was written to help educate you so that you can purchase quality Mini Nubians in the future by focusing your attention not on generations, but on animal quality.
Eliya Elmquist (of Green Gables Mini Nubians) has been raising Mini Nubians for 22 years, and she co-wrote this article (which is styled in her voice) with me. I think her insights are so helpful that I wanted to post it here for easy reference.
Are Higher Generation Minis Better?
Eliya writes, “This article was written because year after year I find myself explaining to newcomers (and also some who have been around Mini Nubians awhile) about misconceptions concerning generations. Hopefully, this article will help the entire Mini Nubian community to better educate buyers as to the proper view of the importance, or place, of generations in assessing miniature goats of any breed.”
(Note: the young buckling pictured at the right is Storybook’s Prince Valiant, an F2.)
First, some definitions.
What Do We Mean By Generations?
All mini goat breeds (Mini Alpines, Mini Toggenburgs, etc.) are crosses between a larger, foundation breed (in the case of Mini Nubians, a purebred Nubian female) and a smaller, foundation breed (a purebred Nigerian Dwarf male). From here on out, this article will focus on Mini Nubians (MNs) as our primary example, but you can apply what’s written here to other mini goat breeds as well.
When you breed a foundation Nubian to foundation Nigerian, the resulting kid is considered to be First Generation, or F1. It is one generation from “foundation” on both sides. It is a 50/50 Nubian/Nigerian cross.
(Pictured right: Joyous Farms Le Tigre: 50/50 cross. Nubian/Nigerian.) LOTS of milk creds on both sides of this cross! See a pedigree here.)
Min Nubian lines can also be started using a Mini Nubian crossed to a foundation breed. So, you can have a MN doe bred to a foundation Nigerian buck. This would result in something more like 25% Nubian and 75% Nigerian. More typically, however, if a MN is crossed with a foundation Nubian, you will find kids that are 75% Nubian and 25% Nigerian.
(Pictured left is Skillman’s Star AR 4*D. She is a Mini Nubian, and is 93.84% Nubian, and only 6.16% Nigerian.)
What is important to grasp here is that any kid that has one parent that is a foundation breed is an F1, also called “Experimental.” F1 does NOT indicate the percentage of the parents’ breed or its overall quality in terms of conformation or dairy abilities; it simply indicates that one (or both) parents were foundation breeds.
Subsequent breedings follow sequentially. If you breed an F1 to an F1, you get an F2 (two generations away from foundation on both sides). However, if you were to breed an F1 to an F5, the kids would be F2, since on one side, their parent was only one generation away from foundation, and they are only two generations away from foundation on that side. The rule is that kids’ generations are always one step up from the parent who is closest to foundation. F1/F6 = F2. F3/F4 = F4. F3/F3 =F4. And so on.
In developing the Mini Nubian breed, it was decided that it would take six generations for an animal to be considered a purebred Mini Nubian. F1 and F2 animals are designated “Experimental” by registries. F3, F4, and F5 are termed “Americans.” F6 and up may be registered as “Purebred,” if they meet the breed standard. (After “purebred” we stop counting generations.)
Newcomers to MNs often hear the word “purebred” and think it must be desirable. Who wants a mutt when they can have a purebred, right? But the idea that lower generation goats are mutts is a serious misconception, which can be hard for newcomers to understand.
Storybook’s Ursa Major, pictured right, is an F2.
Remember how the generations are calculated? As stated above, a sixth generation from foundation (F6) can be registered as a purebred (if it conforms to the breed standard). And all that the F6 designation means is that an animal is 6 generations from a foundation parent on both sides. It says nothing about its conformation, quality, health, or breed character; it simply means that at least six generations back on at least one side of the parental line (the other side could be further back), this particular bloodline of goats got its start.
Now, I just mentioned the term “breed character. What is that?
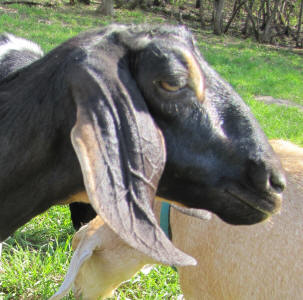
The goal with breeding MNs is to work towards goats that look like a Nubian, but smaller. Nubians have pronounced Roman noses and long, floppy ears. They are a dairy breed, so there are other aspects of conformation that contribute to amounts and longevity of milking, of course, but the main distinctives of the Nubian breed are their noses and ears, and we call this “breed character.”
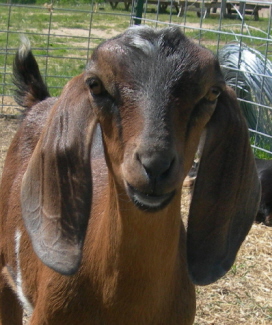
(Pictured at the right is VMCH Green Gables GS Magma 5*P. She is a wonderful example of correct breed character for Mini Nubians. She is an F5.)
The challenge in breeding Mini Nubians is that Nigerian Dwarfs have short upright ears. When you combine Nubians and Nigerians (especially in early generations) you often —but not always — get long ears that stand out from the head, called “airplane” ears. You can also get “2/3 drop” ears. Or, you can quickly arrive at the goal: what are called “pendulous” ears (like Magma’s), which is what Nubians have. Those pendulous ears should not stand out from the head, and should be long enough to touch the goats’ nose tips.
In general, you can expect to see airplane ears in the first generation (F1s), which are 50/50 Nigerian/Nubian. You may have excellent Nubian breed character in an F1 Mini Nubian if with 75% or more Nubian (typically a Mini Nubian bred to a foundation Nubian). Occasionally, you will have an F1 50/50% kid that takes more after one parent than the other and thus has either upright, Nigerian type ears or very correct Nubian ears.
Now, with all that information under your belt, we’re ready to address misconceptions that many newcomers (and young breeders) have.
SO: Are Higher Generation Minis Better?
Eliya writes, “I get asked ALL THE TIME for a certain generation MiniNubian. As a seller, I always ask the buyer why they are looking for that particular generation. Most of the time they are looking for a higher generation (like 5th generation and higher) but occasionally it is a specific lower generation. Understanding the reasoning helps me to help them better.
Over the years, buyers’ reasons for wanting higher gen kids are often based on misconceptions. I want to cover three specific ones here, and also mention some specifics about generations and breeding that are often overlooked.”
General Misconception #1: “Higher generations have better breed character.”
Eliya writes, “This is not always the case! Great breed character is the goal, but it is not true that the further you get from foundation parents (i.e. higher generations) the better the breed character. It simply does not always work out that way. Try telling the generations of the two kids pictured below. One is an F5, and the other an F2. The parents of the F5 both had correct breed character, while the F2 kid had a dam with 2/3 drop ears and a sire with short, but pendulous ears. The one on the left is the F2. The one on the right is the F5.”
General Misconception #2: “Higher generation MiniNubians are better quality.”
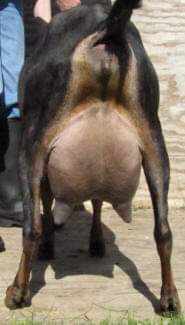
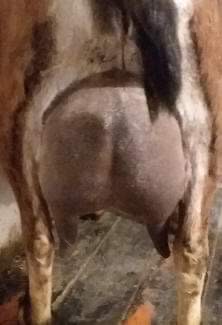
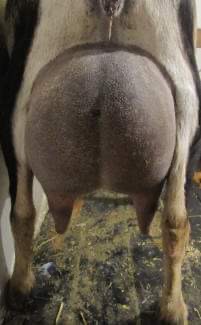
Eliya writes: “Honestly, speaking as a seasoned breeder (since 1999), generations have nothing to do with the quality of the animal. I have seen some absolutely horrendous purebred Mini Nubians: wavy toplines, weak feet, poor breed character, terrible udder attachments, etc., and some absolutely stunning lower generation goats. Below are some examples of udders from various generation does in the Green Gables’ barn:
Gen 1
Gen 2
Gen 2
Gen 5
You need to carefully define the word “quality.”And this word can mean different things to different people as different breeders will love different aspects of the breed. But at base, it should mean that the goat has those elements that contribute to a long, healthy, productive life: conformation, strength, and milk production.
There can be excellent Mini Nubians at any generation and also terrible quality at any generation. The savvy buyer will look at the individual goat and the genetics behind it to determine its quality, not its generation.”
General Misconception #3: “Higher gens are easier to sell.”
Eliya writes: “This is true to an extent, but sadly, it is largely true because of misconceptions 1 and 2 above. If you think that higher gens mean higher quality, you will look to buy and breed higher gens, and look to sell higher gens as a breeder. This is a self-perpetuating issue that I have seen during over 22 years working with the breed make things worse for the breed, not better.
The informed buyer can take the first step in breaking that cycle. As a buyer or a breeder, educating yourself and others (buyers) can help prevent this from being an issue. If we would all start looking at animal quality instead of animal generations, then we would purchase and breed forward only the more excellent animals.
Please feel encouraged to send buyers who do not yet understand about generations to this post!”
Additional comments by Eliya:
While it is understandable to expect that higher generation MNs should be more true to the Nubian type, it simply is not always the case (see photo examples above). Looking at the actual breed character of a goat you are thinking of purchasing (and its parents) will get you much farther towards the goal of developing good breed character than looking at the generations.
I always recommend that breeders choose a buck that will best improve your doe(s)’ specific weaknesses regardless of the generation. I honestly do not consider generation at all when making my breeding plans. Often times, my higher gen does get bred to my lower gen bucks (just because they happen to be the best match for improving their kids over them). And, my high gen bucks often get the lower gen does. Again, I have been breeding MNs for over 22 years, but have only had a handful of purebreds so far. I would rather have excellent quality, regardless of generation, than rush for higher gens and sacrifice the quality and the improvements I am striving towards.
Boy do I LOVE LOVE LOVE my modular barn. I am so glad that I didn’t make permanent divisions within my goat space!
In the past 12 days, we’ve kidded out six does. Now we’re done until April, when we’ll start kidding out 11 more over the space of a month and a half. But then we’ll have nice weather for it! Whew!
We now have 14 new kids on the ground: 10 bucklings and 4 doelings, and their moms, to care for. I’ve spent 3 hours today digging out jug stalls and rearranging heat pads and barriers. As a result, our barn can easily accomodate the changing size and needs of our herd.
The Nursery Setup
With six does due to kid within a week during record cold and heavy snow and ice storms, we set up what I would call “the nursery.”
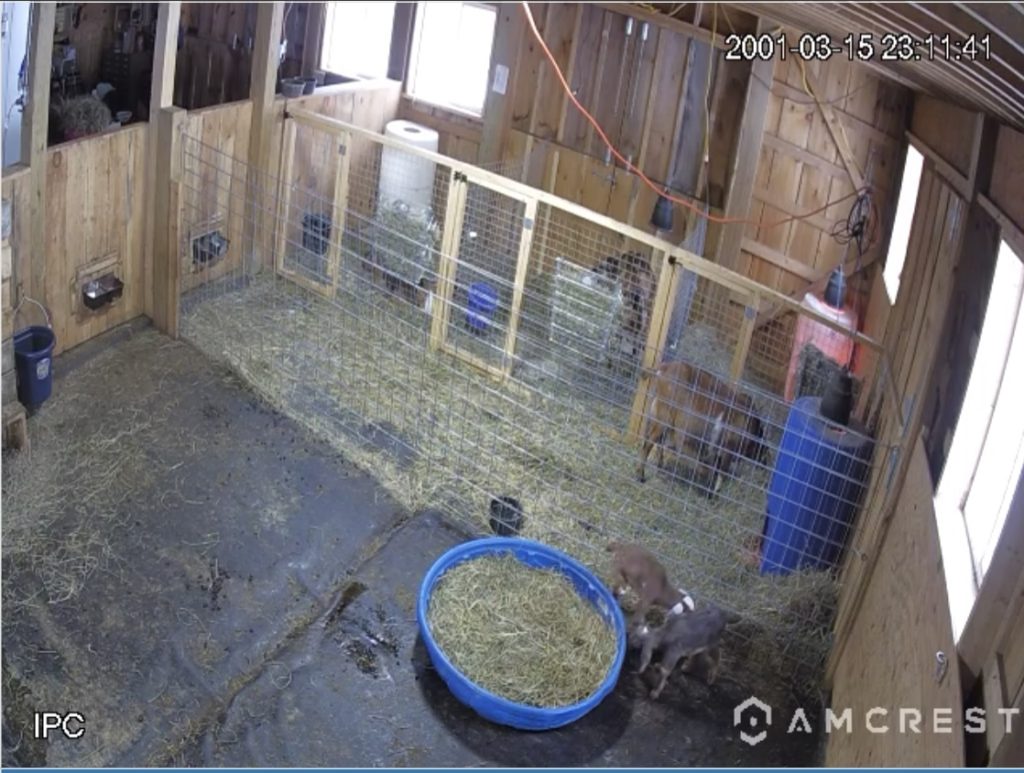
We could accommodate up to 4 does kidding and bonding simultaneously (three in stalls and one in the aisle as pictured, right). Then there was the adjacent “romper room” where 2-3 day-old (and older) kids and their dams can hang out.
In the romper room, for cold nights, we have heat pads under the manger, but will transition kids to just sleeping on hay under there in the next week, as temperatures are supposed to become warmer when the polar vortex moves out (yay!).
Tot Lot
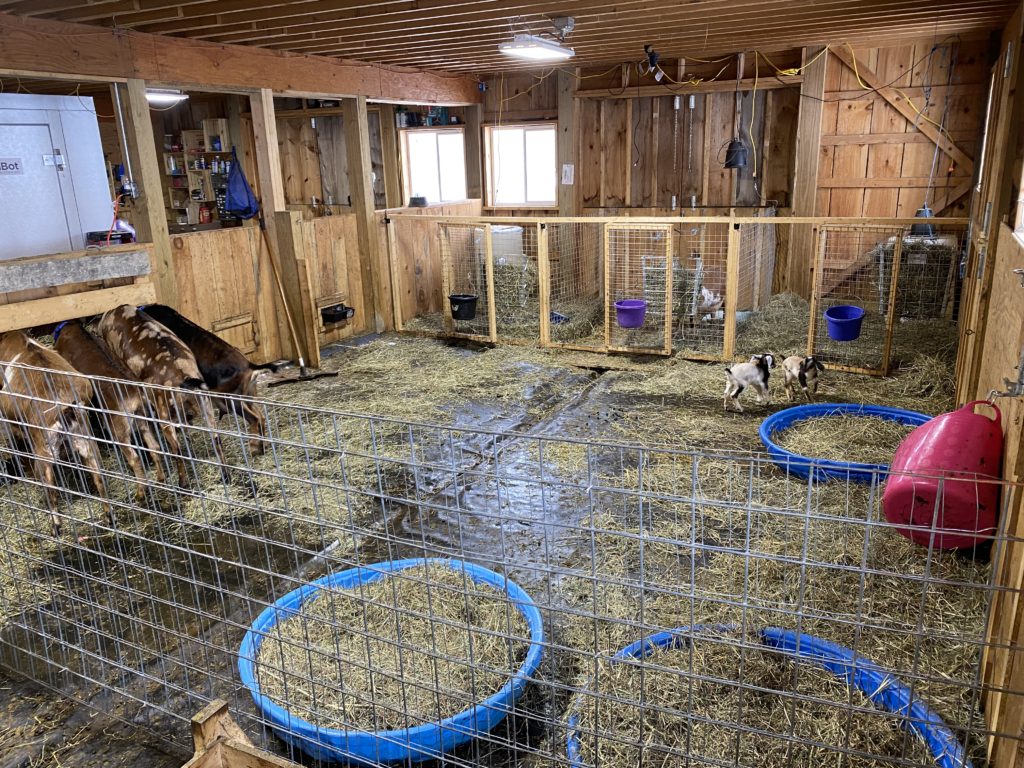
With all the kids in this batch of does safely delivered, and with some sleep under my belt, I took the morning to change the space from “nursery” to “tot lot.” It took about three hours of solid work.
I left the jug stalls in place, but opened and latched back the doors so that all moms and all kids can have whichever spaces they choose. I took down the aisle partition, so the “romper room” space is bigger.
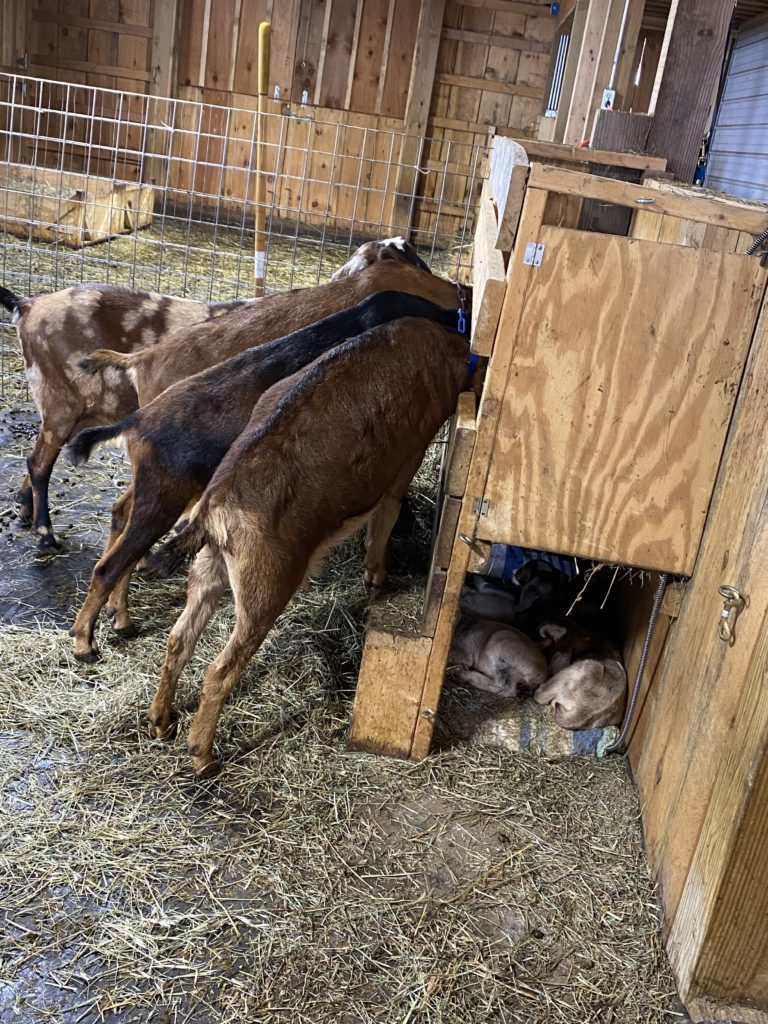
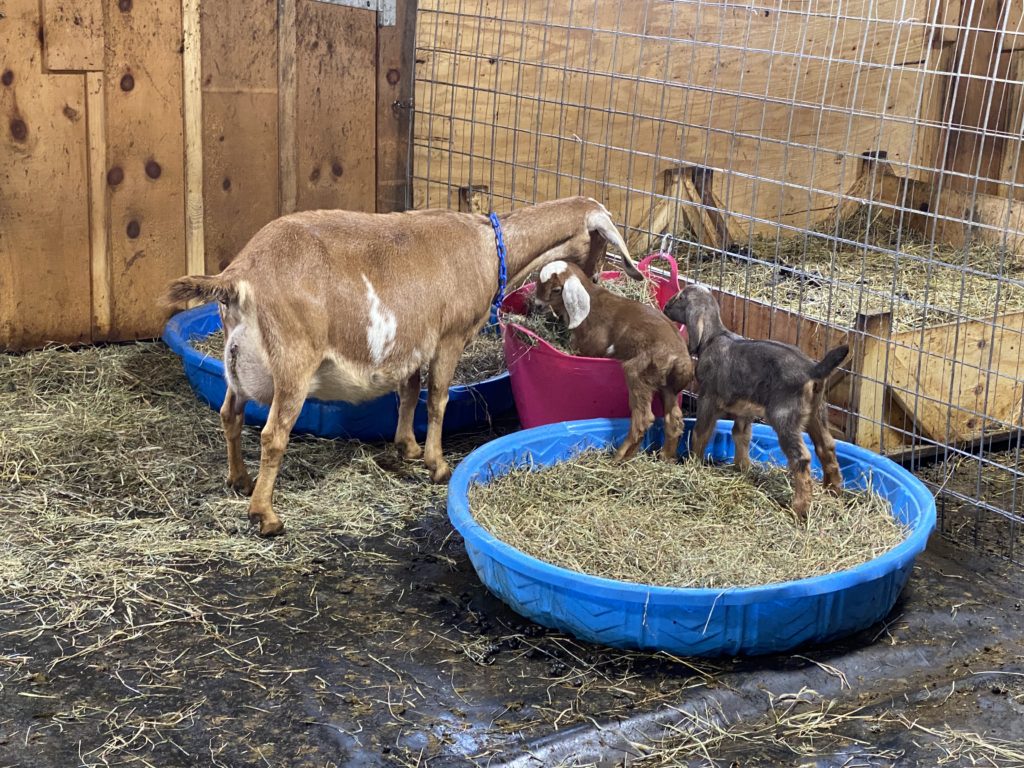
Does can also browse hay in the stalls, since the manger is tight for six does at a shot. (The hay scattered on the floor is for footing for kids as they run and play.) Below are some pictures of new kids exploring their expanded spaces and snuggled up under the manger for naps.
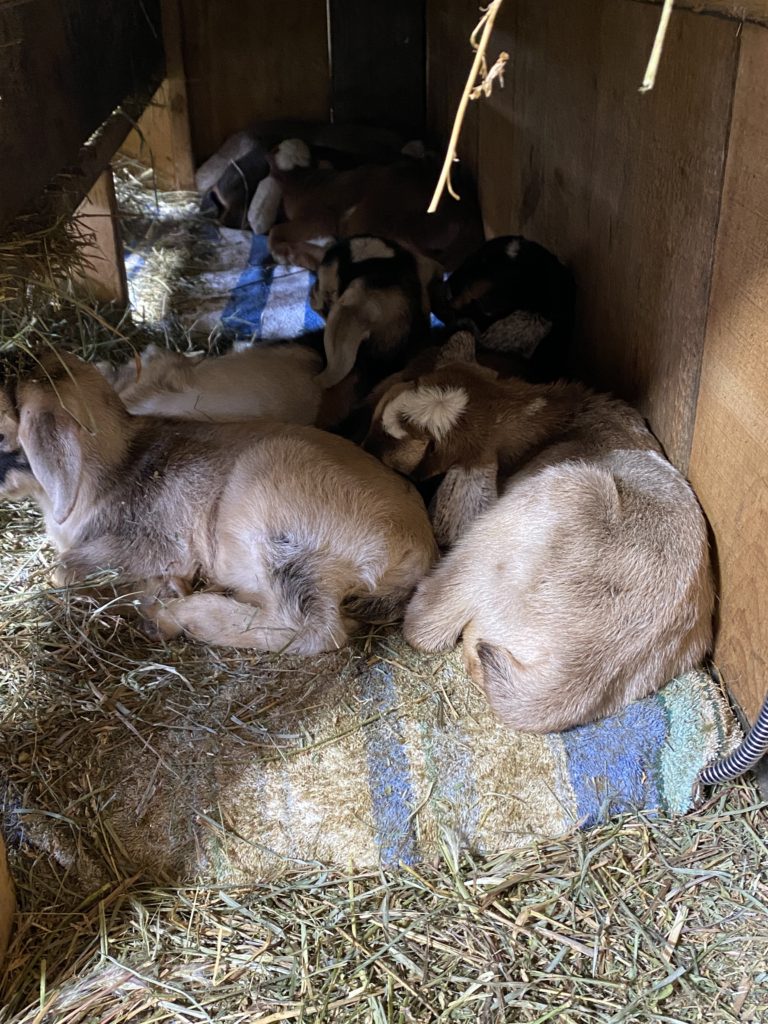
Manger with kids under
Kids sleeping under manger
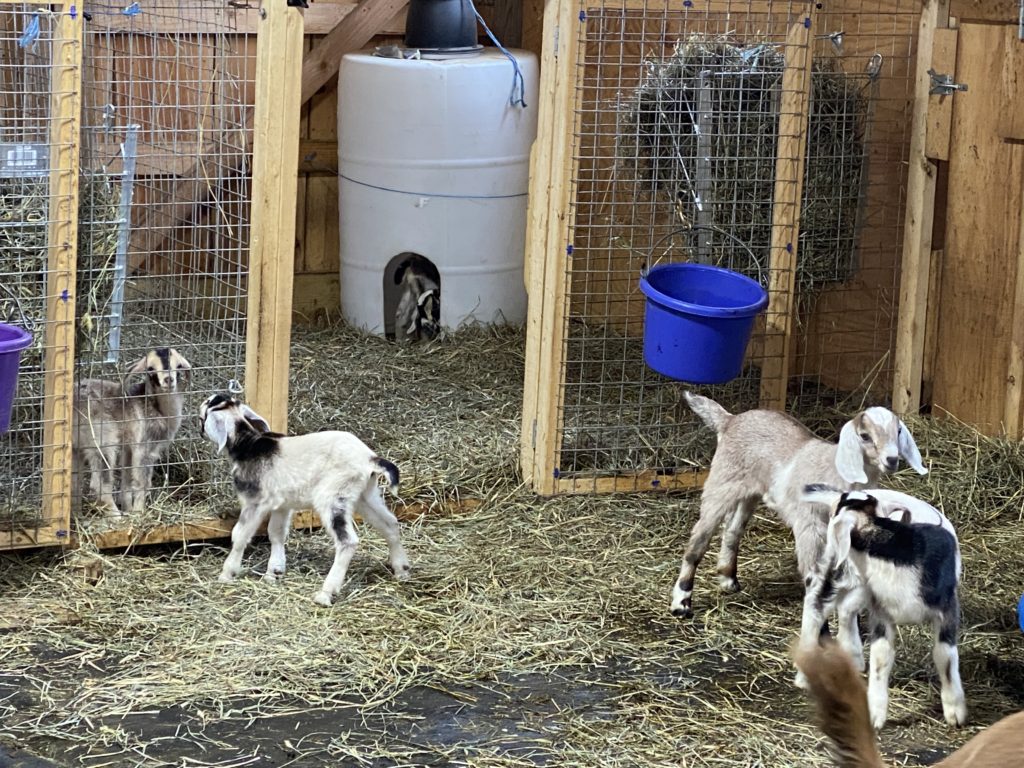
Kids exploring new horizons
What’s that you’re eating, mom?
In a couple of weeks, as pasture comes in and fences are completed, we’ll be moving the cows to their new shed from this barn (their winter quarters), which has an adjacent 1.5 acres “safe pasture” for these six moms and their 14 kids.
Then, eleven more does will use the nursery/toddler space over a month and a half (early April to mid-May) to do their kidding. As their kids are established, they’ll in turn move to this “safe pasture” stable and these first six moms from winter kidding with their kids now six weeks older will move back to the big barn to enjoy larger pastures and the main barn space.
When they do, we’ll take down all the internal barriers, and voila! The now-older kids and their dams will have all the space they need at nights in the barn. Most days, they’ll be out on pasture.
Finally, as the second wave of kids grows older, they will also move back to the main barn to enjoy the enlarged space and bigger pastures.