We have some aged hens, which are kept all together with younger ones, and also some juveniles that are not ready yet to go in with adults. We also need to make decisions about which hens to put with which rooster for breeding season in early spring. So, we needed more pens, mostly for short-term occupancy (not over the entire winter, like these).
The Project
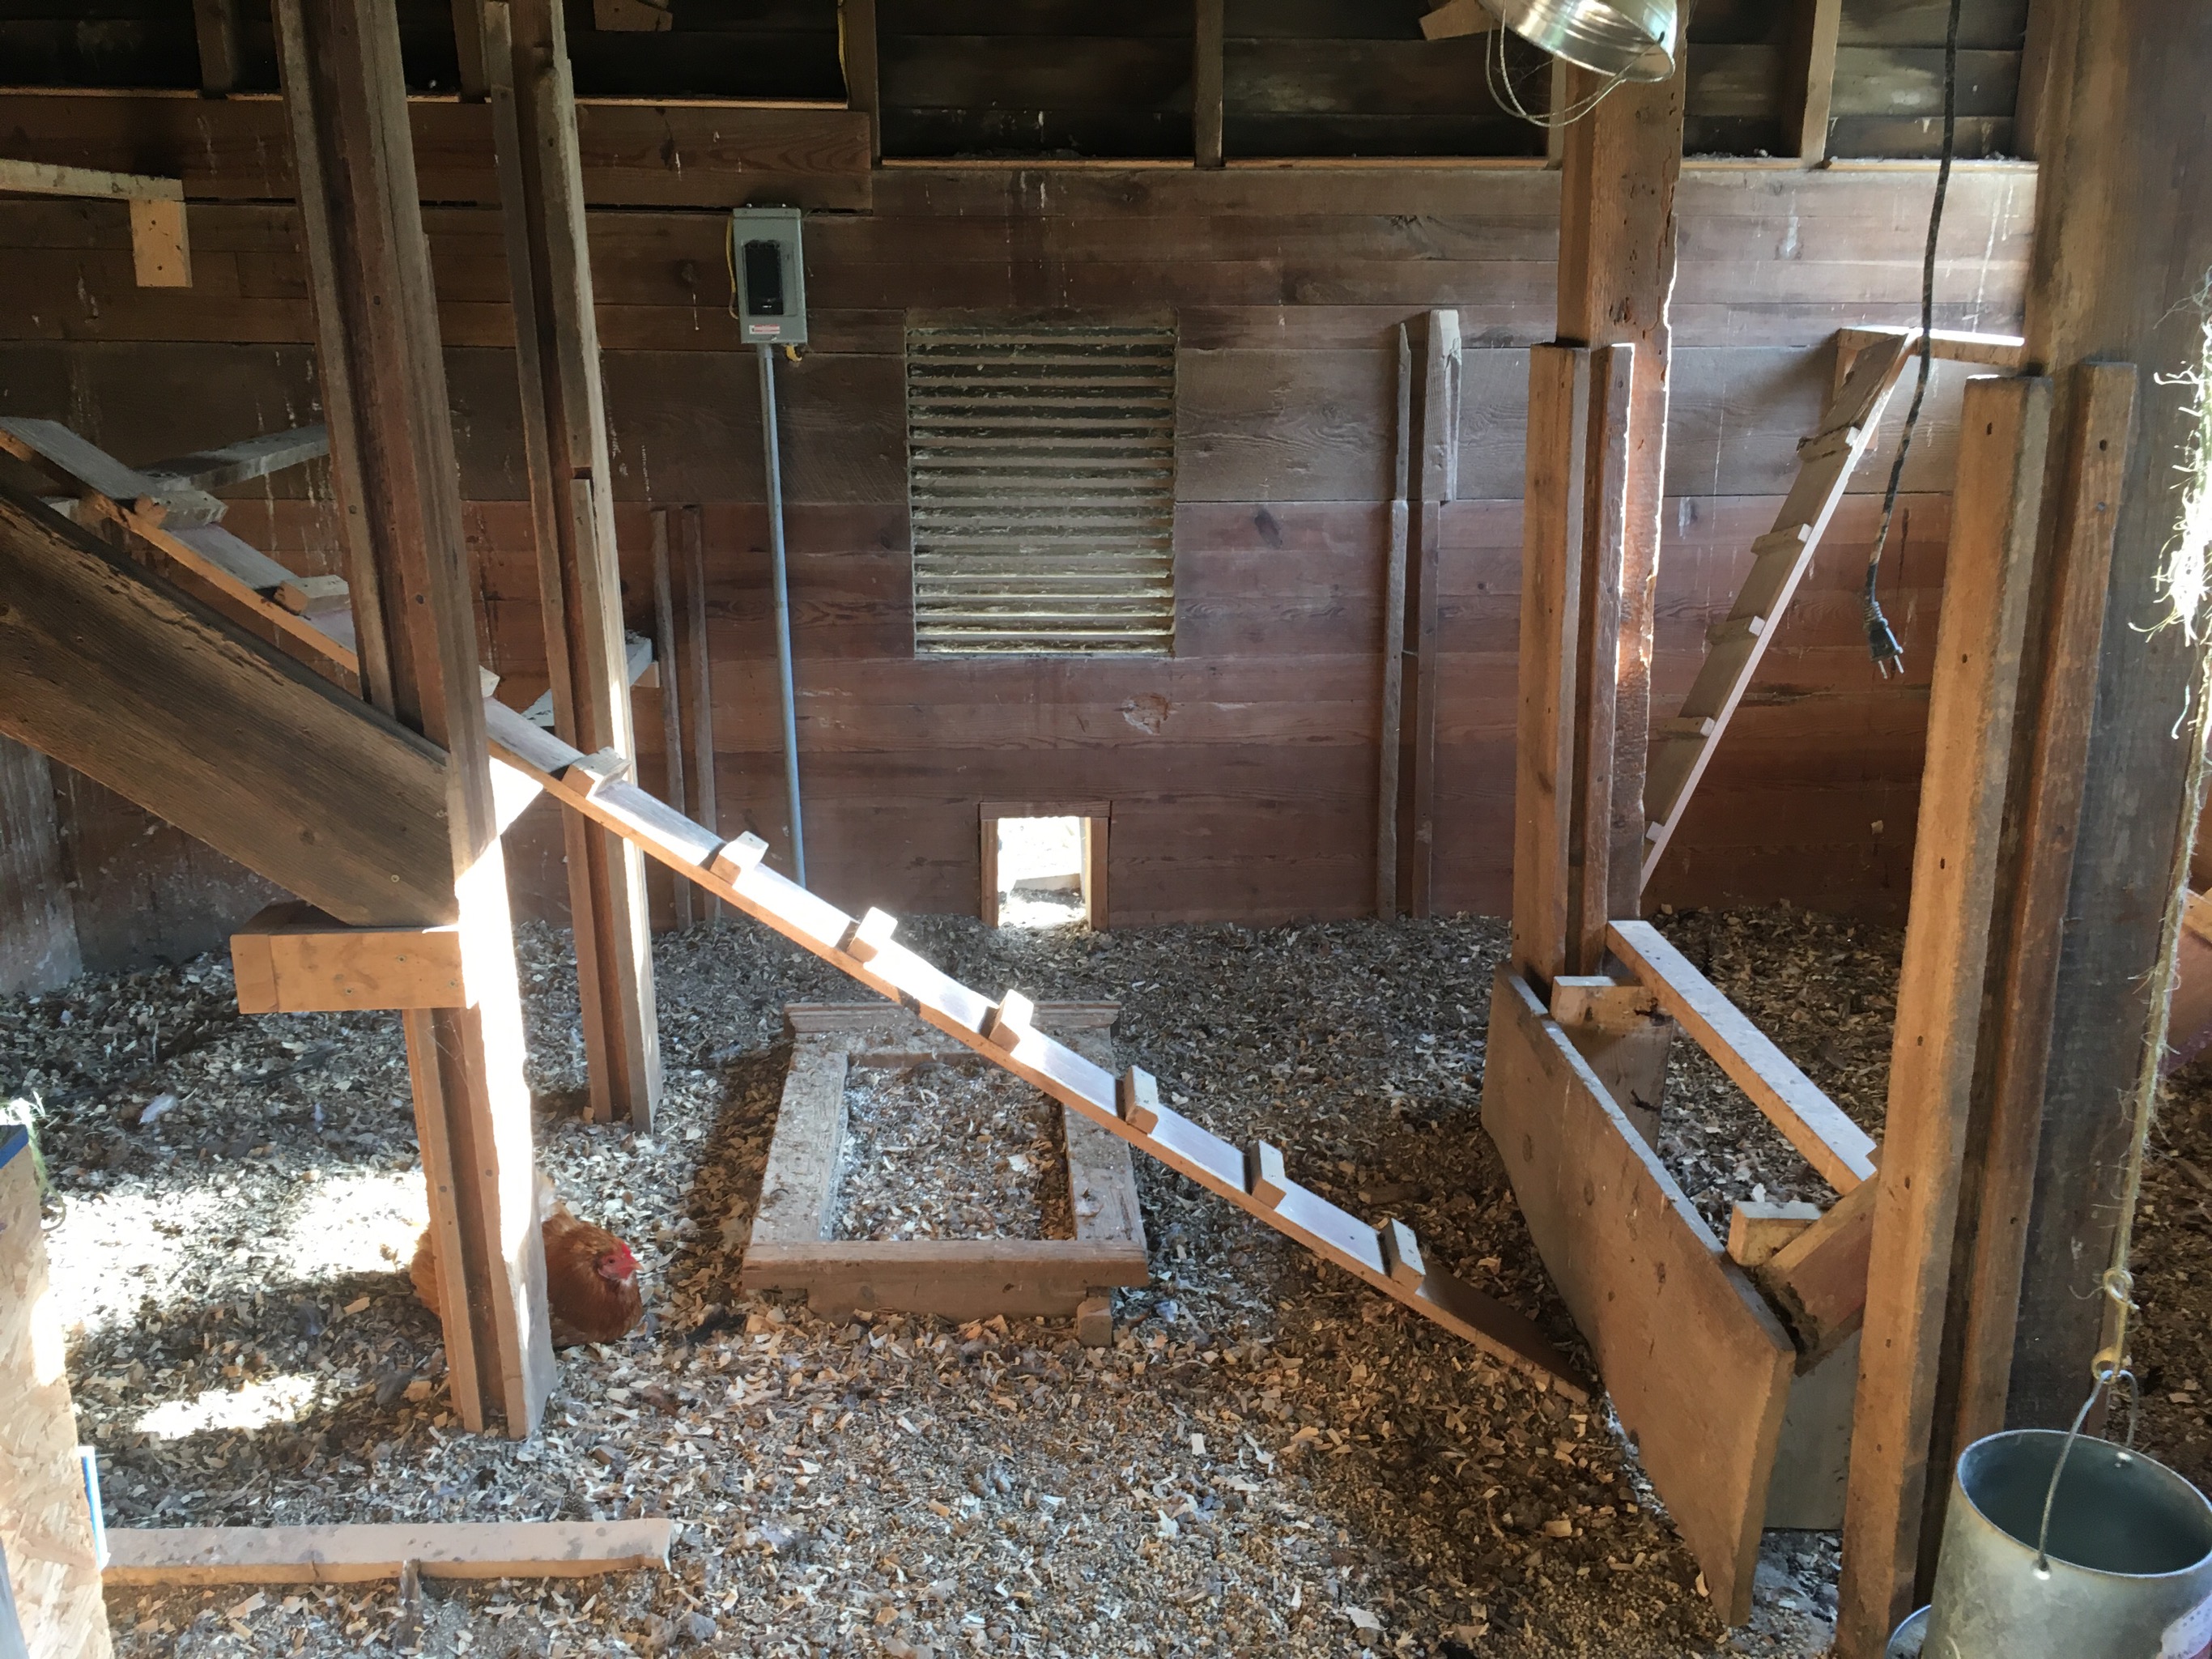
Right side before revamping
We inherited an old shed which, in the six years we’ve lived at Storybook Farm has been (by turns) a grain and tractor storage shed (its original purpose), a tack room and one-stall barn for my first horse here, sheep stalls during breeding season when new mamas needed warmth and quiet, a general-purpose chicken coop for a small laying flock, and now it’s to become the nursery/observation poultry barn.
In the right picture, you can see it before we started work this week. The vertical divisions were what the original builders used to store grains and seeds. They had boards that slid down through grooves such that they divided this space into three (or fewer, larger) bins, each about 4′ x 4′. (Both sides of the aisle had these dividers.) When we turned this shed into a general purpose coop for layers, we created the windows (using old storm windows found in a different barn) by removing the exterior and interior siding. Then we had one perch high up, and their food and water there, but otherwise, it was just open floor space.
Two new pens completed
This week, we cleaned out this right side of the overall space entirely, except for the dividing posts. Then, we set to work dividing each bin horizontally, at about 3′ off the ground.
Our goal is to create six pens in this space, each about 16 sq. ft., with a perch, 2 laying boxes, and a modular feeding/water station that traps food debris and uses small feed/water bowls like those we’ve loved in our hoop coops.
In the picture at the right, you can see one bin that is finished into two new pens (bottom and top). Two nesting boxes for each pen are permanently built in (stacked on the right of each space). Feed/water stations are on the left, and are removeable for access to the pen behind. Each pen has a permanent perch built into the rear right corner. The top pens have full windows; bottom ones are cozy and darker, but we installed electric lights.
The Build
Cleaned out
In each bin, we started with a clean out of old litter, down to the rubber floor matts we installed over the old wooden subfloor when sheep were housed here. (We figured the old floor would last longer without coming into contact with urine.)
New shelf w/paint
Next, we framed the new shelf using 2 x 3’s and 1/2″ exterior grade plywood, and screws. Then we painted the new shelf with white exterior paint (see picture, left). The coat of paint is intended to help the plywood last longer. Chicken poo is powerful stuff, and though we intend to continue to use deep litter methods, we know that liquids (of all kinds) rot plywood over time. As an added bonus, when the floor shows through the litter, it makes the space brighter.
After paint, we installed needed items working from rear to front. First came the fixed perch. Then the overhead light fixtures: upper pens get a heat lamp; lower pens (which are warmer, especially at night) get simple 100 watt bulbs with metal shields to protect from fire and concentrate light/heat downward.
Next, we built the two stacked nesting boxes.
Food/Water modular stations
Beside these, we make a space for modular feed/water stations. These have several fine features.
They catch wasted feed in a bin that easily slides out so that food can be either disposed of or reused (depending on if it gets wet from the water bowl)
They employ a wire shield that prevents chickens from scratching and scattering feed, or sitting in the feed/water bowls. As you see in the picture below right, birds of all ages (these are 4-week-olds) can stick their heads through the wires to easily eat and drink.
They allow us to clearly see the birds as they are eating (giving us a great way to observe their heads, combs, breasts, stances, and eating habits, etc., easily)
Each night, we quickly and easily empty the bowls and catch bins into a nearby metal trash can and store the bowls in there, too. This gives the rodents less to gnaw on.
Young pullets eating
In winter, the water in these small bowls freezes in a few hours, but they are also easy to dump (iced over water just pops out of the heavy rubber bowls) and refill from a nearby heated bucket cistern. We water three times a day in winters; twice in summers, because with only 2-3 birds on each of these bowls, water doesn’t go very fast in summers.
Finally, the whole wood-and-wire structure slides out so that we can clean the pen, access a dead bird (God forbid, but it does happen) or change it for a different kind of feeding/watering set-up (like for really young birds who need feeding right in the shavings). In this last case, we have a simple wood framed wire barrier that we put up in the space vacated by the feeding station pictured here.
Finished bin
As for costs, we used up a lot of old 1 x 1 and 1/2″ plywood that we had hanging around in building the nest boxes. We did buy the 2 x 3’s and the 1/2″ plywood horizontal dividers and the poultry netting new. We had some of the hardware cloth, and the feeding station frames are made mostly from old fencing. All it all, it’s been a pretty cheap way to have six new pens for mult-purposes.
Multi-Purpose Pens
So, how are we planning to use these pens? So glad you asked!
First, as winter comes on, we have been wondering which of our older hens are still laying. Ours is a mixed flock. We have collected (and hatched) hens from different breeds over three years as we were figuring out what we really wanted to stick with, so they all lay differing sizes and colors of eggs. (I love having a rainbow egg basket!) For the purpose of tracking laying frequency, the new pens will house 2-3 hens for a week or two. We can easily collect their eggs, and keep track each hen’s current production. As an added bonus, we can worm them easily. This kind of tracking will become more and more important at we get serious about breeding show birds.
Two 4-week Light Sussex pullets enjoy the sunshine
Second, we grow birds out in all seasons, and with fall coming on hard, we don’t have enough pens to keep our young juvies in. We like for them to get Vitamin D as soon as possible, and we like to be able to see how they’re developing and if they have any obvious deformities, beginning at about 4 weeks old. The top three new pens are great for this.
Third, we need to establish breeding matings each year. For this, we need to have the ability to closely observe pullets and cockerels for both faults and strengths. The top three pens are ideal for this: there is lots of light, they are
Finally, if we have sick birds that need to be isolated and treated easily, these pens are great for that.
So, you’ve been convinced (by me?) that your child will start a small backyard flock of chickens. What a great decision!
Chickens are live animals! There are many things to consider before you bring home your first fluffy chicks! Part 1 of this 2-part series centers on steps to take before you get your child all enthused about chicken keeping.
1. Check ordinances and HOA rules.
Make sure that you are allowed by the powers that be to keep chickens on your property. If not, consider storming city hall with a petition. 🤔 This battle has been won in recent years in countless municipalities across America.
A second important question to ask is whether or not you can keep a rooster. Many ordinances allow a certain number of hens to be kept for eggs, but not roosters (because of their crowing).
2. Join an online community.
I can recommend Backyard Chickens as a warm, supportive, active, welcoming group, but there are others as well.
From their forums you will get immediate, experienced help from people who have no dog in the fight: they are not salespeople. They are chicken lovers just like you. But make no mistake: these are folks who are knowledgeable and serious about chicken keeping! You can learn about coops, diseases, feeds, breeds, hatching — in short, this is your go-to support as you learn to raise chickens with your child. Your child can/should even have his/her own account on this forum!
3. Peruse chicken breeds while considering your goals
There are hundreds to choose from, and the newcomer can be easily overwhelmed, so here are some questions to help you narrow the search before you involve your child (who probably should have the ultimate choice among those you suggest to him or her) 😉 :
How much space can you devote to chickens?
Many breeds come in bantam (miniature) sizes and/or large fowl (sizes that you think of when you think of most chickens you’ve seen). Bantams can be kept kindly in about half the space of large fowl.
General guidelines suggest that each large fowl chicken needs 4 square feet (so 2′ x 2′) of floor space inside your coop, and 10 square feet of run space outside the coop (which can include space under the coop if it’s elevated).
Large fowl need 1 foot/chicken of roosting space, and a 1 foot cubed nesting box (provide 1 box for every 2 hens). Nesting boxes can be very simple: you can do a Google search and see them made out of everything from dish pans to crates to wood to metal to 5-gallon buckets. There’s no lack of creativity among chicken keepers–that’s what keeps it fun!
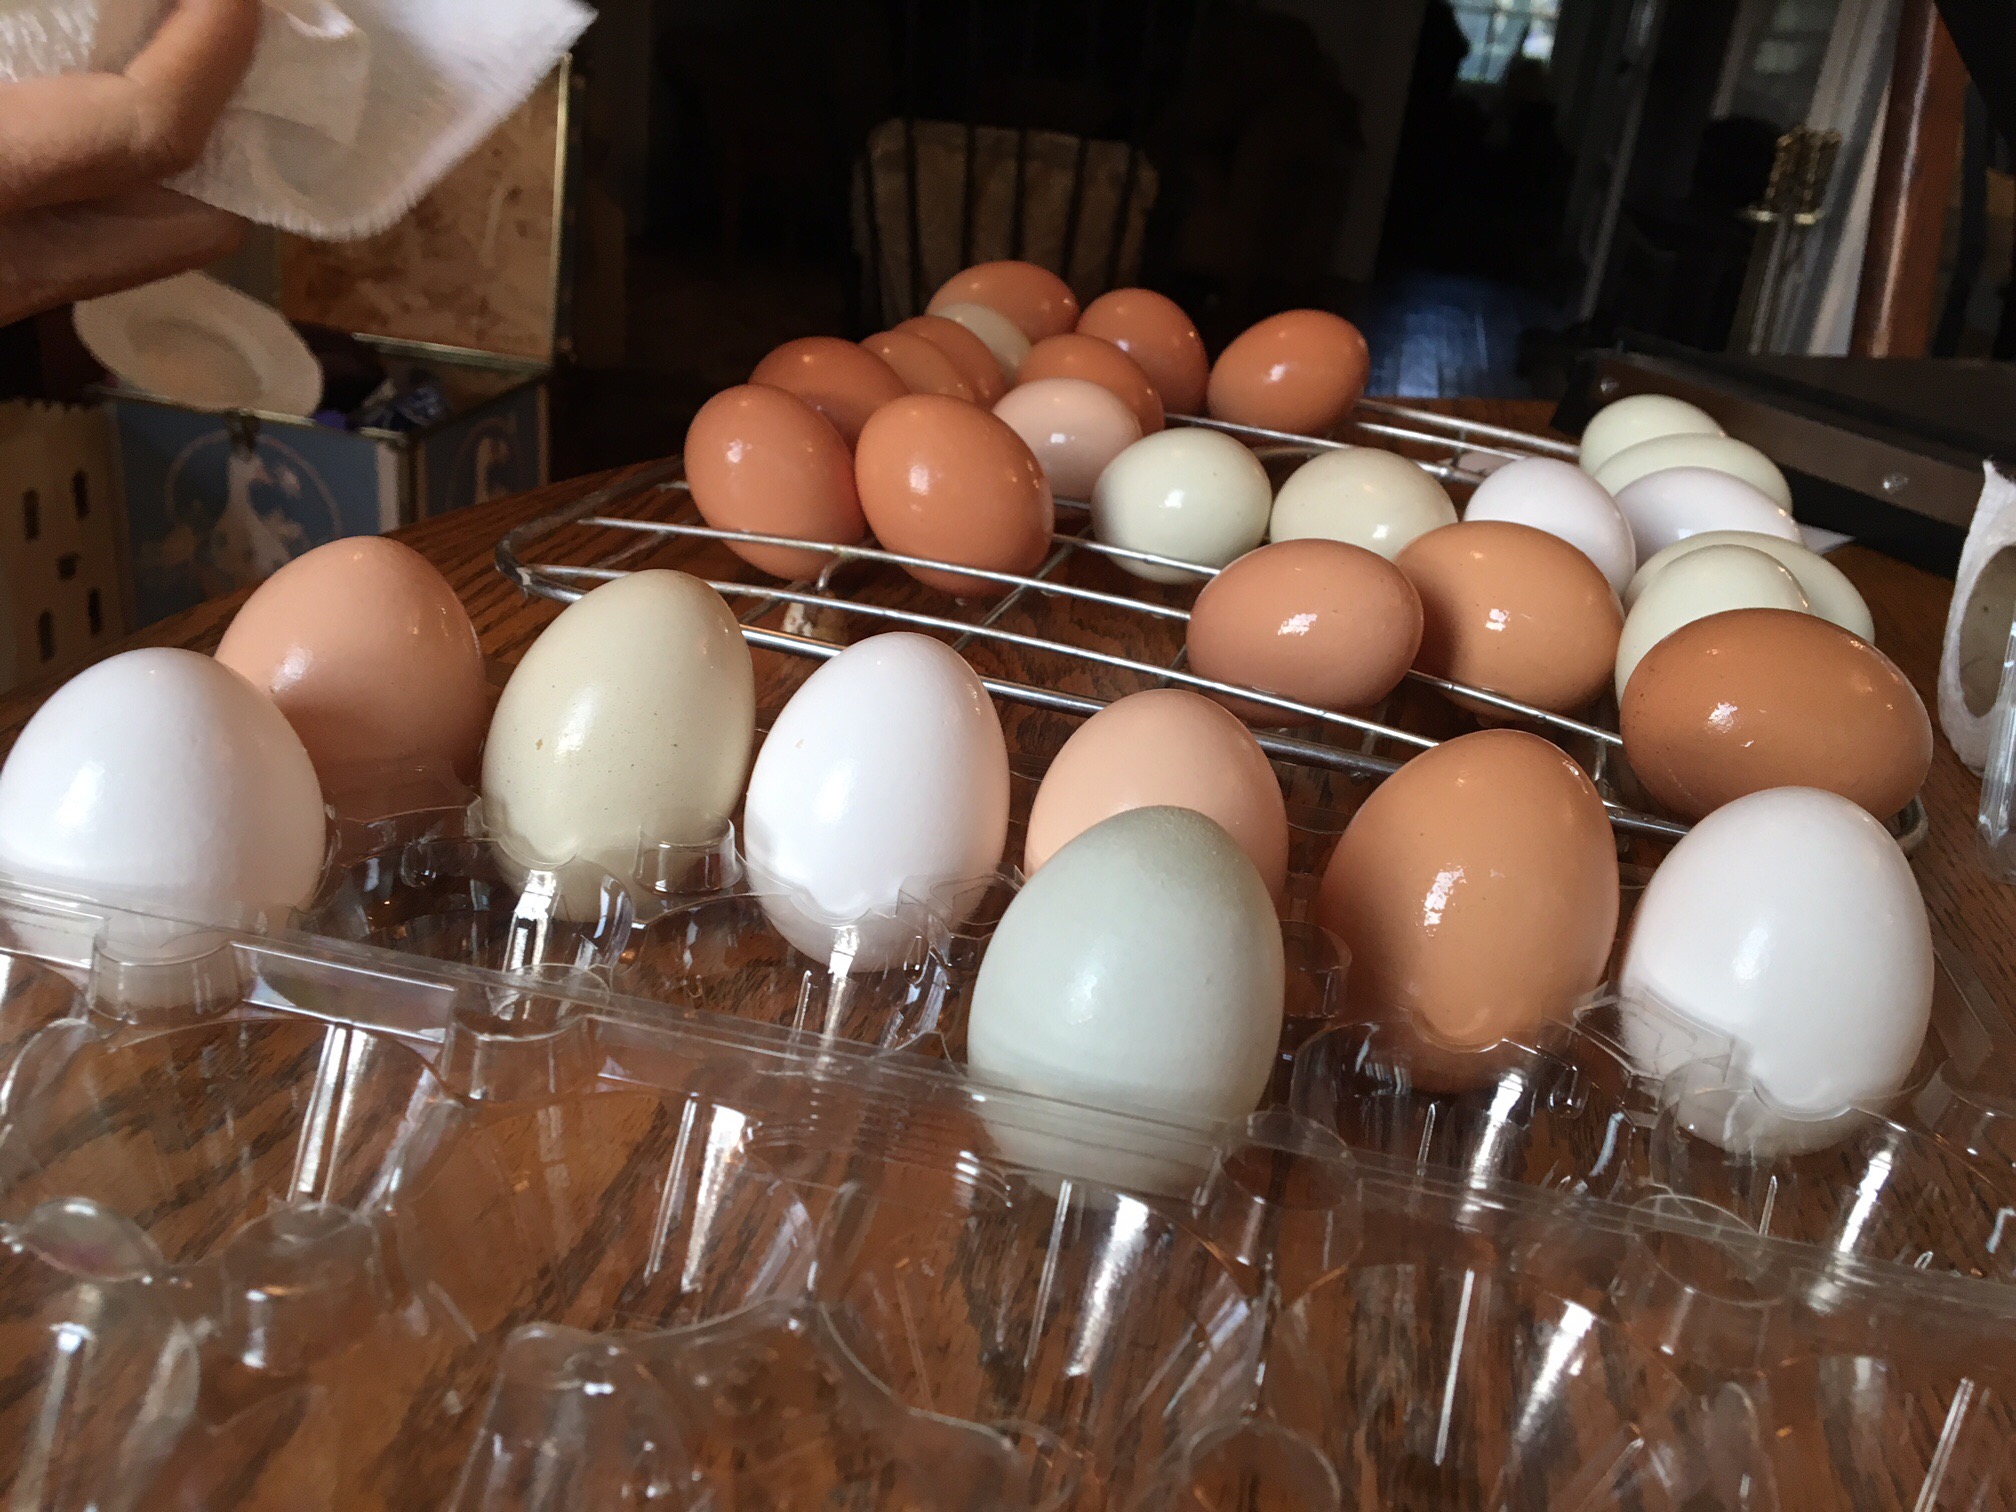
Our colorful eggs
What are your goals for eggs?
Large fowl birds are the better choice for large or jumbo eggs, and there are breeds that lay up to 280-350 eggs per year. Eggs from these hens can be green, blue, brown, tan, dark brown, and white.
Bantam hens are also used as laying hens, with some breeds laying up to 150 eggs per year. However, Bantam eggs are only about one-half to one-third the size of a regular hen egg.
In general, some breeds are reputed to “go broody” easily. This means that they will lay a clutch of eggs and sit on them until some hatch–three weeks, minimum. Then, they will care for these young for months. They will not lay during this period. So, in terms of egg production, broody hens are not a plus. (However, read more about broodies below before deciding on this factor!)
There are champion egg layers among the breeds (topped by the white Leghorns). These birds tend to be small and streamlined. There are also the “dual purpose” breeds (so called because they both lay a decent number of eggs yearly and have enough size that they are good for meat as well). The latter are also often termed “heritage breeds.” The story is too long to tell here, but suffice it to say that today’s commercial breeders raise hybrid birds in conditions similar to veal calves. (You won’t want your child to even know about conditions in such operations.) Many backyard chicken keepers choose to breeds that are beautiful, docile, and have a long heritage among poultry keepers because they were prized for their meat and eggs in bygone days on smaller, family farms. (These are the breeds that we have chosen to raise, and sell as day-old peeps and hatching eggs.)
Do your goals include raising chickens for meat?
With the growing movement towards organic foods, many backyard chicken keepers raise and process their own meat. If you are not so much oriented towards having your child raise chickens as pets, but want him to learn the cycle that brings food to our table, you may be interested in a heritage breed that is known as a good table bird and a good layer (called a dual purpose breed).
There are great resources in the online communities that can teach you to process your birds if you decide to go this route.
Would your child be interested in hatching chickens to raise, or breed, or possibly show or sell?
In this case, you want to know which breeds are somewhat unusual, and in higher demand. Simple searches on the Internet will open your eyes to the possible markets for day-old chicks or hatching eggs. (Check out Greenfire Farms as an example of a breeder who started small but has made an entire livelihood out of selling rare and exotic breeds for high dollar amounts.)
I highly recommend that your child hatch chicks at some point in your chicken-keeping adventure. It is such a great experience, and again, the online community at Backyard Chickens can hold your hand every step of the way. A small, but decent, incubator can be had, new, for something between $60 and $150. (Check out our favorite online store for incubators, and/or check Craig’s List for used ones near you.) To gain vision, check out this lovely guide.
Please note that, if you incubate chickens, you will end up with roosters. What will you do with them? It is quite unreasonable to plan to rehome them as pets. Most people will not feed a bird that gives nothing back, no matter how beloved a pet it has become in your household. Most of the time, you’ll need to plan (and prepare your child) to give it away to a farmer who will eat it, or sell it for meat. That’s just a reality in hatching chickens, and if it bothers you greatly, please read this post. It may help.
Finally, what kind of housing will you provide for these birds? You absolutely need to have a coop built, down to the shavings and heat lamp in place, and feed ready, when you bring your first chicks home. So, consider (and price) the housing that your chickens will need (using allowances in chicken math offered above) before you purchase your first hatching eggs or peeps! This is another great project for you and your child to do jointly! (See more on this below.)
When I was first learning to keep chickens, I did a lot of research on coops. It was good that I did, because there are a surprising number of things to know that are not obvious to the beginner. There are a zillion plans and examples of chicken coops out there: the creativity of backyard chicken keepers is just as robust as it is in most hobbies! For the newbie, however, this variety = confusion, and often leads to regrets as the emphasis on certain features can be misplaced. That’s why I wrote this article!
1. Farmer First: What You Need
Feeding should be easy!
Whatever the design, it needs to be farmer friendly. Don’t build or buy coops that are hard to access for the following frequent activities:
Feeding
Watering
Accessing the floor of the coop for cleaning, or getting at sick/dead birds
Gathering eggs
Protection for your feed: a place to conveniently store feed in galvanized trash cans, or the like
Storage for chicken gear in off seasons
When looking at a coop plan or design, ask yourself how much effort it will take to service the birds and the coop floor. This is key to your longevity in (and enjoyment of) backyard chicken keeping.
So, if you’re going to have to crawl into the coop’s run, don’t use the plan.
If you can’t access inside the coop floor to clean it easily, don’t use it.
If feed and water are set outside (open to the elements) you’ll be wasting a lot of feed (it will go to rodents, to wild birds and animals like squirrels, and be ruined rain/snow).
If you have to stoop, or bend, or twist in order to feed and/or water, don’t use the plan.
2. What Chickens Need
Convert a shed by adding windows
In order of importance:
Fresh water (preferably cool in the summer, and definitely not frozen in winter)
Appropriate feed (the type changes three times over the life of a chicken: starter, grower, layer feeds)
Enough floor space inside the coop for the number of chickens you keep
A roomy place to run safely outside the coop (can include free ranging): a run
Bugs, grasses, seeds (and other natural foods) in addition to commercial feeds. For some, this means using chicken tractors that can be moved easily. For others, free ranging is the answer.
They need to be kept safe, especially at night: their coop/run need to be secure from predators.
Their preference for night time is to roost (ideally on wide boards, like 2 x 4’s, turned sideways) in a draft-free zone (especially important in winter) at least 15″ and no higher than 3′ above the floor.
Hens will lay on the ground, but if you care about harvesting eggs, provide one nesting box per every two hens.
A clean environment. This point takes in the absence of parasites, the management of the chickens’ bedding, and the condition of their nesting boxes.
It also refers to the fact that the coop must be well ventilated, offering fresh air that is free of amonia buildup. This means that a coop will be far more open to outside air than most beginners think, especially in winter months. Think about vents to outside air being both up high and down low, but not in the middle of the coop.
Blankets, sweaters, or tightly closed-up, or heated, coops. We get cold in winter, but chickens have feathers. If they have broad perches, they tuck their feet up under themselves in extreme cold. While some breeds have large combs and wattles that can be frost bitten, almost all of them are way more cold hardy than beginners dream.
Frozen or dirty water.
Drafts: ventelation is one thing; drafts are another. Learn the difference!
Aesthetically pleasing coops: those are for your enjoyment, not theirs. They don’t care how cute their coop is, and you can spend many more dollars than you need to on cute coops. Just sayin’. 😏
Over crowded (allow minimally 4 sq. ft./large fowl chicken inside and 10 sq. ft. of run) and/or dirty coops that reek of ammonia (which will sear their lungs and shorten their lives). This is where ventilation comes in again! Can’t really stress this one enough.
A place where they can be pounced on by dogs, hawks, or other predators by day. Most people in neighborhood settings need to cover their runs with wire and use sturdy wire to construct them.
4. Nice Frills and Extras
A light inside the coop on a timer in winters — if you want to try to boost egg laying rates. It doesn’t always work, though.
Heated bucket waterers with nipples: also nice for a farmer in winter. Be sure to check regularly to ensure that it’s working properly.
Automatic watering systems in summer: however, be careful that the ease of this amenity doesn’t lull you into a false sense of security. You need to check that it’s working daily. Fresh, clean water is the single most important element of your chicken’s diet.
Automatic pop door: these are expensive and, again, need to be checked to make sure that they don’t shut too early and leave chickens outside.
A cute coop that makes your neighbors smile. While the chickens don’t care, the neighbors might. Making your coop pleasing to look at (using a coat of paint even on pallet coops can do wonders) can go a long way to buying good will for your flock. The reverse is also true.
5. Building Your Own vs. Buying
In our experience, diy coops are always cheaper than purchased ones. A lot cheaper!
You don’t need mad carpenter skills to get the job done. Again: simpler is better, and farmer friendly is the key!
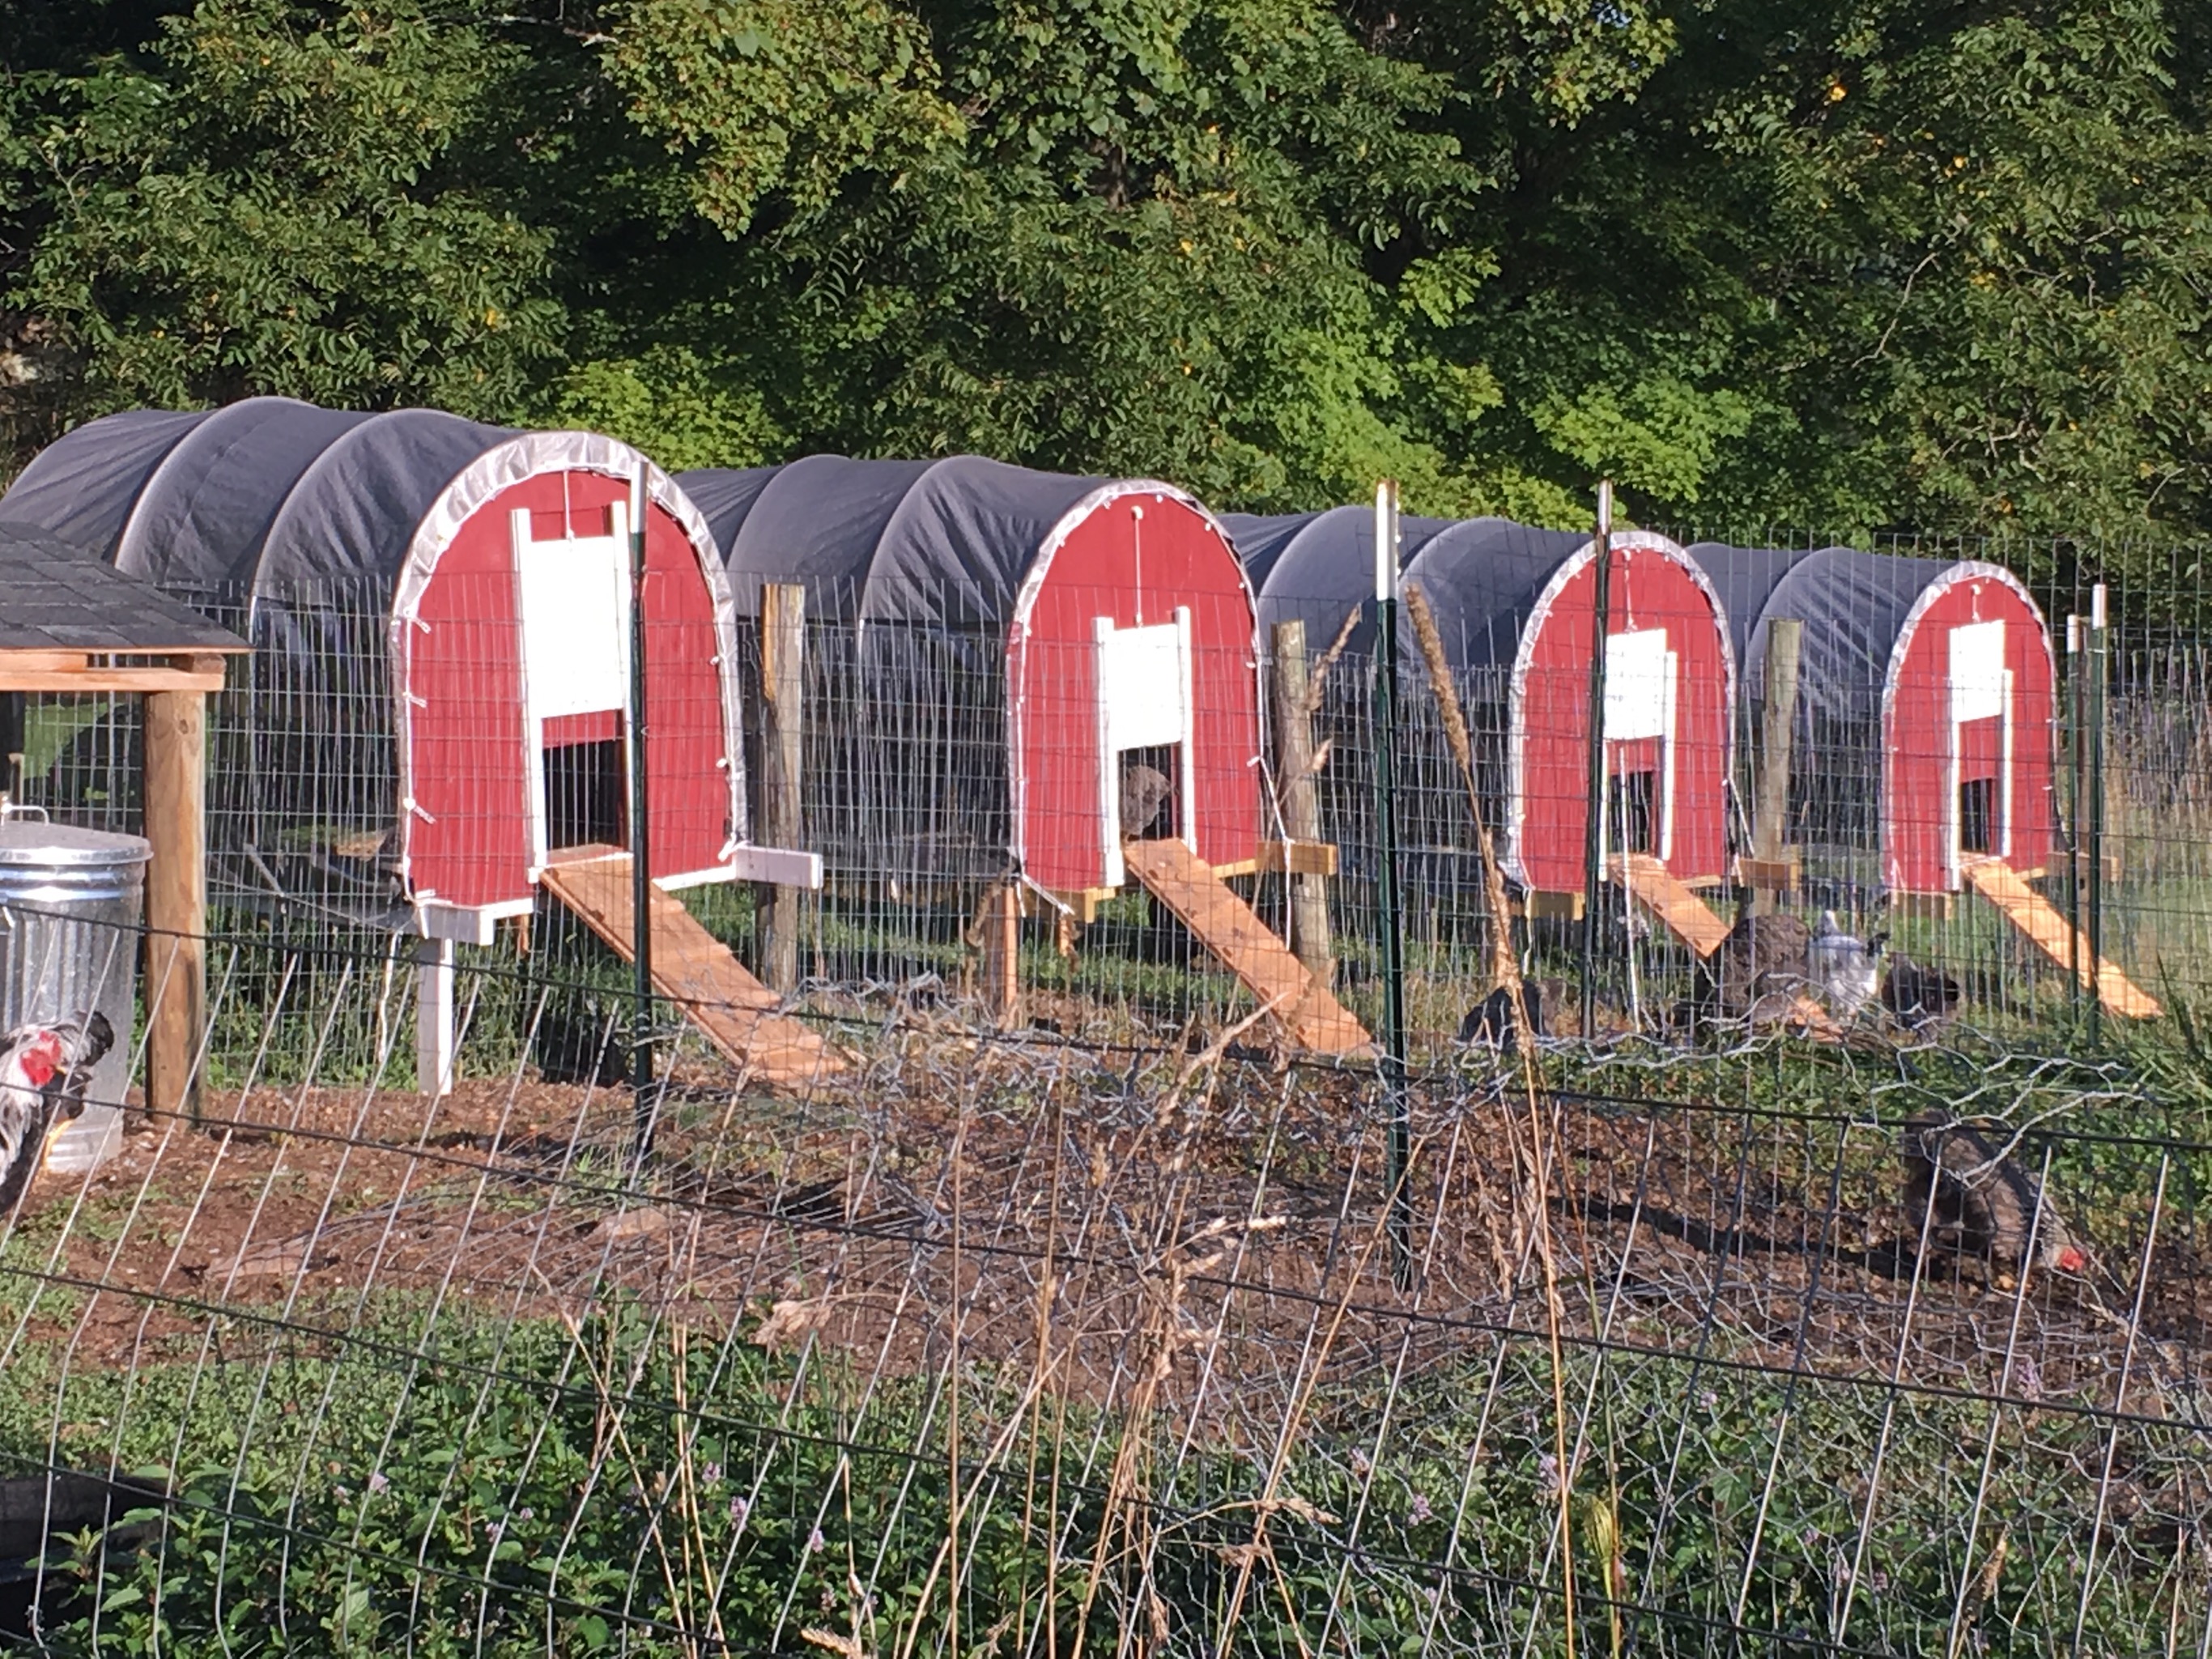
Check into hoop coop designs: these are by far the most weekend warrior friendly coops to build, and are usually the most economical as well. (We offer plans for a small one that meets all of the criteria above, and you can find examples of larger ones on our Pinterest boards — and more — by searching for Storybook Farm Poultry.)
Our hoop coops
If you have six or fewer birds to house, you might want to consider building a design that we’ve come to love. We practice clan breeding with five carefully selected hens and one rooster per coop. They’re pictured at the right. They take us about two good days to build (using average skills) and cost around $80 if you have to buy all the materials new. They are the easiest possible coops to service, work well in hot and cold weather, are extremely clean and well ventilated for birds (none needed for humans) and have the elegance of simplicity. We think they’re pretty cute, too! You can read details about this design here. We sell highly detailed plans for constructing them at our store, here!
It’s fall, and that’s the time when we face one of the harder parts of breeding chickens: culling. I can still remember the first time I realized that we would need to learn to butcher our roosters (and some older hens). While we often can rehome young hens, almost all roosters end up as food for our table. I know it’s a topic that many chicken lovers try to avoid or ignore, but I’d like to offer some thoughts on the rightness of seeing chickens all the way through their life cycles since the reality is that backyard chicken keepers will end up with roosters at some time in their careers.
First of all, though many of us keep chickens as pets, which means they are beloved individuals with names, they are animals: as such, they have no self consciousness. For instance, a chicken does not “say goodbye” to another chicken when they are sold away from each other. Chickens don’t fall in love, get married, or even — as do some animals — mate for life. Neither do chickens freak out at harvest time when cage mates are culled. Chickens are not humans: they do not reason as we do, or know their world as we do. Of course they have feelings, which include pain and fear. But the fear is more like startling, or a flight instinct, than a reasoned dread such as you or I would have in the face of mortal danger.
As a breeder of chickens, it gives me a great sense of purpose to raise birds that are the best that they can be. I choose high quality parent birds, and seek to feed and house them very well so that they will be as healthy (and happy) as possible. I place carefully chosen eggs in an incubator, and hover over it as the eggs set. I watch with amazement as chicks hatch — sometimes even intervening to help, though I’ve found that usually there’s a reason why a chick can’t make it out of the egg unaided. Many of our day-old chicks go off to be adored by others. But many also remain here at Storybook Farm.
I nurture my newborn chicks with electrolytes and apple cider vinegar in their water, medicated feeds that I grind in a blender to make sure they can get it into their newborn beaks. I provide warm lights, and clean, large pens. If they get pasty butts, I wash them off lovingly by hand.
As the birds who remain here grow from fledglings to adolescents, I watch them with delight. I love to see them come running at chow time. I love to hear the young cockerels learning to crow, sounding so much like adolescent boys whose voices have just changed. I laugh over the sparring matches of the young cocks, and am amazed to see the feathers change on pullets with each successive molt. Over and over, I wonder daily at the miracles of life, and growth, and beauty, and sweetness that my birds display.
Both cockerels and pullets frolic all summer at Storybook Farm on green grass, with plenty of sunlight, shade, food, clean water, and company. Unlike most large hatcheries, we do not dispatch young males. We purposefully choose breeds that are 1) heritage, 2) dual purpose (so that they are valuable for both meat and eggs), and 3) homozygous (look the same at birth) so that we sell all our chicks as “straight run” — and raise them the same as well. They all live sweet, pleasant lives while at Storybook Farm.
And then, in the fall, comes time for the hard choices of which chicks will feed us, which pullets will go into our laying flock for eggs, and which of the best birds will be bred to produce the next generation. For me, there’s a holy sense of awe when we go to harvest chickens. I’ve watched each animal its whole life, and now I’m bringing it full circle, and taking it to its final purpose. Each bird here has had a good life. Each bird has been loved and appreciated. And each bird will meet a quick, peaceful, painless, and humane end. It is hard, but it is also good, right, and proper.
All animals die. If I do not lovingly end their lives, their lives will still end eventually, and often in the claws of a predator or in disease brought on by old age. I cannot breed chickens and avoid that fact. Better I do it kindly and quickly than that they fall into hands less loving — like those of predators, or cock fighters, or as a by product of a larger chicken mill.
Deep thoughts about life and death come naturally to me because I am a Christian. I believe that God created chickens for a purpose. Actually, He created them for more than one purpose! Chickens give us so much: their eggs, their friendliness, their funny antics, their silly ways, and ultimately, their bodies. We live in a world where death comes to all. My faith teaches me that death is an evil, but a necessary evil, and sets me free to play my part in this circle of life.
So, I don’t have to ignore or avoid this phase of my responsibilities as a breeder. Bringing chickens into this world includes the duty and privilege of seeing them out of it, and I accept that, humbly and gratefully. I’m standing in the image of my Good Shepherd, Who has determined the roles that each of His people shall play, Who provides for, cares for, loves, and nurtures His children, and Who decides when He will bring them — not to an end, for we are not unconscious animals — but to be home with Him forever.
For me, then, butchering chickens is a sober, sacred business. God gave them life, and then gave them to me. As I choose which ones shall live and die, I reflect in my tiny way His awesome authority. I suppose it could make some people proud to wield such power, or help them become callous/indifferent to death. It has the opposite effect on me: I value the lives of both myself and my chickens more, seeing each day as a joyous gift. I also face death better (mine and my chickens’) by seeing it in right relationship to a bigger picture, and I am grateful.
I birthed, raised, and homeschooled six kids: three boys and three girls. I’m nearing my 60th birthday (April of 2018, and yes, it’s surreal, thanks for asking), and I’m blessed with 10 grandchildren who visit us often. All of my grandchildren love doing farm chores, but our most avid young farmer is probably my two-year-old sweetie, named Torri.
Torri & Grandpa check for eggs
If Grandpa gets his boots on in the morning, Torri scrambles to find her “farm boots” — which her mom says she had better remember to pack when she comes, or else Torri will go out barefoot!
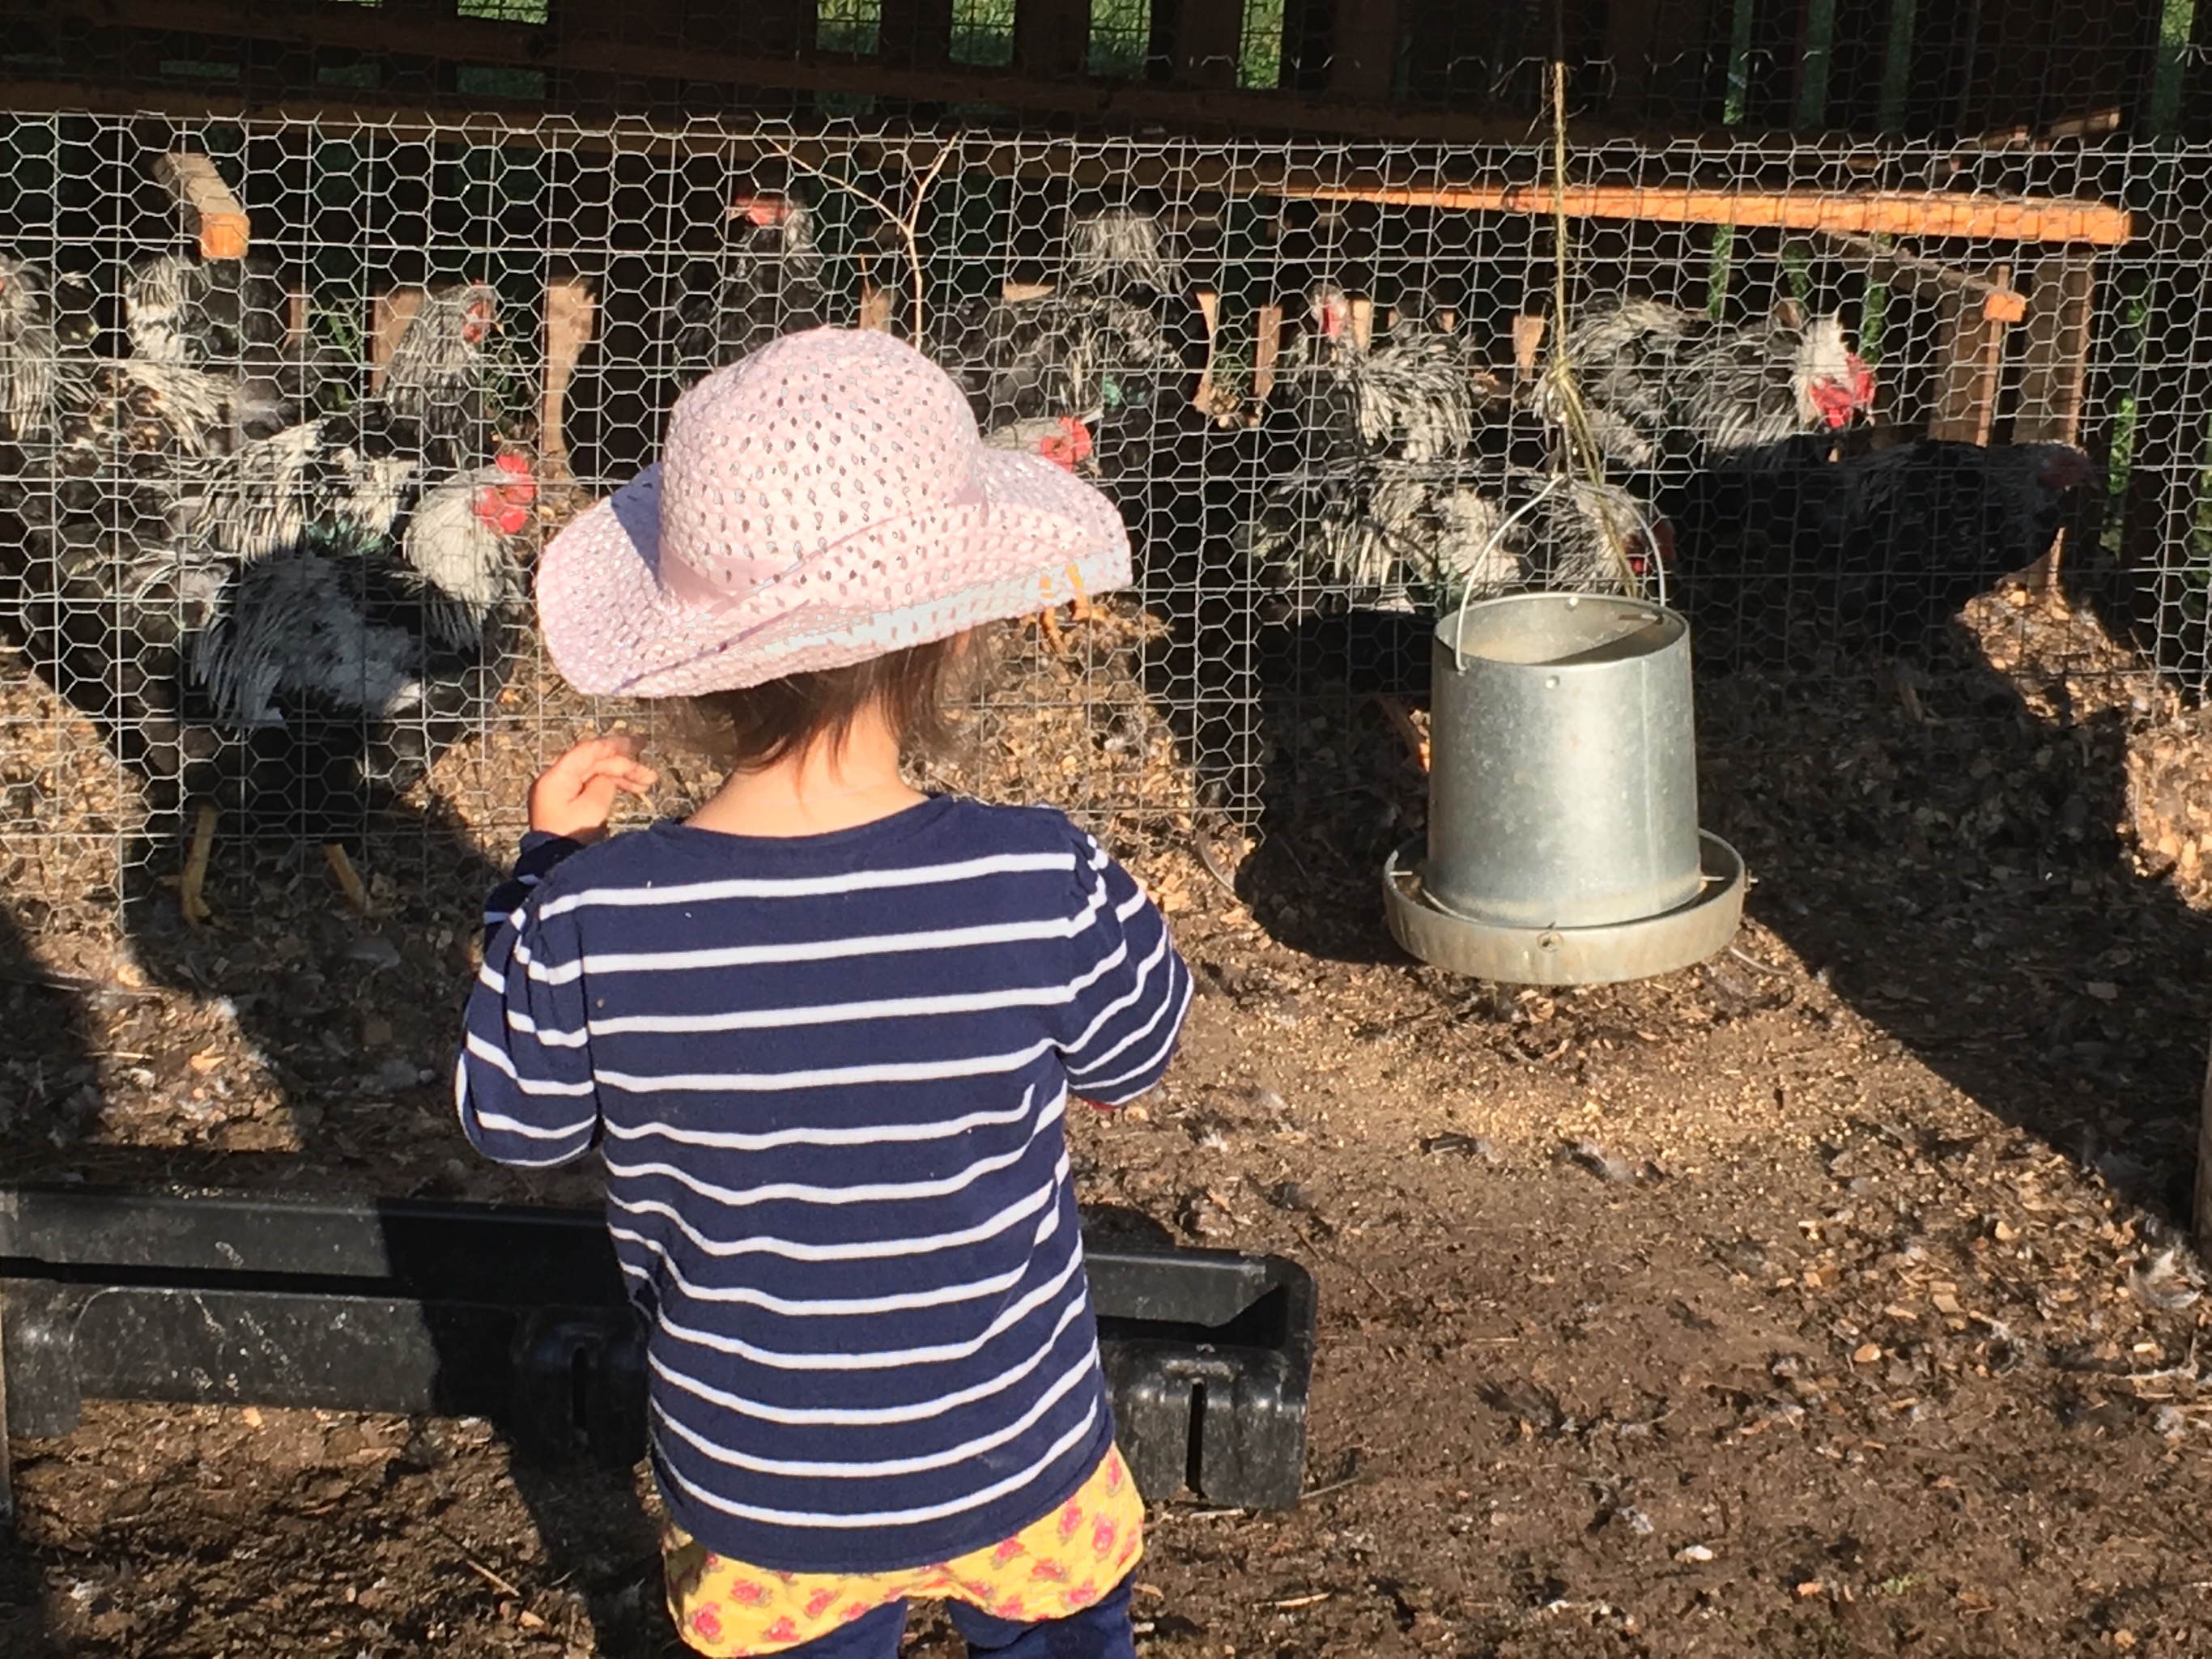
Grandpa and Torri feed the calves their grain, and make quick work of mucking the horses’ stall before beginning the real joy of the morning: feeding the chickens!
Because we use small Family Coops in a clan mating program, we have lots of small feed and water bowls at just Torri’s height. She truly can help with the chores! With just a little help from Grandpa, two-year-old Torri can open the nesting box and look for eggs, she can pull the cord to open the pop door, and she can feed and water the chickens. Because our Family Coops are designed as they are, she does much of this work herself, and comes out clean after doing so! (Read more about this here.)
Torri (and our other grandchildren) have also enjoyed helping with incubating eggs. They love to watch me candle eggs. They are fascinated to see chicks hatch (aren’t we all?). I have shared hatches with my grandchildren via FaceTime: you can see grandson Hector watching the chick hatch all the way from Maryland in this picture to the right!
And of course they all love to hold the fluffy darling chicks as soon as they are dry enough to do so. One task we set them is to watch the smallest chicks –usually the last to hatch — as we put them into the brooder. They make sure that the older chicks don’t peck or heckle younger ones.
Some of my older grandchildren have become quite adept at catching adolescent chickens when it’s time to move them to bigger pens as they grow out. They are not afraid to hold the flapping birds and help us to clip their primary wing feathers so that they’ll be safe in uncovered garden pens.
All this to say: generally speaking, children and chickens are natural together.
I know that my grandchildren come by a love of the farm honestly. It’s in their blood, and nurture! I always loved animals, and our family enjoyed a huge variety of pets growing up. To list a few, we had: salt water fish/corals, chinchillas, a ferret, white rats, a guinea pig, horses, an octopus, parakeets, and dogs.
Being a homeschooler, I was always on the lookout for projects that my young children could do. I wanted ones that would bring a sense of independence, hands-on learning, and delight in nature (and nature’s God). Book learning is necessary, but I always felt that my kids should also have as close a connection with what I called “the elements” as possible. For this reason, for instance, we chose to heat our home with wood when we could, took our kids to zoos and nature centers, and (of course) had all those pets.
Kids Should Consider Keeping Chickens
Raising, breeding, and even showing chickens are all well within the realm of a young child’s abilities. Most of the work can be done by them independent of hands-on adult supervision. Thirty years ago, when my kids were born, the backyard chicken movement hadn’t gotten underway. Our suburbs didn’t allow us to keep chickens, much less our HOAs. So, I never even considered chicken farming as a project for my homeschooled kids.
But, today I sure would! Things have changed. The movement towards buying food that’s fresh and local, and as organic as possible, has led to chicken advocates across America lobbying successfully for the ability to keep small flocks in backyards. Chickens are easy to keep, hardy, and inexpensive to buy. Like all pets, they need housing, food, and attention.
So, here are 10 reasons to consider encouraging (and financing) your child’s chicken project:
Chickens are the right size. Whether your child chooses bantams (miniature chickens) or large fowl breeds, chicks are certainly not intimidating when you purchase them as babies, and they tend to grow up to be very tame. Kids can handle adult chickens all on their own, usually without intimidation.
Chicks are adorable, and then they grow up to be beautiful birds. Aesthetically, chicks are as cute as puppies, and you don’t have to housebreak them. Kids have a huge variety of breeds to choose from when starting out, which is part of the fun. They can choose heritage breeds, and help save them from extinction. This is meaningful, but perhaps they’ll choose more exotic breeds for their amazing plumage. It’s up to them. 🤔
Forget the parakeets! Chickens are far more hardy and handleable! Chickens will eat treats from a child’s hand, sit on her lap (with training) and follow her around the yard. Chicken antics and expressions are funny and endearing. Chickens are great pets by any standards!
For those with allergies to furry pets (like some of my grandchildren) birds can offer an great alternative. And chickens are great birds to choose (see #3). Chicks are cheap, and their housing can be as reasonable as any other pet. (Older children can assist in building a chicken coop as well, which is a great hands-on project itself!
The life cycle of a chicken — especially egg formation/laying and then hatching eggs — is fascinating and brings great glory to the Creator God. You can study chickens and be amazed at how they propagate and grow.
If your ordinances permit a rooster, your child can breed chickens. He can learn about genetics, and become an astute observer of breed traits, good and bad, in the birds he breeds. He can raise better and better birds each year. Ordinances may limit the number of birds you can keep, but if you are in a rural setting, you don’t need a lot of space to dedicate to breeding chickens, and it’s easier than breeding puppies!
Possibly, there is no cheaper or easier animal to show. If your child likes to compete, she can enter her chickens in shows large and small, near and far. This is a great experience for many young people, offering honest feedback on your child’s efforts. Most counties have a 4-H office, or YFA where you can learn more about showing.
Torri feeding chickens
Don’t forget the eggs! The same satisfaction that a gardener experiences is felt when your child, day after day, goes out to the coop to harvest eggs for his family’s consumption. Different breeds lay different colored eggs. Your child might want to choose breeds that yield a rainbow egg basket.
As with all pets, keeping chickens will teach your child to be consistent and responsible. Chicken pens do not need to be stinky or difficult to clean. There are methods of bedding and there are coop designs that minimize the work and unpleasantness of tending chickens. Most birds can be tended only morning and evening, so those in traditional schools can keep chickens just as well as can homeschoolers.
Going all out, your child could dabble in a home business. She can sell table eggs (in your neighborhood, or at a local farmers market). If a rooster is allowed, she can sell hatching eggs and/or day-old baby chicks! This last one will need adult help and supervision, because there are permits and car trips involved, but the child can do much of this home business on his or her own!
Do you have questions or comments related to this topic? Feel encouraged to comment below if so!
For years now, we’ve had a serious egg surplus. It came from my chicken habit, and my husband (who collects the eggs) often had to say to me, “Honey, what shall we do with them all this time?”
And now that we’re breeding more chickens, our laying flock is increasing (since that’s where those hens who are not comely enough to be bred can still find a useful place at Storybook Farm).
We eat a lot of our yummy eggs. We have also sold them to friends locally, and given them away to family members. But this summer, I realized that our tiny town hosts a fledgling farmers’ market in good weather, and when I went down to check them out, they allowed as how they never had enough eggs!
The first hurdle was, as is so often the case, legalities. I consulted the WV Vendors’ Handbook. Here are the (lightly annotated) regulations I found:
A small producer may market up to one hundred fifty (150) dozen eggs (!) or less (that’s me!) per week of their own production.
The producer must register with the WVDA (West Virginia Department of Agriculture).
Small producers must label their cartons with:
The name and address of the person selling the eggs
The date the eggs are packed
The words “Ungraded Eggs” in print of at least 5/8″ high
Eggs shall be washed (removing their bloom, and necessitating refrigeration, whereas if we had not washed them, they would stay fresh for up to 6 months, but never mind).
Eggs shall be transported at forty-five degrees F, unless the time for transportation is less than three (3) hours. (Great! I only live 20 minutes from the market. 😇)
Eggs are to be stored and displayed at the Farmers Market in cold-holding equipment capable of holding forty one degrees F or less. The eggs must reach the forty-one degree temperature within four (4) hours of receipt at the market. (That cold-holding equipment was my cooler, and since our market lasts from 9 AM to noon, no problems here.)
Small producers are permitted to pack in recycled or used cartons when the distributor’s name, address, expiration date, size and grade are marked out and replaced with the labeling required for small producers.
Cartons shall be clean and free of odor or debris.
Any vendor selling eggs shall have a valid Food Establishment Permit from the local health department before the date of sale. (Our county did not actually require this. Yeah; it’s almost heaven here! 😍)
It took me a couple of weeks to get all these ducks in a row.
I had to fill in a WVDA form and show it to our county Board of Health.
Then, I had to pay for a county permit ($15/year), which my county BoH discounted since we were at the end of the season. I paid $6.
After all that, there were only a couple of weeks left in the selling season, but we got up early to wash and pack eggs. Here we are in our PJs getting it done (right)!
Eggs were washed.
Eggs were packed and labeled according to regulations and put into clean, clear cartons (so, no need to ink out the former farms’ names).
Me at our table
We set up our table, and had a blast networking with other likeminded folks.
We sold about half of the eggs we brought and had a great time! Can’t wait for next Saturday!
We have been enjoying our family coops so much, some for reasons we envisioned, and some for reasons we never thought of when we designed them!
We love so much how easy it is for the farmer to tend the coops morning and evening. One just stands in one place to feed, water, check for eggs, and open or close the pop door. All that we hoped and expected to love, and we do!
We also love how easy (and clean) things remain for the farmer. In closed coops, things get dusty. It’s unavoidable. And, when it’s been rainy for days, things also get stuffy and closed in. (In poorly tended coops, you also get bad ammonia/poop smells, but we don’t normally deal with that in our closed coops, since we tend them properly and use deep litter methods.) Family coops do not require humans to enter where the birds live! Their litter falls under the coop, and in our case, our birds scratch and hang out under there, so it’s not even that dirty. There’s no dust in the air. The farmer tending one of our coops walks on lawn and breathes fresh air!
Young Light Sussex Eating
We love how we are saving on feed. The design of the feeding station means that the chickens cannot scratch at all. They can spread a little feed by flinging with their beaks, but it’s not much, and it generally falls on the feed stand. We take up the feed bowls each night (read below to see why) and each morning, hungry hens tend to peck up all the feed they scattered the day before while waiting for us to come outside each morning.
We love that we seem to be foiling rodents! Each night, we take in these small bowls and dump any remaining feed into our metal storage cans. We stack the bowls and put them in with the feed. In the morning, we take out the feed bowls, fill them, and return them to the feeding stations. Rodents come out at night and find little, if any, feed waiting for them!
Opening the Pop Door
Best of all, we love how easy it is for our small grandchildren to do morning chores with us! These are pictures of 2-year-old Torri helping her grandpa to open pop doors, check for eggs, feed, and water the chickens in four coops. We used to be very careful to ask grands to wear special shoes, wash hands, etc. before tending chickens inside coops. With our family coops, the children never enter the chickens’ domains. They are outside, on the lawn, handling only a hose and a feed dish. They still wash their hands, but we are far less concerned with any dangers of salmonella.
Putting in the Feed Dish
Our family coops have been nothing but delight to us. We’re building more each week; we’ve gotten down to the ability to build one in an easy 2-day period. If you would like detailed plans, we sell them HERE.
While working along at getting set up to mail chicks for the first time in the fall of 2017 and winter of 2018, a part of that process was to become NPIP and AI certified. Maybe you are mystified, as I was, as to why this is important, and how it is accomplished. If so, read on!
What Is NPIP? And AI Clean?
First, then, what do NPIP and AI stand for? Reputable breeders of chicks should be National Poultry Improvement Plan certified and Avian Influenza clean, and must do so to legally transport birds across state lines. Here is a brief explanation of the history and purpose of the National Poultry Improvement Plan (NPIP) from their website.
The National Poultry Improvement Plan was established in the early 1930’s to provide a cooperative industry, state, and federal program through which new diagnostic technology can be effectively applied to the improvement of poultry and poultry products throughout the country. The development of the NPIP was initiated to eliminate Pullorum Disease caused by Salmonella pullorum which was rampant in poultry and could cause upwards of 80% mortality in baby poultry. The program was later extended and refined to include testing and monitoring for Salmonella typhoid, Salmonella enteritidis, Mycoplasma gallisepticum, Mycoplasma synoviae, Mycoplasma meleagridis, and Avian Influenza. In addition, the NPIP currently includes commercial poultry, turkeys, waterfowl, exhibition poultry, backyard poultry, and game birds. The technical and management provisions of the NPIP have been developed jointly by Industry members and State and Federal officials. These criteria have established standards for the evaluation of poultry with respect to freedom from NPIP diseases.
APHIS’ mission is to safeguard the health of our nation’s agricultural resources. Our many animal health experts work closely with other federal agencies, states, foreign governments, industry and professional groups, and others to enhance international trade and cooperation while preventing the introduction of dangerous and costly pests and diseases.
Chicks and hatching eggs that carry these avian diseases can threaten not only flocks to whom they come, but humans as well. Responsible farmers who sell chicks seek to make sure that the birds they mail are healthy. So, what is the process in becoming certified NPIP and AI clean?
The program is administered through state agricultural extension offices. You can find out contact information for your official state officer by clicking here. In my state, West Virginia, inspectors come to your farm for free. (Yeah, it’s almost heaven here for sure!) In many other states, there will be a fee.
So, What’s the Process?
I started the process by sending an email query to the contact listed on the NPIP page linked above. I had to wait about five days for a response, but it was June and I assume the contact was on vacation, because when I did get an email it was very helpful and detailed. It included a phone number, so I called with a few questions. She took my contact information and told me that the inspector would call shortly to make an appointment. He did so two days later.
My inspector made an appointment with me for two weeks after his call. He came an hour late, but this was fine. He only was interested in testing adult birds (six months and older) who were breeders for the chicks we planned to mail out. (In other words, he didn’t test our laying flock.) We have our birds separated into various outbuildings on our farm. He only wanted to test the ones in our breeding coops. We had six birds for him to test by this criteria, even though we have a laying flock of 20 chickens, and over 85 birds under the age of 6 months.
I was surprised when he told us that most flocks he tests in backyards average 12 birds! He also said that it was fine for him to “test sample” because if any birds were sick, all were, and so testing a sample flock would cover all our birds.
The testing consisted of a wing prick for blood (the Salmonella typhoid test, which gives results instantaneously) , and a mouth swab for Avian Influenza (which gets sent to a lab and we get our results back in two to three weeks). The inspector also looked around our facility and rated it. He rated us an “A” for cleanliness — which he mentioned mostly included no dirt piles around the coops — I think because of rodent infestation, but that’s a guess.
He asked about whether we used automated watering or hand watering. We do the latter: I can’t bring myself to trust automated systems, in case they fail, so we water and feed morning and evenings daily, as well as shutting coop doors by hand. He gave us a “1” for not having automated watering. He did not look into our coops to see the cleanliness levels.
He left us some paperwork to fill in. It’s mostly contact information and the type of operation you are running. Two pages; very simple. We mailed it in, and are waiting for our “all clear.” Our inspector told us that it was on us to call and arrange a repeat visit yearly. It took about a month for us to receive our NPIP #253 from the WVDA.
And that was it! I was glad to clear this hoop and find that my birds are as healthy as I thought they were! I think that, for most of us, if you habitually follow best practices for your birds, you too will clear this hurtle easily, so don’t be afraid to try!
This year (2017), we are working on expanding our flocks and taking on new breeds. Our goal is to create three “families” (or clans) per breed of chickens that we raise. This enables us to preserve genetic diversity without needing to import “new blood” every couple of years. We have a large garden (1800 square feet) and are cross fencing it into interior pens with hoop coops ringing the exterior while reducing the area we’ll use to raise food. This past week, we spent a few days building the prototype coop. We are thrilled with the results, as are the lucky Light Sussex birds who giving it its shakedown cruise. Come, take a peek!
General Parameters
This coop’s wire floor is 4′ x 6′. It has two 6′ long 2 X 4 perches (mounted sideways so birdies can tuck their toes in on cold winter nights). It has three nesting boxes, and below these is a food and water station. We plan to put 6 birds (one cock and five hens) in each of these coops, but its maximum size according to normal chicken math (because they will have outdoor space as well) is 12 large fowl.
Both ends of this coop are made from one 4′ X 8′ sheet of exterior grade 1/2″ plywood. We paint the edges, and then encase them in old garden hose shells (or duct tape) in an effort to preserve their life span. The middle two ribs of the coop are made from bent 10′ metal conduit. These are attached by setting them atop 10″ carriage bolts and wiring them to poultry netting. They end up being slightly taller than the ends, but this helps shed rain and snow, so we don’t cut them down. The nesting boxes/feed stand are all made from an additional half-sheet of exterior grade 1/2″ plywood.
About Tarps
Coop covered in silver tarp before modification.
In the prototype design, a silver tarp covered the coop, providing shade in the summer and protection from drafts in the winter. While this will work great, sometimes necessity is the mother of invention! We ordered 7′ X 10′ tarps, but (surprise, surprise) those are not the finished dimensions of the tarp — oh, no! They are actually 6′ 5″ X 9′ 6″. Grrrrr~ Let the imitator of our coop beware!
Luckily, I know how to sew, and I had some heavy duty vinyl left over from a different project. I cut the tarp and sewed in a clear panel (see picture right). We carefully considered how high this panel should go. We wanted to have plenty of shade for the birds in hot summer weather, but allow sunlight in (for warmth and increased egg laying) in the winter.
Tarp modified with vinyl panel
My husband calculated beautifully. The clear panel is south facing, and the high summer sun barely kisses the uphill perch, while leaving more than half of the coop in shade. In the winter, the sun will slant lower, filling the coop with light and warmth for much of the day, yet the birds can still go outside if on those rare, freaky days it gets too hot.
Yay for mistakes, huh? (If you are imitating us but don’t sew, a wee bit more expensive (but effective) option would be to purchase a clear tarp and an opaque one, and lap them so that the clear tarp would show similarly to the picture, right. (We have tried duplicating the sewing results with duck tape, and it doesn’t work, alas.)
More recently, we have made a great discovery for non-sewers, though! We have used a corrugated plastic panel and put the tarp over top. It works great! On the left is a pictur of one in production.
Under the tarp (as you can see in the picture at the top of this post) the coop has 24″ poultry netting lining both sides of the tarped area. The wire is laced to the conduit ribs (stabilizing both wire and ribs). This netting adds a layer of protection for the birds (especially at night) from raiders — around here, it’s usually raccoons — and also allows us to safely raise the tarp six inches or so on hot summer nights so that breezes can cool the coop. We considered putting netting all the way around the hoops, but rejected it because we wanted a way to access the coop (without installing a door) for winterizing. When we need to get inside the coop body (for winterizing, say, or to do deep cleaning in spring), all we do is shoo the birds out into their pen, close the pop door, remove the tarp, and work on the coop.
One more note on tarps: the one pictured advertized grommets every 18″. This is fine on the sides of the coop, but not good enough for the front and back (the 10′ sides). In these pictures, you can see the tarp as it came to us. However, my plan is to install grommets every 9″ on the next tarp we use. They are easy to put in — no sewing required! You can get grommets at some hardware stores, but even more reliably at sewing supply (fabric) stores.
Mobile or Not: Your Choice~
We are making these coops stationary, mounting them 18″ above the ground around our garden perimeter, but they are easily modified to become chicken tractors by adding wheels to the back side floor framing and repositioning the wire floors, attaching them to the bottom of the floor framing instead of on top, as we did. Such tractors would be light weight and can be easily moved by one person, especially if one added a cross piece between the two front “handles.” I am 5′ 2″ and, though I can carry this coop with my husband, I cannot reach the 4′ span. A cross piece here and wheels in the rear would make moving this coop a breeze, even for me!
Pop door
In our application, we’ve cut a hole in our garden fence the size of the pop door. (If your eye tells you that the coop is not quite level or lined up, you are accurate! What you need to know is that the land is sloping quite a bit and the garden fence follows the lay of the land. The coop floor — and perches and nesting boxes — are level.)
We first intended that the ramp would be the door. However, in refining our design, we came up with the current design (of standing at the back of the coop and operating the door from there) so the ramp became stationary. Therefore, on this version, we filled in the space we had first cut out with a piece of plywood, and then painted it red. In future versions, the cut out will be 1′ square, so the front will be solid except for that low opening. You could build this coop either way, or without any ramp at all, if it functions as a chicken tractor and sits on the ground.
We cut another another hole in our garden fence under the pop door and put wire to the ground under the coop’s frame so that our birds get even more space to enjoy that is shaded: under the coop! This has the added benefits of 1) more greens for the birds, 2) less trouble for my husband to mow, in summers, 3) the dogs can’t run under the coop for shade and scare the chickens half to death, and 4) in winter, the ground under there stays clear of snow so the chickens can get out more often! Word of advice, though. When introducing (especially young) birds to the coop, don’t allow them under it at first or you’ll have a hard time training them to go in at night! (Ask me how I know this… no, don’t.)
Stand in One Place and Do All the Chores? Yes, Please!
To continue: the coop’s pop door that is operated from the coop’s back side by a clothesline. The farmer, standing in front of the nest box and feeding station at the coop’s back, can 1) collect eggs, 2) open/close the pop door, and 3) feed and water the coop’s occupants.
We prefer to hand water, feed, and regulate the door ourselves daily (morning and evening) because we both battle rats and don’t trust automation. However, one could rig these coops with an automatic pop doors and watering systems, or bucket waterers.
There are two details to notice about how the pop door cord was constructed:
Detail: hose covering and PVC elbow
1) On the front of the coop, we were concerned about how the cotton cording would hold up, and/or operate when wet, if we just ran it through the hole without a pulley. Unfortunately, we couldn’t find a pulley that mounted easily the right way. In the end, we used a 1/2″ PVC elbow (pictured right) as a guide/preserver of the cording when running the line up from the pop door and through the drilled hole in the front face of the coop.
Detail of hole, cleat on farmer side
2) As you can see in the detail picture at the left, the line that then comes through the space at the top of the hoop coop (under the tarp) exits through a hole at the back and is cleated around two screws. (Be sure to put those screws about 6″ down from the top, or you’ll be fighting with the tarp each time you use it!) Because there is no downward pressure on the line in this area, we didn’t need to put the same PVC elbow, but we did insert a wooden toggle so that, when the cord shortens as the door is closed, the line can’t disappear into the coop.
Feed and Water Station Details
We prefer to not use electricity to heat water in the winter, so we have these shallow, thick yet flexible, rubber feed and water bowls (see below) which are easily dumped when frozen. In the dead of winter, I will use a wagon and go down the row of coops, popping out frozen water and replacing it with heated water morning and evening at least, and sometimes at noon. However, again, one could put a small nipple bucket with heater in the feeding area.
Detail: feed and water station
The bowls are wired off from the birds with 2″ X 4″ galvanized field fencing, curved in an “double S” format. The wire spaces are plenty wide for adult birds to put their heads through for feed/water, but do not allow for scratching of food or sitting on the water. (They can and do still fling it some, though.) This makes for less waste of food and purer water for longer.
Notes: Chickens regurgitate when they drink, so the water still needs changing morning and evening. Also, very young birds can go through these wire spaces. If I were housing juveniles in these coops, I would put a wooden panel on the back of the feeding station and remove the wire barrier until the babies were big enough that they couldn’t go through it.
Young Light Sussex eating
I dump the unused feed back into my metal trash can each night (even brushing spilled feed in as well) so that varmints have nothing to eat here. With the tarp in place, and nesting boxes above, shade keeps the water bowl from growing algea, and the overhang keeps food from being spoiled during rainstorms. I painted the floor of the feeding area in an effort to preserve the life of the plywood. If I was making this a chicken tractor, I think that I would put a lip on its back so that when I moved it, the bowls would stay put.
Nesting Boxes
nesting boxes and feeing station inside
The coop is designed for a family of 6-8 birds on our farm, but as I said above, you could house 12 here. With more than 6 hens, though, it might get a little tight when it comes to nest boxes. Because we anticipate housing only 5-6 hens and one rooster most of the time, we chose to provide three nest boxes. In our experience, multiple hens often choose to use the same box no matter how many are provided. We often find three to four eggs in one favorite box among our laying flock, but that is up to the hens!
The general rule of thumb is to provide one box for every two hens. Our boxes are raised, which laying hens prefer, and the lip in front of them keeps the shavings that we put there to help with egg cleanliness in the boxes, and not falling through to the floor. We do have hens that will sleep in the nesting boxes, so they do need cleaning out regularly (not my favorite farm chore) but that’s so with every nesting box we’ve ever built.
Winter Modifications
We live in the mountains of WV, where temperatures do go to zero in some months of the winter. In the fall, staple feed bags or landscaping cloth over the wire floor of the coop and fill it with dried fall leaves and wood shavings to a depth of 4″. Deep litter will result, insulating and remaining in the coop until spring (with monthly additions), when we will remove the barrier and the coop will become self cleaning again.
In winter, we also staple a clear vinyl flap or landscaping cloth to the back of the feeding/water area in order to cut the flow of winter winds into the coop. It’s great to have the vinyl in the back and on the side so that I can look out at any time and see how my chickens are doing, but an opaque landscaping cloth flap works just as well. In the picture at the right, you see that we added a landscaping cloth skirt. This was actually added in summer because this run had zero shade. But, as winter came on, we left it there for added protection against the cold, both in daytimes and at night.
You can get more detailed information about winterizing in this post.
Want More Information?
How do you like our design? Do you have any improvements to suggest? Got any questions you’d like to ask? Leave them in comments.
Update: We’ve now constructed seven of these coops, and have used them for over 6 months. We are thrilled with the results, so we’ve written up a detailed set of plans for those who are interested!
If you would like to purchase plans, click here. They are $25/set (delivered via PDF), have lots of detailed step-by-step instructions and pictures, and include a bill of materials.
The basic cost to construct one of these coops depends on how many of the materials you have on hand, and how much you need to buy, and where you live. For instance, you only need 6′ of four-foot galvanized wire per coop, but wire is sold in minimum rolls of 25′. If you’re just building one coop, that’s expensive wire! If you’re building eight coops, it’s cheap. (The good news on this wire is that you can also use it for the birds’ run as well.)
A ballpark figure for all materials purchased new, but assuming that you have tools needed for assembly, is in the neighborhood of $75-$100. (We’re building 12 of them, and they are costing us more like $60 apiece.)
Storybook Farm has been our home for five years, and I never would have dreamed that we’d get into the business of breeding, raising, and selling chickens. But we are doing just that!
We’re Not Selling Garden Produce
Part of the reason is that I’m definitely not the inheritor of my grandmother’s award-winning green thumb. When we got here, the first thing we did was plant an orchard, and that spring, we cleared and terraced and fenced an 1800 square foot garden. For two seasons, we worked with the soil that was there naturally; very little grew. The next two seasons, we built raised beds and used the square foot gardening method. Things came up, but then came the rabbits to eat the tender bean shoots, and the deer finished off the tomatoes just when they were getting ripe after so many days of watering and weeding. That was the last straw for me as a gardener: I’ve been happily buying other people’s veggies ever since. (I do wish that we could grow cilantro, though, in the winter, especially. I use it a lot, and our local grocery store can’t keep it in stock because many people in our small town haven’t yet discovered it and it goes bad. Sigh.)
We Want a Working Farm!
Pretty Pony!
Part of the reason for the chicken selling adventure is that we have always planned to create a working farm (in contrast to a hobby farm). We first tried raising sheep, and they were a lot of cute, but not any profit to us in any way that could be reflected on a Schedule F tax form. (Did you know that wool prices now are lower than they were 100 years ago, and that’s without adjusting for inflation?) We sold our flock, and now raise cattle instead, mostly for meat for our extended family and friends and to keep down our back 30 acres. We may sell beef someday, but it will take years to build up our herd. So, that’s still not going to satisfy Schedule F any time soon.
I ride horses, and I thought of flipping horses. Yeah. I’m not good with problem horses, so even though I bought a pony for $1200 and sold her two years later for $2400, in the process I came off her and broke a couple of ribs. When she got ornery, I quit riding her and looked to sell her. It was my bad for buying a green pony for my grandchildren when they are total beginners. I just got suckered by her pretty face and big brown eyes… which is why, I guess, she sold so well in the end.
Chickens Were My Hobby First
I never thought of selling chickens before this summer, but I have had fun raising them. Three years ago, I talked my sweet husband into buying me a coop off of Craig’s List and the seven chickens that went with it. Oh, they were so cute I thought. Finally, I said, Storybook Farm looked like a farm.
Then, a friend gave me three guinea fowl. And they were so funny and made such a unique and sassy noise that I fell for them… until one by one they disappeared. So, I decided I had to have more guineas and more chickens. We had an old outbuilding that we could renovate into a bigger coop than my Amish starter one… so, why not? Now we had a layer flock of 25 chickens, and my job began to be finding people who wanted farm-fresh eggs. Well, our little town has a Farmer’s Market on Saturdays, so that was a problem solved.
Then, I bought an incubator. And I was so terrified that it would break mid-hatch that I bought a second one just to have as a backup. My first hatching season wasn’t so great. I had 50% hatches, mostly. But the chicks were so cute! (In the picture at the right, you can see my grandson watching a hatching chick long distance via FaceTime.) It has been so much fun to watch the fascination that the children have with both hatching and the cute little chicks. They even like helping with morning and evening feeding and watering when they’re here.
With a little practice, I got better at hatching, and this year we had 80% hatches… in both of those incubators… which is how we ended up with 60 Silver Penciled Rocks to grow out. (Oops!? Well, not really a problem. We like to eat chicken, and with much encouragement and training have made our peace with butchering if we can’t sell less-than-perfect birds as pets. Yearly, we keep the best birds to improve our breeds!)
Into the Chicken Biz!
So, after reading this blog post, selling chicks and eggs kind of happened to us. What’s not to like? I get to buy a bigger incubator, and a hatcher. I get to start new breeding flocks. I get to meet new friends who love chickens as much as I do when showing my birds. I get to bless other people with cute fuzzy butts!
If we’re successful, we can cover our expenses and fill in that good old Schedule F and get a tax break. We will have a working farm, and I will have the joy of breeding and hatching to my heart’s content. And if we’re not successful, well, I like chickens and I have a generous husband who has always loved to watch me care for the myriad of animals that I’ve talked him into letting me have. So, it’s all good! 🐔


 2. Join an online community.
 Would your child be interested in hatching chickens to raise, or breed, or possibly show or sell?


 The first hurdle was, as is so often the case, legalities. I consulted the
  It took me a couple of weeks to get all these ducks in a row.


 Chicks and hatching eggs that carry these avian diseases can threaten not only flocks to whom they come, but humans as well. Responsible farmers who sell chicks seek to make sure that the birds they mail are healthy. So, what is the process in becoming certified NPIP and AI clean?
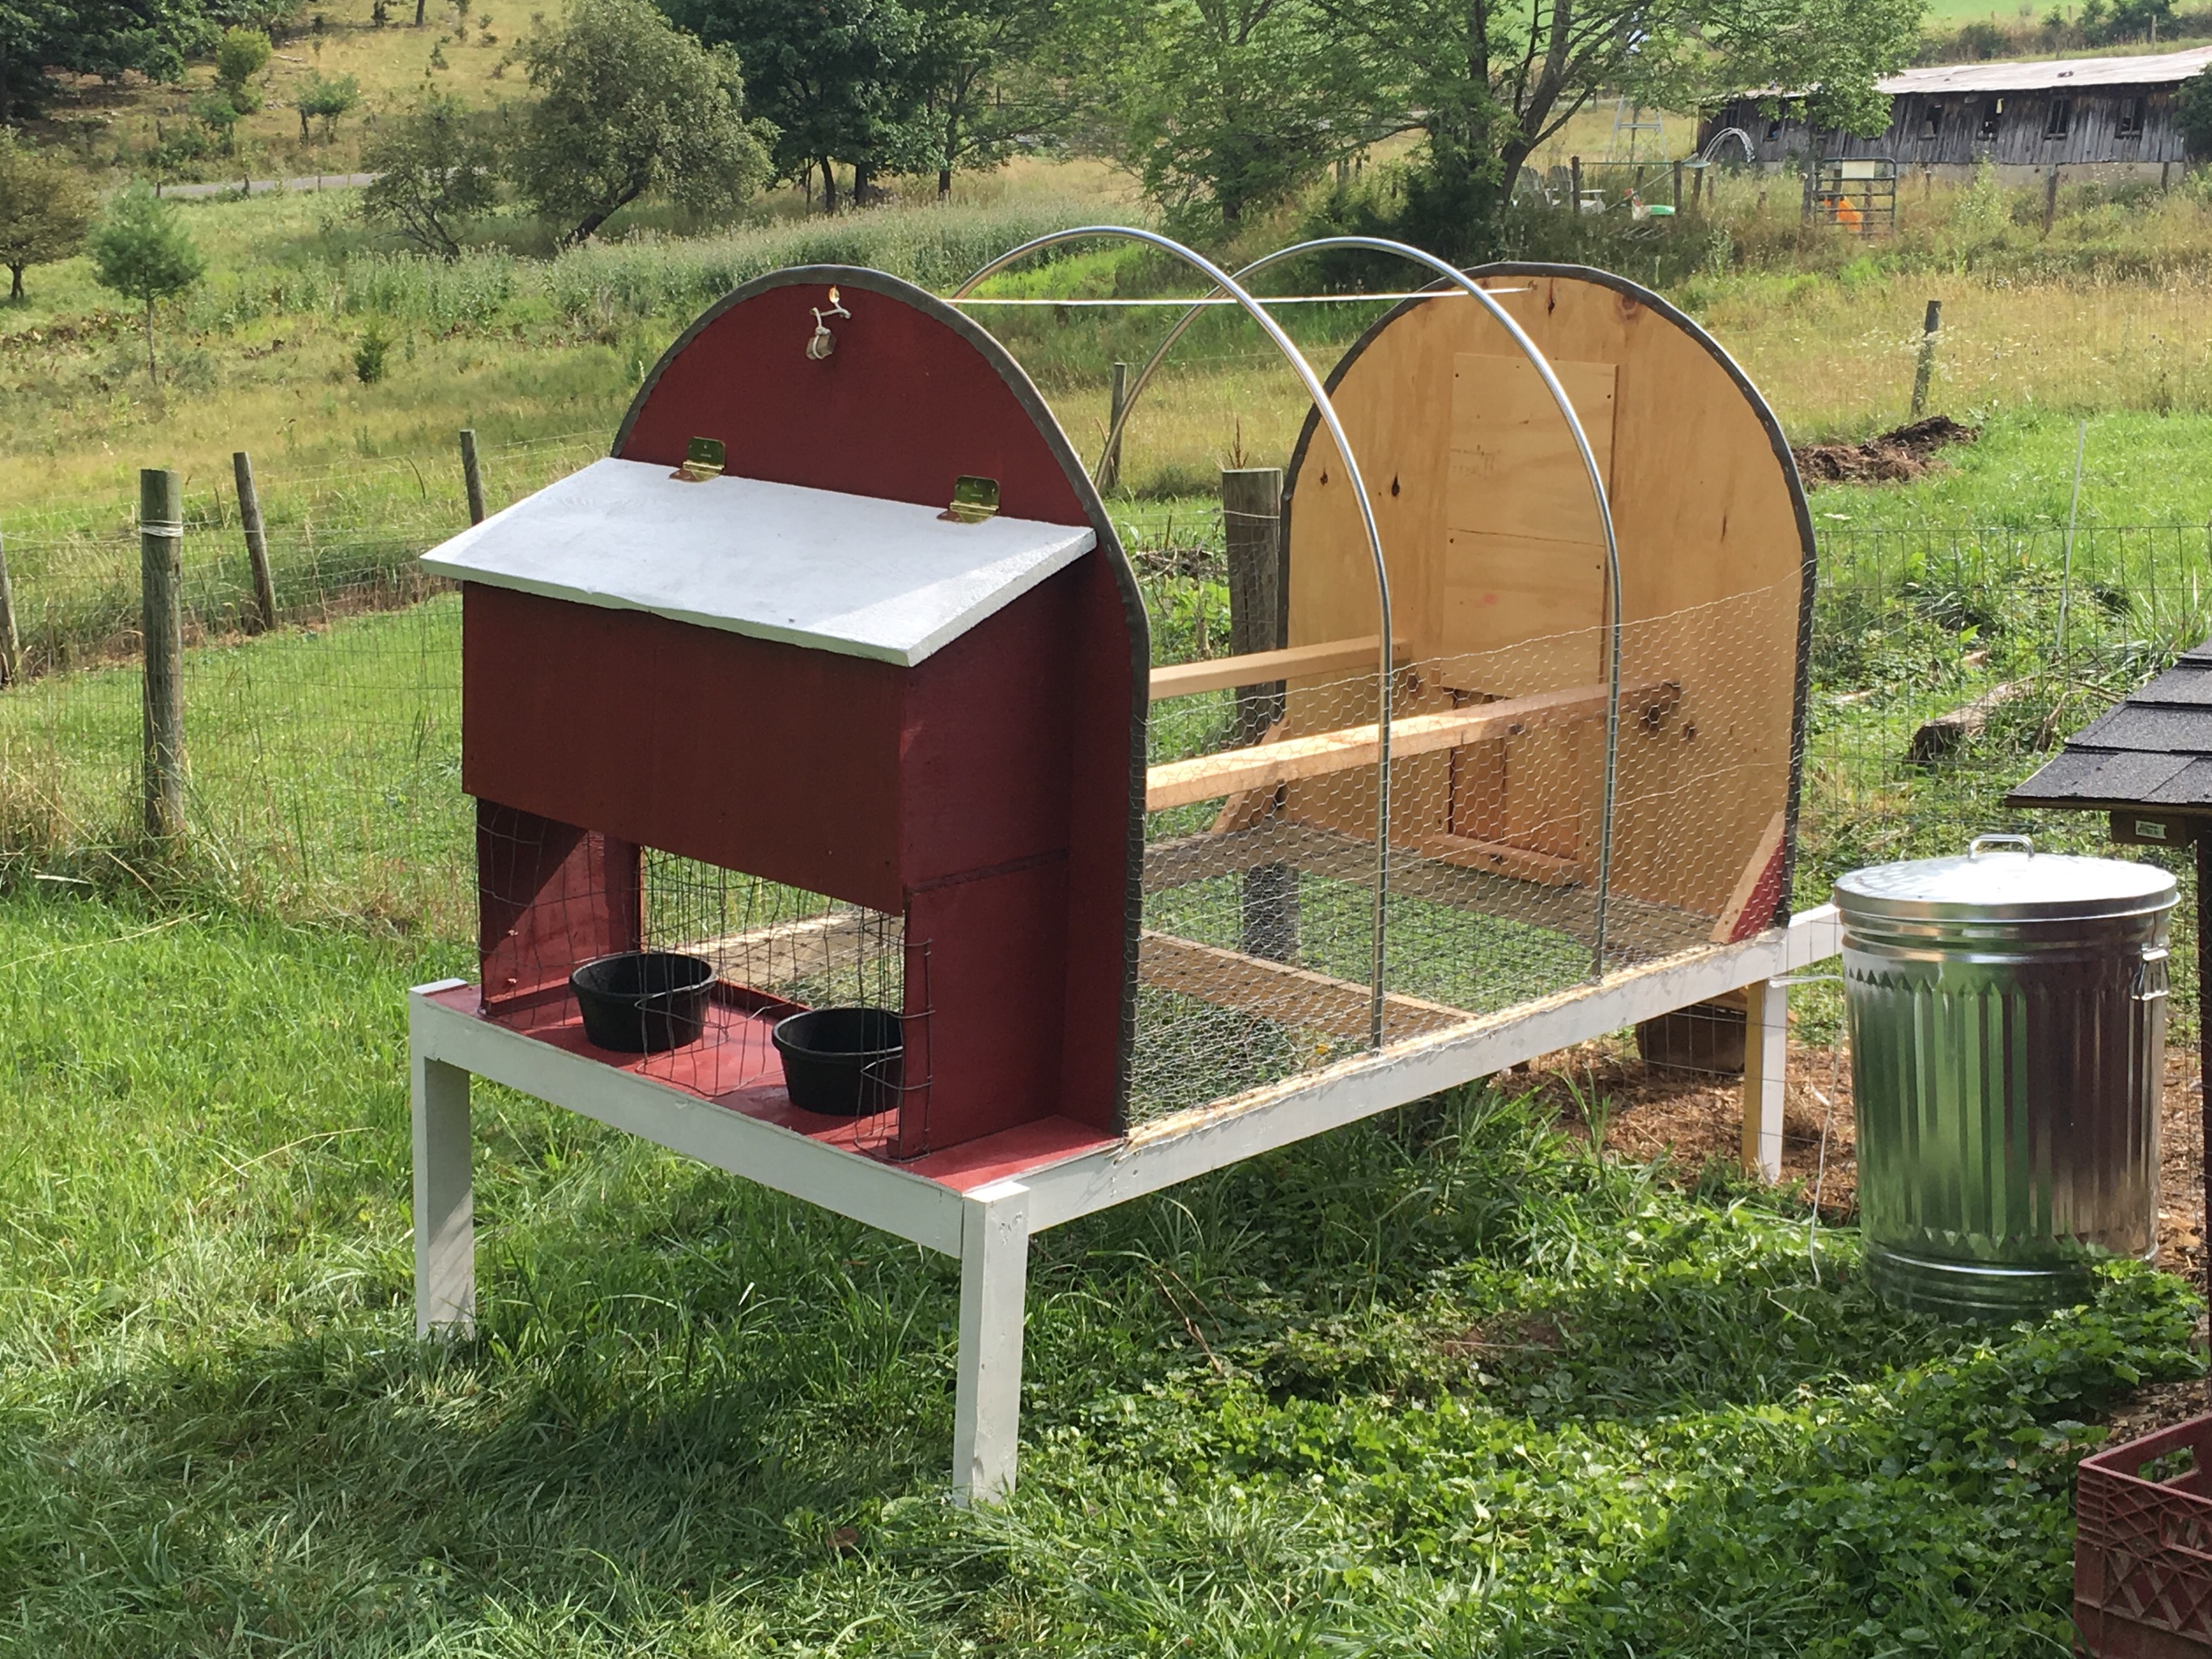


 More recently, we have made a great discovery for non-sewers, though! We have used a corrugated plastic panel and put the tarp over top. It works great! On the left is a pictur of one in production.
 To continue: the coop’s pop door that is operated from the coop’s back side by a clothesline. The farmer, standing in front of the nest box and feeding station at the coop’s back, can 1) collect eggs, 2) open/close the pop door, and 3) feed and water the coop’s occupants.


 We live in the mountains of WV, where temperatures do go to zero in some months of the winter. In the fall, staple feed bags or landscaping cloth over the wire floor of the coop and fill it with dried fall leaves and wood shavings to a depth of 4″. Deep litter will result, insulating and remaining in the coop until spring (with monthly additions), when we will remove the barrier and the coop will become self cleaning again.
 How do you like our design? Do you have any improvements to suggest? Got any questions you’d like to ask? Leave them in comments.
 Part of the reason is that I’m definitely not the inheritor of my grandmother’s award-winning green thumb. When we got here, the first thing we did was plant an orchard, and that spring, we cleared and terraced and fenced an 1800 square foot garden. For two seasons, we worked with the soil that was there naturally; very little grew. The next two seasons, we built raised beds and used the square foot gardening method. Things came up, but then came the rabbits to eat the tender bean shoots, and the deer finished off the tomatoes just when they were getting ripe after so many days of watering and weeding. That was the last straw for me as a gardener: I’ve been happily buying other people’s veggies ever since. (I do wish that we could grow cilantro, though, in the winter, especially. I use it a lot, and our local grocery store can’t keep it in stock because many people in our small town haven’t yet discovered it and it goes bad. Sigh.)