Posted on Leave a comment

Kidding 101: Part 3

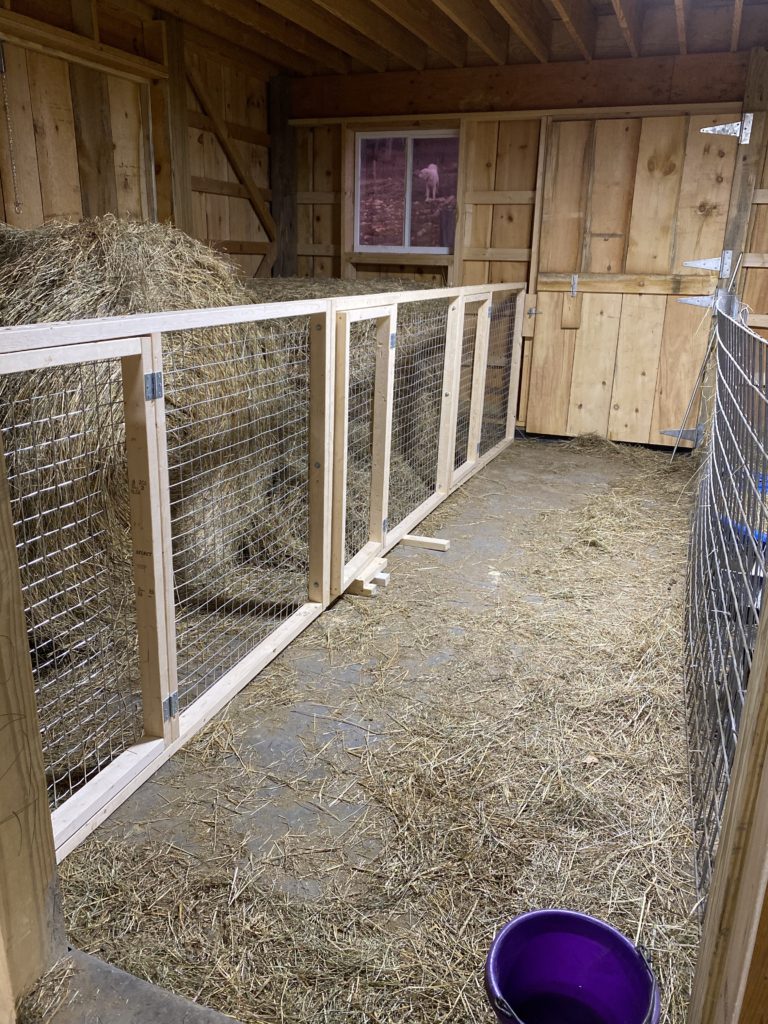
Part 3: Kidding Issues

This series is not meant to be comprehensive, but I hope that it’s helpful, especially to those having pregnant does with no experience. I wish I had had such a webpage series when I was where you are now!

Part 1 covered preparations for kidding, including prenatal care of does.

Part 2 focused in on the basic steps and signs of normal labors and deliveries, which a vast majority of deliveries are.

In this last post, we will focus on delivering kids who present more difficult positions (called dystocia), and gives a few ideas of how to help distressed kids after they are born. The time to think about dystocic positions is now, before it happens, so that you can at least know what you might encounter and the basic gist of how to solve problems that may be presented!

First: As I suggested in Part 1, watching YouTube videos of normal births is a very good preparation.

Second: I hope you have a mentor who will be there for you (by phone or in person) if you need her. Online groups are not a good substitute here. Try to develop a relationship with an experienced goat momma before you need her!

Third: Ditto for a vet. God forbid that you’ll need one, but it’s important that you have a relationship with one before you need his or her services. Find out what your vet considers a relationship: registration, perhaps, or a well check before delivery? It may be money well spent to make sure that the vet will be there for you should you need him or her.

Fourth: Make sure that your nails are closely clipped as kidding approaches. Have hot, soapy water ready when pushing starts, and have gloves and KY jelly nearby. You’ll also need to give a shot of LA 200 antibiotic after kidding if you have had to reach inside a doe.

On to some self help strategies

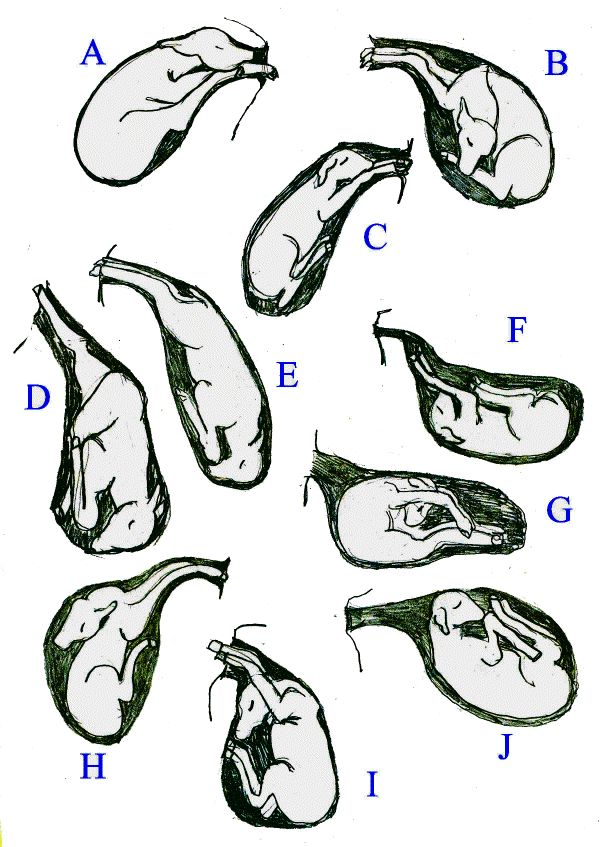
Study diagrams of both ideal and dystotia positions. (The link here is extremely helpful, with a free PDF that you can print, laminate, and keep in your kidding box for reference.) Print out these diagrams and think hard about why the kids can’t be born in certain positions without adjustments.

Credit for the diagram on the left to thegoatchick.com. Click on the link to see positions explained.

If you have to reposition a kid inside a mother, you will need to have the kid’s anatomy well fixed in your mind because you’ll be working by feel only! Try these exercises before your first doe kids:

  • Study your adult goat’s body carefully, looking for features that you’ve seen in diagrams. Picture her internal anatomy.
  • Now, closing your eyes, run your hands over your adult goat’s body, slowly. (Maybe while she’s eating.)
    • Start with the front end. Put your hand on her head. Move your hand down her jaw to her neck, and then to her shoulder. Make your way down the front right leg, noting the ways that the various joints bend.
      • Feel the point of the elbow at the back of the front leg, and then the foreleg. The elbow bends the knee towards the chest and mouth.
      • Find the knee and bend it; it bends the lower leg away from the chest, towards the belly.
      • Find the fetlock and bend it; it bends the hoof towards the belly.
      • Find the pastern and the hoof.
      • Pick up the front leg and stretch it out in front and back under the belly.
    • Do the same with the hind end and legs. The hock bends the lower hind leg towards the body, as does the front knee.
  • Now, using the diagrams that you have of kids that are not in good positions imagine how you would reach inside a goat to find the initial dystocia and then correct it by moving limbs.
    • In doing this over the years, I have found that I need first to become sure of one body part. Then I can usually work from it to figure out what I’ve got and how to deal with it.

The biggest challenges are these: to make sure that you’re feeling all one kid (and not parts of multiples, if they’re tangled) and to work carefully, if quickly, because in breach situations, the umbilical cord separates once the kid enters the birth canal and he can run out of air and suffocate.

Study this picture: which way to limb joints bend. Where are the ears located on the head? How does the ear feel different from the tail? How does the back of the skull feel different from the nose?

Difficult Kid Presentations

As we discussed in Part 2, there are two ideal, or normal, kid presentations:

  • Front hooves and nose together, in a diving position, with legs stretched out behind
  • Back legs first, stretched out, and then the body, head, and forefeet.
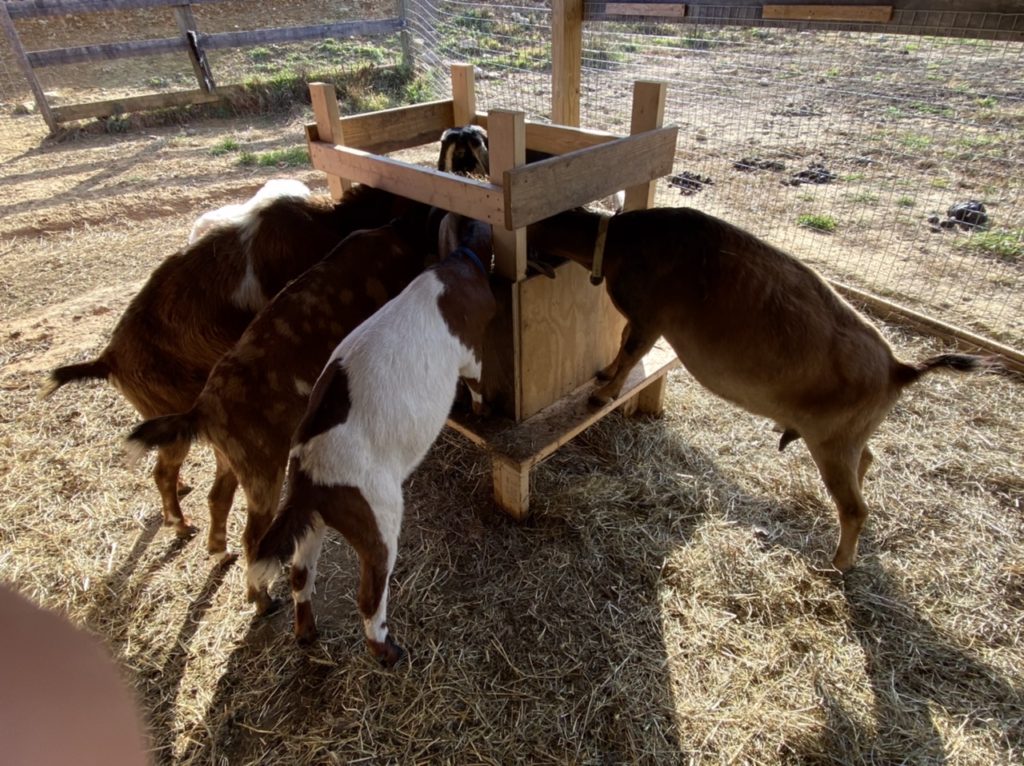
  • Typically as well, each kid is lined up, one at a time, so that they can travel through the birth canal easily and slip out of the doe’s body, typically with only a handful of good, hard pushes.
  • Some older does can also push out small breached (butt first) kids, or kids with only one foreleg back unaided. First fresheners will typically have trouble with these positions, however, especially if it’s a singleton kid.

Generally speaking, one never goes inside the doe until she has worked hard at pushing (see time allotments below). The cervix must fully dilate (open) for the kids to pass through. In the normal course of events, early labor contractions line the well positioned kids up one at a time while opening the cervix. When the first kid has moved up and put pressure on the dilated cervix, the doe has the urge to push. She bears down on the well positioned kid, and it moves rapidly through the birth canal and is born. She may stand to do this, but most of mine lay down. It is important to not rush this process by going in before the cervix is fully dilated. That’s why we wait a good 30 minutes (time it!) from the first push if there has been no water bag rupture before exploring within the goat.

Each kid is encased in his own amniotic bag of waters. Kids can be born without rupturing these sacks, but most often they break either just before birth, or during it. The membrane that surrounds them is thin, flexible, wet, and translucent. It protects the kid from infection and helps to keep multiple kids apart while in the womb, protecting the all-important connections between umbilical cords and placenta(s). There are other birth fluids in the uterine cavity as well. This moist environment helps the kids to slide around and adds pressure to the cervix so the pushing impulse occurs.

Each kid has an umbilical cord that is connected to a placenta, which is supplying oxygen to the kid. During a normal delivery, the cord typically severs itself as the kids is pushed out of the doe’s body. The kid will amost immediately take a breath in response, and this is why we seek to wipe off their mouths and noses ASAP. It’s also where the challenge with distotya kids is significant. When either repositioning kids, or untangling them, or hauling them out hind end first, be prepared to move quickly so that they don’t gulp amniotic fluid, and aspirate it or, worst case, drown before you get them out.

When do we suspect that there might be issues with kid presentation and need to go inside the doe?

  1. If the doe has been pushing hard for over 30 minutes and no kids have come, but no bag of waters has ruptured.
    • In this case, one suspects that either a kid is stuck in an awkward position in the canal, or kids are tangled, or that there is a singleton who is too big for the doe to push out unaided. Or a kid may be dead.
    • The preferable problem is the malpositioned kid. One can reach inside the doe and move body parts around to make birth possible fairly quickly and relatively easily. Often only one kid of multiples is dystocic.
  2. If the bag of waters has broken and she has been pushing hard for only 15 minutes and no kid is presenting, or a kid is presenting no hooves, but an ear or a tail and his sack is ruptured.
    • This is a “stuck kid” that must be repositioned before it can pass through the birth canal. His head is turned, or he is breach.
      • It is important to go in sooner if the bag of waters has broken, because the birth process depends on things being slippery. If the birth canal and kid dry out, things cannot slide properly, and internal damage can be done.

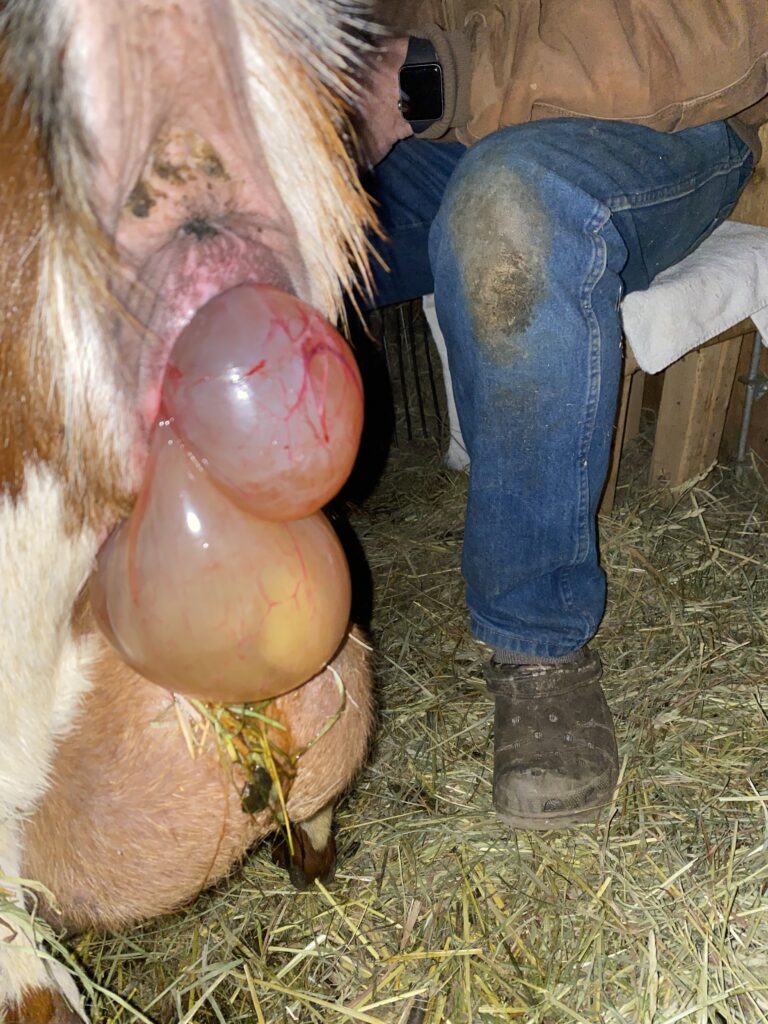
When, as in the picture here, there are more than one amniotic sack presenting (such that two kids are trying to come at the same time).

In this case, one must be pushed back into the birth canal, while the other is quickly eased out. It is necessary to go in carefully and find the one more close to birth (bottom one, here) and then GENTLY and slowly push the other back into the uterus. Once the first is born, try to get the second one out pronto.

The same concerns about air supply due to severed umbilical cords apply, so one has to work rather quickly.

What to do?

  1. FIGHT to stay calm and get focused. Do what you have to to calm yourself. Pray. Breathe. Drink a bit of water (it’s probably been a long day) and tell yourself that you can only do your best. It truly is all in God’s hands, and not in human control.
  2. Wash your hands really well in hot, soapy water.
  3. Don gloves (or don’t), and get your hands slippery with KY jelly or olive oil (which has natural antibacterial properties).
  4. Gently reach inside and start to feel for a part of the kid that you can recognize. I close my eyes so I can concentrate on what I’m feeling. Once you have a mouth, or a hoof, or a tail, follow the body to figure out what’s amiss.
  5. Work with the doe’s contractions: wait to move limbs, or push a kid back if needed, then work with her contraction to pull a kid out.
  6. You can pull hard when you get to pulling. Baby kids are much tougher than we think. But be gentle with the doe: protect her uterus from tears by shielding it from sharp little hooves with your hand as you reposition limbs, etc.

Singletons

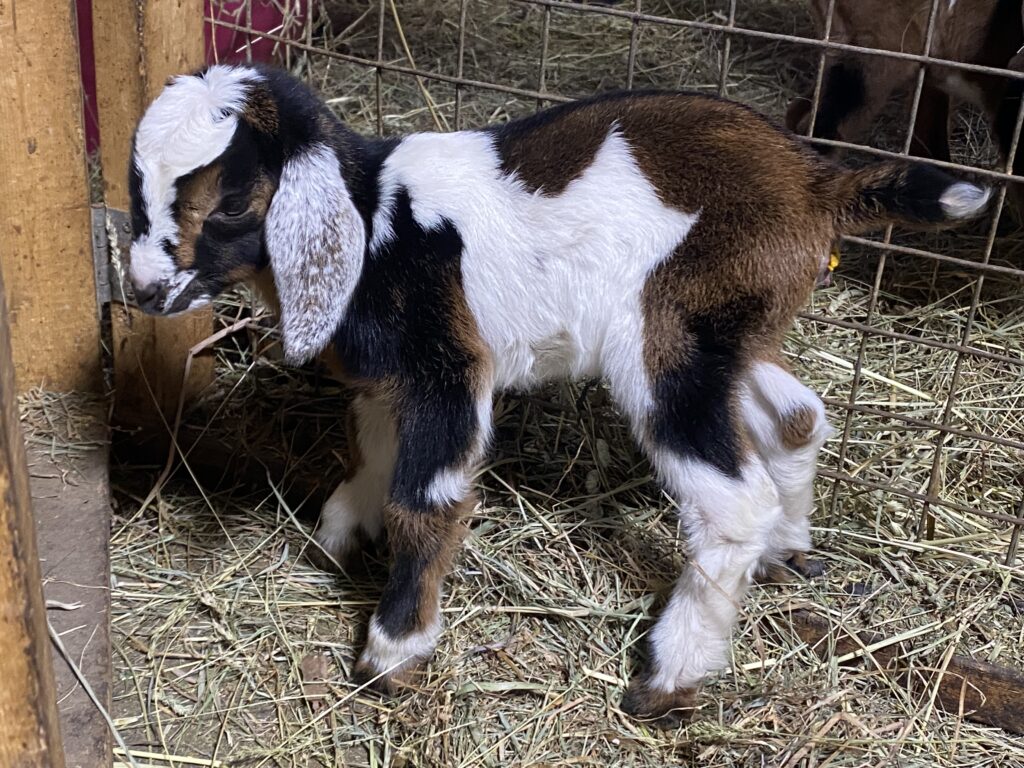
With first fresheners particularly, but really with all deliveries, one concern is with singleton kids, especially males because they are usually larger in general than female kids. A single kid can grow large because it gets all the prenatal nutrition to itself. Consequently, it can be difficult to deliver because the head is large for the birth canal, and doubly so if it’s malpositioned.

This doe was 10 days late with this singleton boy stuck, breached, inside. Look how big he was at birth!

In a first freshener, this kid is the first to open the birth canal, and things can be tighter and less elastic than with older does who have had a litter or two. Pulling is hard on the vulva, and it can look really bad when you get done. There will always be blood, and it’s hard to know how much blood is too much.

Does can go into shock. If she gets shocky, put cayenne pepper mixed with honey on her tongue every 20 minutes and keep her warm with a blanket. If she will, have her drink the warm tea that has molasses in it. It will give her energy and hydrate her.

Births can be quiet or a surprise, noisy or peaceful, chaotic and terrifying, or sweet.

In the end, births are always a miracle, and we should thank God that we get to participate in this process. We at Storybook Farm regularly pray for our does. We pray for their safety and good health through pregnancy and delivery. I always pray for twins, since they’re typically easiest on does. We pray for ourselves when perplexed or when we have to go in and rearrange babies. God is there; He cares, and He is good. Births don’t always go as we could wish, but He is there in those moments to comfort us and to remind us that we, too, are creatures.

Be of good cheer! You can only do your best at the end of the day. Pray that it’s good enough, and then trust your faithful Creator with the rest. May your kidding season be blessed!

In case you found this part first, it is the third in a series. Here are the links to Part 1 and Part 2.

Posted on Leave a comment

Mineral Bar Feeder Options

So, we’ve been using a mineral bar (20 free choice minerals) with our doe herd for going on three years. I can attest that it has made a HUGE difference (for the good) in our herd. Glossy coats and a marked increased the health of newborn kids: no knuckle dragging or floppy kids since the summer that we started with it.

I’ve always wanted a bar in our buck barn but never figured how. This is our doe mineral bar , which uses 11″ long, black, 2-hole mineral feeders from TSC (10 of them) which is quite a lot of wall space needed. (About 10 feet.)

Recently, I saw a post on a FB group for mineral bar users by Lura Huff who used these reinforced pig feeders (available at Amazon and Walmart).

Each feeder unit has five holes, so you need 4 feeders for a full 20-mineral bar. Here is a picture of Lura’s design. It’s a portable version (which is what I thought I’d do when I ordered them, and may yet do in another buck barn).

It is ingenious because it can be unbolted quickly in order to service the dishes or to move it to another spot on the farm

The trouble was, of course, getting time to make it.

Photo Credit to Lura Huff

As I took inventory of our second barn’s interior space (where we usually house junior does in winter and/or bucks during breeding months, I realized that we had about 8 feet of wall space… enough to easily put all four, five-hole feeders onto one 8-foot 2×4. So, we screwed them on with lug bolts and washers, measured up the same height as our manger openings, and screwed it to the wall.

We have found that when you put the dishes higher and give goats a step up (in this case, cinder blocks) you have less poop in the feeders.

Our supply buckets (5 gallong Home Depot buckets) are in our main bard, about 200 feet away, so we had to think about how we were going to easily re-supply the mineral feeder in this new barn. We came up with using two file boxes (bought at Staples) to keep 12 quart-size mason jars in perfectly.

You only need 8 jars in the second box, but they stay put nicely with 12, so we double up on some of the most-loved minerals in the remaining 4 jars.

We labeled the tops of the jars, and now I only make two trips to refill all the minerals with ease!

Posted on Leave a comment

Goat Sling

How do you transport your goats when needed?

There are many ways to do this, of course. Most of the time, I like to use dog crates of various sizes. We generally put the crate into my Hyundai Santa Fe on top of a tarp that we then secure to the sides of the crate so that goat pee and poo are largely contained. In general, I help my buyers with transport only when I will travel up to four hours (making an 8-hour driving day, max). Most of those trips are made with young kids on board.

However, recently, I needed to take two adult does on an eight-hour trip one way. None of our crates would have contained them comfortably (or fit into my SUV, even). We do have a truck with a cap, but my back does not tolerate trips of this magnitude in that truck. What to do?

Ta da! The goat sling!

We made it out of 1″ PVC. The bar at the top rear is NOT cemented in. It is jammed in at the end, after we put in the goats.

The front and back sections *are* cemented together. The center, transverse pieces over the wheel wells are not cemented, but they are held in place with locking eye-hooks.

After we constructed the sling, we draped a tarp over it. In our case, the basic dimensions of the sling were 48″ wide by 60″ long, roughly. We bought an 8′ x 10′ tarp, and it worked perfectly.

We tied down the tarp in a few places with shock cords, but in truth, the whole sling is so close to the car sides that the tarp was held securely by friction.

Maiden Voyage

I had a two-day trip planned with this goat sling in place. On the outward leg (8+ hours) I took two adult does from WV to OH. The girls loved it. They could stand or lie down, eat, and move about as desired within the sling space.

On the way home, I had two 11-week-old kids (pictured). They were a buckling and a doeling. I was a bit nervous about them jumping the sling to the front seat, but neither tried it. I did have collars on them, and dog ties with me. At one point, the boy got bucky, so I did end up using the collar and tie to restrain him until he calmed down.

If I do another trip with young kids of different sexes, I think I will take along a collapsed dog crate and stick it behind my front seats, just to have that option to restrain/separate them if needed. It was a bit of a sticky wicket when the boy started to be bucky while I was in traffic. Otherwise, the sling was perfect, and I’m sure we’ll get a lot of use out of it in the next few years. It kept my SUV spotless of hay/poop/pee. Very pleased!

Posted on Leave a comment

Freestanding Better Manger

This is Part 2 of an ongoing discussion of how to reduce waste in feeding hay to goats. Part 1 gives all measurements for the manger pictured below. This manger is built on exactly the same vertical measurements. It is 3 feet long by 2 feet wide in the horizontal dimension. Note that the place you put hay is only 9” deep!

The reason that this manger got built is that our barn is designed to be highly flexible, and there are times when we quadrant off sections that don’t have our wall mangers.

Additionally, there are seasons where we have more goats in a space than there are linear feet to a manger, and so the weakest get pushed aside.

I wanted to make a manger like the ones we have on our walls, but that was portable and accessible from all four sides.

This has fitted the bill admirably. I’ve seen as many as three adult goats on each side. For smaller herds, this design would prove ideal!

As with the wall version, the key to NOT having wasted hay is to NOT fill it above the level where the goats put their heads through to eat. If they don’t put their heads all the way in to eat, and stay there, this manger is no better than a slatted one, in terms of waste. The whole point of this design is that you drop a leaf of hay horizontal in the 9” bottom, and let the goats pull up on mouthfuls while leaving their heads inside the feeder.

See the demonstration below!

Ours is currently on our goat porch, so it is protected from rain and snow. However, one could easily extend the height of the four corner posts and affix a roof above this feeder if it were used primarily outside.

Using the lumber that we did, this manger is stable: it’s pretty heavy, but I find that two adults can move it easily.

Posted on Leave a comment

Building Bonding Pens with Creep Gate Option

We are still perfecting our infrastructure here at Storybook Farm. Last year, we had three goat litters widely spaced apart, and it was not hard to portion off generous parts of our barn spaces for moms and babies to bond and grow until they were ready to rejoin the herd.

This year, from late February to early April, we’re expecting six does to deliver, and some of those does are due only days apart. We have been doing research on “jug stalls” — small stalls that does and kids can inhabit for several days to bond tightly before rejoining the general population.

In addition, we have really found a benefit in providing a creep pen for kids who have begun to eat hay (which they do at about 2 weeks old). In this post, you can read about the prototype pen we made to see if we liked (or needed) such a space, and we found we really did. However, the creep gate that we bought from Premier 1 was both heavy and expensive, and not the easiest to join to our existing stall partitions. It’s great, and we’ll probably use it outside, but I got the idea of making jug stall partitions that would convert easily to creep gates, so that jug stalls could become creep pens for any number of little kids, should we so desire.

Below are shots of the construction of our three identically made panels. Obviously, you can scale to your space, but for reference, two of ours are 5’8” long, one is 5’7”, and all are framed in 2” x 3” lumber, with 10-gauge, 2” mesh fencing, 4’ high (purchased at Home Depot).

Each has a door that opens toward the humans, with the fencing towards the goats. When desired, the gate swings back and can be locked open, and then 1/2” metal conduit is inserted in pre-drilled holes so that the gate opening becomes a creep gate. There are construction notes on each picture below.

Step 1: framing. We decided to make the uprights the strong part, and so they are a full 4’ long. The horizontal pieces are 5’5”, giving an overall panel width of 5’8”. The center strut (to which we hinge the door) is 45”.

Step 2: frame the door and hinge it. (We made our door openings 24” wide; you can make them any width.) The only thing I’d note here is that I left a sizeable space (a good 1/2” or more) vertically between the overall frame and the door frame because the wood is “on edge” and I didn’t want it to catch when operating. The two uprights of this door are 44.5” (so as to leave 1/4” of space for it to swing top and bottom) and then the horizontals were 19”.

Step 3: If you’re using metal half-inch conduit (which is cheap and can be found in any hardware store) for your creep gate function, it usually comes in 10’ lengths. So, you’ll need a Saws All or hack saw to trim it. (In picture 6, we were just fitting it; we hadn’t trimmed yet).

You’ll need a 3/4” bit to drill the holes in the top and bottom of the frame, swinging the door out of the way first. Half-inch conduit is 1/2” interior; it’s wider on its exterior, so a 3/4” bit works well. In the beginning, I did not drill all the way through on the bottom of the frame, but then I thought of dirt and poops lodging in the holes, and decided to go all the way through.

Spacing is a matter of personal preference. We raise Mini Nubian kids, so I know that we wanted spaces that could be adjusted from 3” (can’t get thru) to 4” (can get thru when itty bitty) to 5” (lasts from about 3-8 weeks) to 6” (about the widest we’ll need). My measurements for these holes (on center, in inches) in a 2’ opening were as follows, left to right: 3, 6, 8, 10, 13, 15, 19, and 22.

Another trick on this step: drill partially through the top of the door frame on the ONE hole closest to its non-hinged, top edge. Then, you can use a piece of conduit scrap as your latch and save money and labor!

Step 4: Affix the fencing wire. We used regular staples on each division of the wire, and then reinforced those with some leftover insulated electrical staples (hence the blue plastic on them). We found that large, standard, barbed fencing staples threatened to split the wood.

Fencing was affixed on the goat side of the partition, because mine LOVE to scratch themselves on woven wire, so we wanted the frame to be buttressing the strain. In this picture, as well, note the pressure-treated two 2” x 2” pieces on either side of the door. They are on the goat side, and are 14” long. (You do not need pressure treated, but it won’t hurt to have it. That’s what we could find, so we went with it.) See Step 5 for how we use them.

Step 5: If you try to simply bore holes for horizontal creep gate restraints in the same plane as the uprights, they will butt into each other. So, you need to create a deeper plane. Hence these pieces. We drilled three holes in each one, after screwing them to the frame, which is more than enough for our purposes.

Step 6: Fit your conduit into all holes to check for alignment, and then trim them to size. In this photo, we have yet to trim.

Final setup: above are our three panels, joined together with bolts and joined to each wall using eye hooks and conduit down thru them.

They will be divided with two 7’ lengths of the same 2” square mesh wire, to create three jug stalls and/or creep pens, depending on our stages of raising kids. We used bolts between the panels to join them together now, and (in keeping with our overall modular approach) to be able to take them apart when kidding season is over and we want the space for other things.

That door at the end leads to an area outside that we call “the playpen.” It is a kid-safe area outside where kids can go on nice days. The wire you see to the right divides this “nursery area” from the rest of the goat space.

Right now, we’re still storing round bales in the jug-stalls-to-be, but we’re going to clear that hay out this weekend and get the kid-warming huts set up, so stay tuned!